Posts tonen met het label Bloom & Grow. Alle posts tonen

zondag 10 mei 2020

Ik stuur je bloemen/I send you flowers! *Kre8tors Bloghop, theme Floral

*This blogpost is in Dutch and English!*

Hallo, en welkom bij de Kre8tors Bloghop!
Hello and welcome, to the Kre8tors bloghop!


Deze maand gaan we aan de slag met BLOEMEN! Elke stempelaar heeft wel bloemenstempels, en dat is niet zomaar, bloemen vervelen nooit, en kunnen eigenlijk altijd! Bovendien kun je er zoveel leuke dingen mee doen!!

This month we work with a FLORAL theme.... Every stamper has some flowerstamps, and that is not strange at al... Flowers never go out of style, and they can be used for all kind of occassions. I also love the fact you can do so many things with flowers!


Vandaag is het moederdag, maar ik ken -naast mijn eigen mam-  nog veel meer dames die ik OOK fantastisch vind. Daarom maakte ik een setje kaarten voor een paar "fabulous" vrouwen in mijn omgeving!

Today it is Mother's Day over here in the Netherlands, but there are more ladies around me of whom I think they are wonderful! So I decided to make some cards to let some of these women know how fabulous they are!

Deze kaarten kun je nu eens niet openvouwen, maar het zijn pocketkaarten!

These cards can not be folded open, they are Pocket Cards.


Voor de prachtige bloemenafbeelding gebruikte ik de Bloom & Grow stempelset. Ik koos een van de prachtige bloemenborders uit deze set en stanste ze uit met de bijpassende Budding Blooms Dies

For the lovely Flowerimage I used the Bloom & Grow Stampset. I chose one of the beautiful Flowerborders from the set and diecut them with the Buding Blooms Dies.
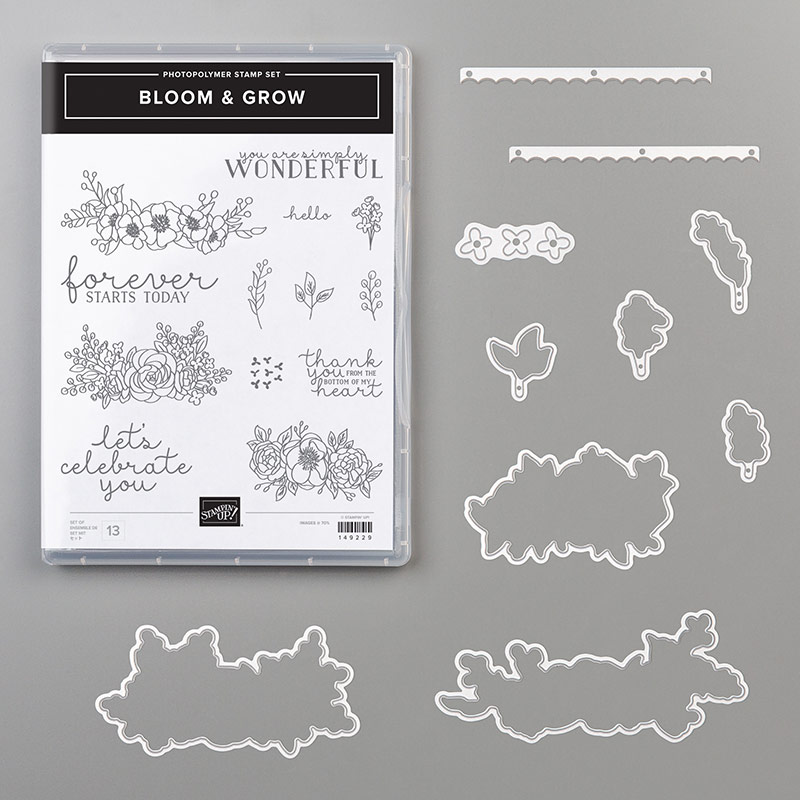
BLOOM & GROW BUNDLE

Bloom & Grow Stampset & Budding Blooms Dies
*Deze maand nog samen te bestellen met Bundlekorting.
* Only this month still available as a Bundle


 Ik kleurde de bloemafbeelding heel subtiel in met Stampin Blends. Door in de bloemen veel wit te laten krijg je een mooi, zacht effect.'

I coloured the flowers in a very subtle way with the Stampin'Blends. By keeping a big part of the flowers white it gives them a nice, soft look.

Heel makkelijk!

Very Easy!

 Zo wordt het toch een kleurrijk geheel.

This way you still get a colourful effect.


Ik emboste de pocket met de nieuwe Ornate Floral 3D Embossingfolder!

 I Embossed the Pocket-part with the New Ornate Floral 3D embossingfolder!

 Het insteek kaartje is natuurlijk ook bijpassend versierd. Ik gebruikte de zelfde bloemafbeelding hier nog eens. De tekst komt uit de set  Dressed to Impress en stempelde ik met een bijpassende kleur inkt.

The Insert card was also decorated ofcourse. I used the same floweryimage for this. The sentiment is from the set Dressed to Impress in a matching ink colour.


De bloemenborder heb ik dus precies op de rand van de pocket verwerkt. Dit geeft de pocket een elegant effect.

The flowerimage hides the edge of the pocket which has an elegant effect.

Het is zo fijn als alles matcht!

It is so nice when everything matches!

Dus ik kleurde ook het lint zelf. Dit deed ik door met de Blends over het witte Crickled Ribbon te gaan. Zo past het precies!

So I coloured some Crinckled White Seam Binding Ribbon with my Stampin'Blends. 


Wat heb ik een plezier gehad met het maken van deze kaarten. Bloemen kunnen zoveel looks hebben, en met stempels en inkt kun je bloemen maken die in de natuur niet voorkomen, maar toch mooi zijn. In dit geval werden het moderne kaarten met een vleugje kleur. Welke kleur vind jij het mooiste?

I had so much fun making these cards! Flowers can come in all kind of colours and styles but with stamps and ink you can make your own, even in a way they will never be found in nature.. I this case I made them look modern, with just a touch of colour. Which one do you prefer?

Dit was weer mijn project voor vandaag! Dankjewel voor je bezoek aan de Kijkkast! Voel je welkom terug te komen en mocht je vragen hebben of producten willen bestellen, kun je me altijd even een MAIL sturen! Ik help je graag! Voor nu, een fijne dag, en veel plezier met het vervolg van deze bloemige bloghop!XXX Annette

This was my project for today! Thank you for visiting de Kijkkast! Feel welcome to come back any time, and in case you have any questions, feel free to send me an EMAIL! It is my pleasure to help you! For now... have a nice day and have fun with this floral bloghop! XXX Annette

De volkgende bloghopbijdrage is bij:
Next Bloghopstop is at:

>>>ANGIE!<<<


Roll Call List
Annette Elias-De Kijkkast-NL-> Hier ben je nu/You are here now


Wat heb ik gebruikt:
Stempels: Bloom & Grow, Dressed To Impress
Papier: Thick Whisper White, Whisper White, Basic Black, Rich Razzleberry, So Saffron, Bermuda Bay, Real Red
Inkt: Memento Black, Rich Razzleberry, So Saffron, Bermuda Bay, Real Red
Dies: Budding Blooms Dies
Pons: 1,5 inch Circle
Stampin'Blends: Rich Razzleberry, So Saffron, Bermuda Bay, Real Red -> allen Light & Dark
Embellishments: Crickled Seam Binding Ribbon Whisper White, Wink of Stella Gliterbrush


Eerstvolgende (mee)besteldagen:
Momenteel bestel ik dagelijks!
Je spulletjes worden direct vanaf StampinÚp naar jouw huis gestuurd ( Vanaf 60 euro is dat nu gratis!), maar ophalen is op afspraak ook nog mogelijk.


Wil jij ook voortaan minimaal 20 procent korting hebben op al je stempelmaterialen? 
Kom er bij!   Je bent van harte welkom!
Vraag mij om uitgebreide informatie, of kijk eerst eens HIER! 

en spaar voor gratis producten!
***Met diverse Clubvoordelen ;o)***


Wil jij graag de JAARCATALOGUS
en/of de nieuwe voorjaars-minicatalogus ontvangen?? 
Vraag er eenvoudig eentje aan door mij een EMAIL te sturen

Of doe een bestelling, dan voeg ik hem er gratis bij!


zaterdag 22 juni 2019

Thinking Outside Of The Box Bloghop: Snel en makkelijk: Enveloppevouw-doosjes! (met stap voor stap tutorial)


*This Blogpost is in Dutch AND English!*

Welkom bij de JUNI Bloghop van het internationale Thinking Outside of the Box-Design Team!
Je bent hier zojuist begonnen, of je bent hier gekomen via mijn getalenteerde en lieve Britse Collega ZOE


Hello and welcome to the JUNE-Bloghop ot the International Thinking outside of the Box Design Team! You just started this bloghop here, or you got here through my talented and sweet colleague from the UK  

Het thema van deze maand is een envelop-vouw doosje. Dit type doosje is ook wel bekend onder de namen Origamibox, of Diaperfold Box. 

Theme of this month is a Folded Envelope Box, alsno known als a Origamibox, or Diaperfold Box

Afbeelding kan het volgende bevatten: tekst


Het is echt supermakkelijk en snel te maken. Dat maakt dat je er makkelijk veel van kunt maken, OF dat je uit kunt leven op de decoratie er van! Maar wat ik daarnaast gedaan heb is het maken van een leuke variant op het doosje. Net zo makkelijk, maar superleuk om te maken EN te geven!

This box is SUPER$EASY and fast to make! Therefore it is easy to make many of them, OR it gives you extra time and opportunity to work on the decoration. I also made a special variation of the box. Just as easy as the "normal"version, but superfun to make, and great to present as a gift!


Mijn eerste voorbeeld en variant is dit Envelopfold doosje. Het is een soort doosje of tasje, waar je een leuk kleinigheidje in kunt stoppen, zoals hier een theetje en een chocolaadje. Echt een schattig hebbedingetje!

My first example is this envelop-like fold. It is a kind of puch or bag  for a small goodie, like a teabag and a chocolate, like I did here.

Als het leeg is kun je goed de vorm zien.

When it is empty you can see the shape of it.

Hoe maak je het doosje? How do we make it?

1

Neem een stuk designpapier van 6 x 6 inch ( of 15 x 15 cm) Neem het diagonaal voor je. 

Take a piece of Designer Series Papier, sized 6 x 6 inch, of 15x 15 cm. Lay is diagonally in front of you.

Ik gebruikte het prachtige nieuwe Garden Lane DSP. De mooie kleine motiefjes zijn supergeschikt!

I used the beautiful new Garden Lane DSP. The small designs work great for this!

2.
Neem de onderste punt en vouw die nauwkeurig omhoog zodat de punt precies op de bovenste punt past. Er ontstaat dan een driehoek. Wrijf de vouw goed aan met de Bone Folder en doe dat ook bij alle volgende vouwen.

Now take the lowest point of the paper and fold it upwards to the upper point of the paper. We have a triangle now. Score the folds with a Bone Folder and repeat that at all the next steps too.

3.
 Neem de punt rechtsonder en vouw die naar de linkerzijde zoals afgebeeld. Let er op dat van de bovenste driehoek die ontstaat, de aangegeven zijden even lang zijn.

Now take the lower right point of the paper and fold it to the left side as shown. Make sure the triangle at the top had two sides with the same length ( as pointed with the arrows)

4.
Neem nu de punt links onder en vouw die naar de rechterzijde, zoals afgebeeld.

Now take the left point and fold it over to the right as shown.

5.

Neem nu van de bovenste driehoek een laagje en vouw deze omlaag. Indien gewenst kun je deze nu vastplakken. Het doosje/tasje is nu klaar! Ja, dat was echt alles!

Now take one layer of the upper triangle and fold it down. If you want you can glue this flap. The box/pouch is ready now. Yes, it is that easy!


Ik maakte er ook een speciale variant op. Dit heeft een gave houder voor geld of een giftcard als resultaat!

I also made another version. This makes a nice wrap for money or a gift card!

 Het gaat op een heel speciale manier open!

It opens in a very special way!

Om deze giftwrap te maken, heb je twee basis Envelope fold doosjes nodig! De linker krijgt lijm op de bovenste driehoek aan de voorkant. Van de rechter leg je de achterkant naar je toe, en ook daar lijm je de bovenste driehoek. Kijk goed op de foto waar je je lijm aanbrengt.

To make the giftwrap you need two basic Envelope Fold boxes. The left one gets glue on the uppr triangle, the right on is turn backside up, and then also gets some glue at the upper triangle. Look closely to the picture to see where the glue is added!


 Het linker en rechterdoosje vouw je op deze manier in elkaar. Daarna druk je de doosjes goed aan. Ze zitten dan in elkaar vast. Je hebt nu van twee doosjes eentje gemaakt.

The left and richt box get folded together as shown on the pictures above. When the are folded together press the boxes so the glue makes good contact and the two boxes become one.

De achterkant ziet er zo uit!

This is how the backside looks now!

Om het doosje open te laten gaan knijp je de boven en onderpunt naar elkaar toe!

To open the box you have to pinch the upper and lower point of the box to eachother.

Maar nu is het tijd voor de decoratie!

And now it is time to decorate!


Ik stempelde en heatemboste afbeeldingen van de set  Bloom and Grow en heatemboste deze met Copper embossingpoeder. Daarna kleurde ik de afbeeldingen in met inkt en de aquapainter. Ik gebruikte diverse groentinten hiervoor die bij het DSP passen. Daarna stanste ik de bloemen uit met de bijpassende dies.

I stamped and heatembossed some flowery images from the stampset Bloom and Grow, heatembossed them with Copper Embossingpowder and watercolored them with ink and an aquapainter. I used different shades of green that match the DSP. After that I diecut the flowers with the matching dies.
 De Bloom & Grow Bundle is een van mijn allernieuwste favorieten!

The Bloom& Grow Bundle is one of my newest favourites!


Op het dubbele doosje moet de afbeelding uiteraard in twee delen gesneden worden om het doosje open te laten gaan!

On the double box ofcourse the image has to be cut in half to make it possible to open the box.


Door de vouwen ontstaan aan de zijkanten extra "pockets"waar je bijvoorbeeld een klein label in kunt doen, met een gestempelde of handgeschreven tekst!

Because of the folds you have some extra pockets on the sides of the double box. I used this to ad a tag in it, on which you can add a stamed or handwritten text!


Ik hoop dat je beide versies eens gaat uitproberen! Het is echt leuk om te maken!

I hope you will give both versions a try! They really are fun to make!


Zo'n simpel doosje en zoveel mogelijkheden. Ga vooral ook de rest van de bloghop bekijken voor nog meer inspiratie! Ik hoor in een reactie graag hoe je mijn varianten vindt!

Such an easy box, and so many possibilities. Make sure you check the rest of this bloghop to get even more inspiration! I would love to hear in a reaction what you think of my versions!


Ik hoop dat je beide versies eens gaat uitproberen! Het is echt leuk om te maken!

I hope you will give both versions a try! They really are fun to make!


Ga vooral ook de rest van de bloghop bekijken voor nog meer inspiratie! Ik hoor in een reactie graag hoe je mijn varianten vindt! Dank voor je bezoek aan de Kijkkast en graag tot ziens! XXX Annette

Make sure you check the rest of this bloghop to get even more inspiration! I would love to hear in a reaction what you think of my versions! Thanks for visiting de Kijkkast, and feel welcome to come back soon! XXX Annette

Volgende bloghophalte is bij
Next bloghopstop is at
>>>BEATE<<<


Bloghoproll

1. Shannean Moncrieff (Australia) 
2. Tanja Kolar (Germany) 
3. Zoe Tant (UK) 
4. Annette Elias (Netherlands) 
5. Beate Wacker (Austria) 
6. Aude Barbara (France) 
7. Barb Stewart (Canada) 
8. Fiona Carson (New Zealand)


Wat heb ik gebruikt:
Stempels: Bloom & Grow
Papier: Cardstock: Shimmery White, Soft Sea Foam
DS: Garden Lane DSP
Inkt: Soft Sea Foam, Garden Green, Mossy Meadow, Mint Macaron, Versamark
Dies: Budding Blooms Dies
Pons: Delightful Tag Topper, Classic Label
Embellishments: Scalloped Lace Trim, Embossingpowder Copper
Tools: Big Shot, Bone Folder, Heat Tool, Embossing Buddy, Aqua Painter