
***This Blogpost is in English and Dutch!***
Welkom bij deze bloghop van het International Totally Techniques Designteam! We hebben ook deze
maand weer een leuke techniek "uitgediept" en laten je samen diverse voorbeelden zien!
Leuk dat je er bent!
Welcome to this Bloghop of the International Totally Technique Designteam! This month we have chosen another fun technique again and together we will show you several examples of it! Happy to see you here!
Ook deze maand doen we weer iets leuks: Block Stamping!
This month we are doing something fun again: Block Stamping!

Met onze fantastische Clear Blocks kun je namelijk ook stempelen!
Our fabulous Clear Blocks happen to be great for some stamping too!

Hier maakte ik bijvoorbeeld deze maritiem getinte kaart mee!
With this technique I made this Sea-themed card for example!

Deze achtergrond maakte ik namelijk met Clear Blocks! In deze blogpost vind je een stap voor stap tutorial, EN een aantal handige tips om dit te kunnen maken!
This background was made with Clear Blocks! In this blogpost you will find a step by step tutorial, AND some handy tips, for in case you want to give it a try too!

Het is namelijk echt helemaal niet moeilijk, en superleuk en ontspannend om te doen!
It is not difficult to do, and a superfun, relaxing technique!


Stap 1: Neem een aantal clearblocks, drie kleuren inkt, en een Stampin Spritzer, en een achtergrond paneel in de gewenste maat, in Thick Basic White.
Beinkt het clearblock met de eerste kleur inkt, spray deze nat met de Stampin Spritzer, en leg het clear block op het papier. Herhaal dit ongeveer drie keer.
Step 1:Take some clear Blocks, three ink colours, and a Stampin'Spritzer, and a background panel in the size you prefer, in Thick Basic White Cardstock.
Ink the Clearblock with the first Ink Colour, Spritz it with water, with a Stampin'Spritzer, and put the block on the cardstock. Repeat this three or four times!

Tip: Kies een hoofdkleur, een rustige basiskleur en een accentkleur bij elkaar!
Tip: Choose one main colour, a basic neutral colour and an accent colour!


Stap 2: Droog zorgvuldig na de eerste stap, en herhaal het bovenstaande met een ander Clear Block en de volgende kleur uit je setje van drie! Zoals je ziet stempel ik vooral aan de randen. Dat is namelijk het deel dat straks zichtbaar zal zijn op mijn kaart!
Step 2: Make sure everything is dry, and then repeat step 1 with another Clear Block and the next colour from your set of 3! As You can see I concentrated on stamping the edges. That is the part that will be visible on my card!
Tip: Door verschillende formaten Clear Blocks te gebruiken krijg je een extra leuk en afwisselend eindresultaat! Ik gebruikte de Clear Blocks D, C en B!
Tip: By using Clear Blocks in different sizes, you get an extra fun, playful end result! I Used the Clear Blocks D, C and B!


Stap 3: Herhaal het bovenstaande met het volgende Clear Block en de accentkleur! Dit block is wat kleiner, dus deze stempel ik wat vaker af.
Step3: Repeat the steps with the next clearblock and the accentcolour. This block is smaller so I stamp this one a bit more than the other steps.
Tip: Baal je er van dat je geen perfecte afdrukken krijgt? Niet doen!! Juist dat onregelmatige en imperfecte geeft straks het coole eindresultaat!
Tip: Does it bother you that you don't get any perfect impressions? Stop doing that! That irregular, and imperfect effect is what will give you the coolest endresult!

Stap 4: Kijk of je de kleuren goed verdeelt hebt, of nog grote lege stukken hebt en pas dat nog even aan. Als je wilt kun je eventueel nog met een stempel uit de set die je gaat gebruiken over de gemaakte achtergrond heen stempelen, als gaaf accent!
Step 4: Check and look whether the colours are nicely mixed, and make sure there are no big empty area's. When you like that, you can now stamp some imagery from the stampset you will use, on top of the Black Stamped panel, as a fun accent!
Tip: Ga niet alle stukken wit vullen met kleur. Dat witte zorgt juist voor contrast en frisheid! Ook krijg je dan geen overmatige vermenging van kleuren (Dan wordt het al snel "modderig" namelijk)
Tip: Don't try to fill up all the emplty spots with colour. These bits of white add contrast and freshess! It also prevent the colours from mixing and getting muddy!


Stap 5: Beinkt licht de randjes van het paneel en plak het op wat laagjes cardstock in bijpassende kleuren. Plak nu een of twee lintjes om het paneel heen. Je achtergrondpaneel is nu helemaal klaar!
Step 5: Lightly ink the edges of the panel and adhere it to some layers of cardstock in matching colours. Now add one or two ribbons to the panel! Your background is ready now!

Tip: Als je van laagjes houdt, maar niet wilt dat je kaart te zwaar wordt, kun je ook het middenstuk uit deze lagen wegsnijden! Deze kun je dan bovendien later weer gebruiken.
Tip: If you like adding layers, but don't want you card to become too heavy, you can cut out the centres of the layers. These parts can be used later!

Nu is het tijd de kaart verder op te bouwen en te decoreren!.
Now it is time to decorate and build up the card!

Maar laat ik eerst even de set laten zien die ik vandaag gebruikte. Dit is Sunrise Sailing! En deze set heeft naast stempels ook stansen en een Hybrid Embossingfolder!
But first let me show you the set I used today! It is called Sunrise Sailing! This set consists of stamps, matching dies, and a Hybrid Embossingfolder!

Ik stempelde de zeilboot, en door de bijpassende stans in de Hybrid Embossingfolder te leggen en dan de afbeelding er tussen te doen, stanste en emboste ik dit in een keer!
I stamped the Sailboat, and by laying the matching die into the Hybrid Embossingfolder, and then adding the stamped image, I was able to diecut AND emboss the image in one go!


Ik sneed een klein paneeltje en emboste dit ook met de embossingfolder. Met Blending Brushes en Inkt bracht ik de kleur accenten aan. Ook stanste ik het extra bootje en de meeuwen. En met dit alles stelde ik vervolgens dit leuke tafereeltje samen. Door de bootjes iets uit te laten steken krijg je een leuk 3D effect!
I diecut a small panel and embossed this with the same embossingfolder. With Blending Brushes and Ink I added some colour accents. I also diecut the extra little boat and the birds. And with all these elements I assembled this cute litte scene!

Het staat natuurlijk prima op de gemaakte achtergrond!
Ofcourse it is a nice match with the background I made!

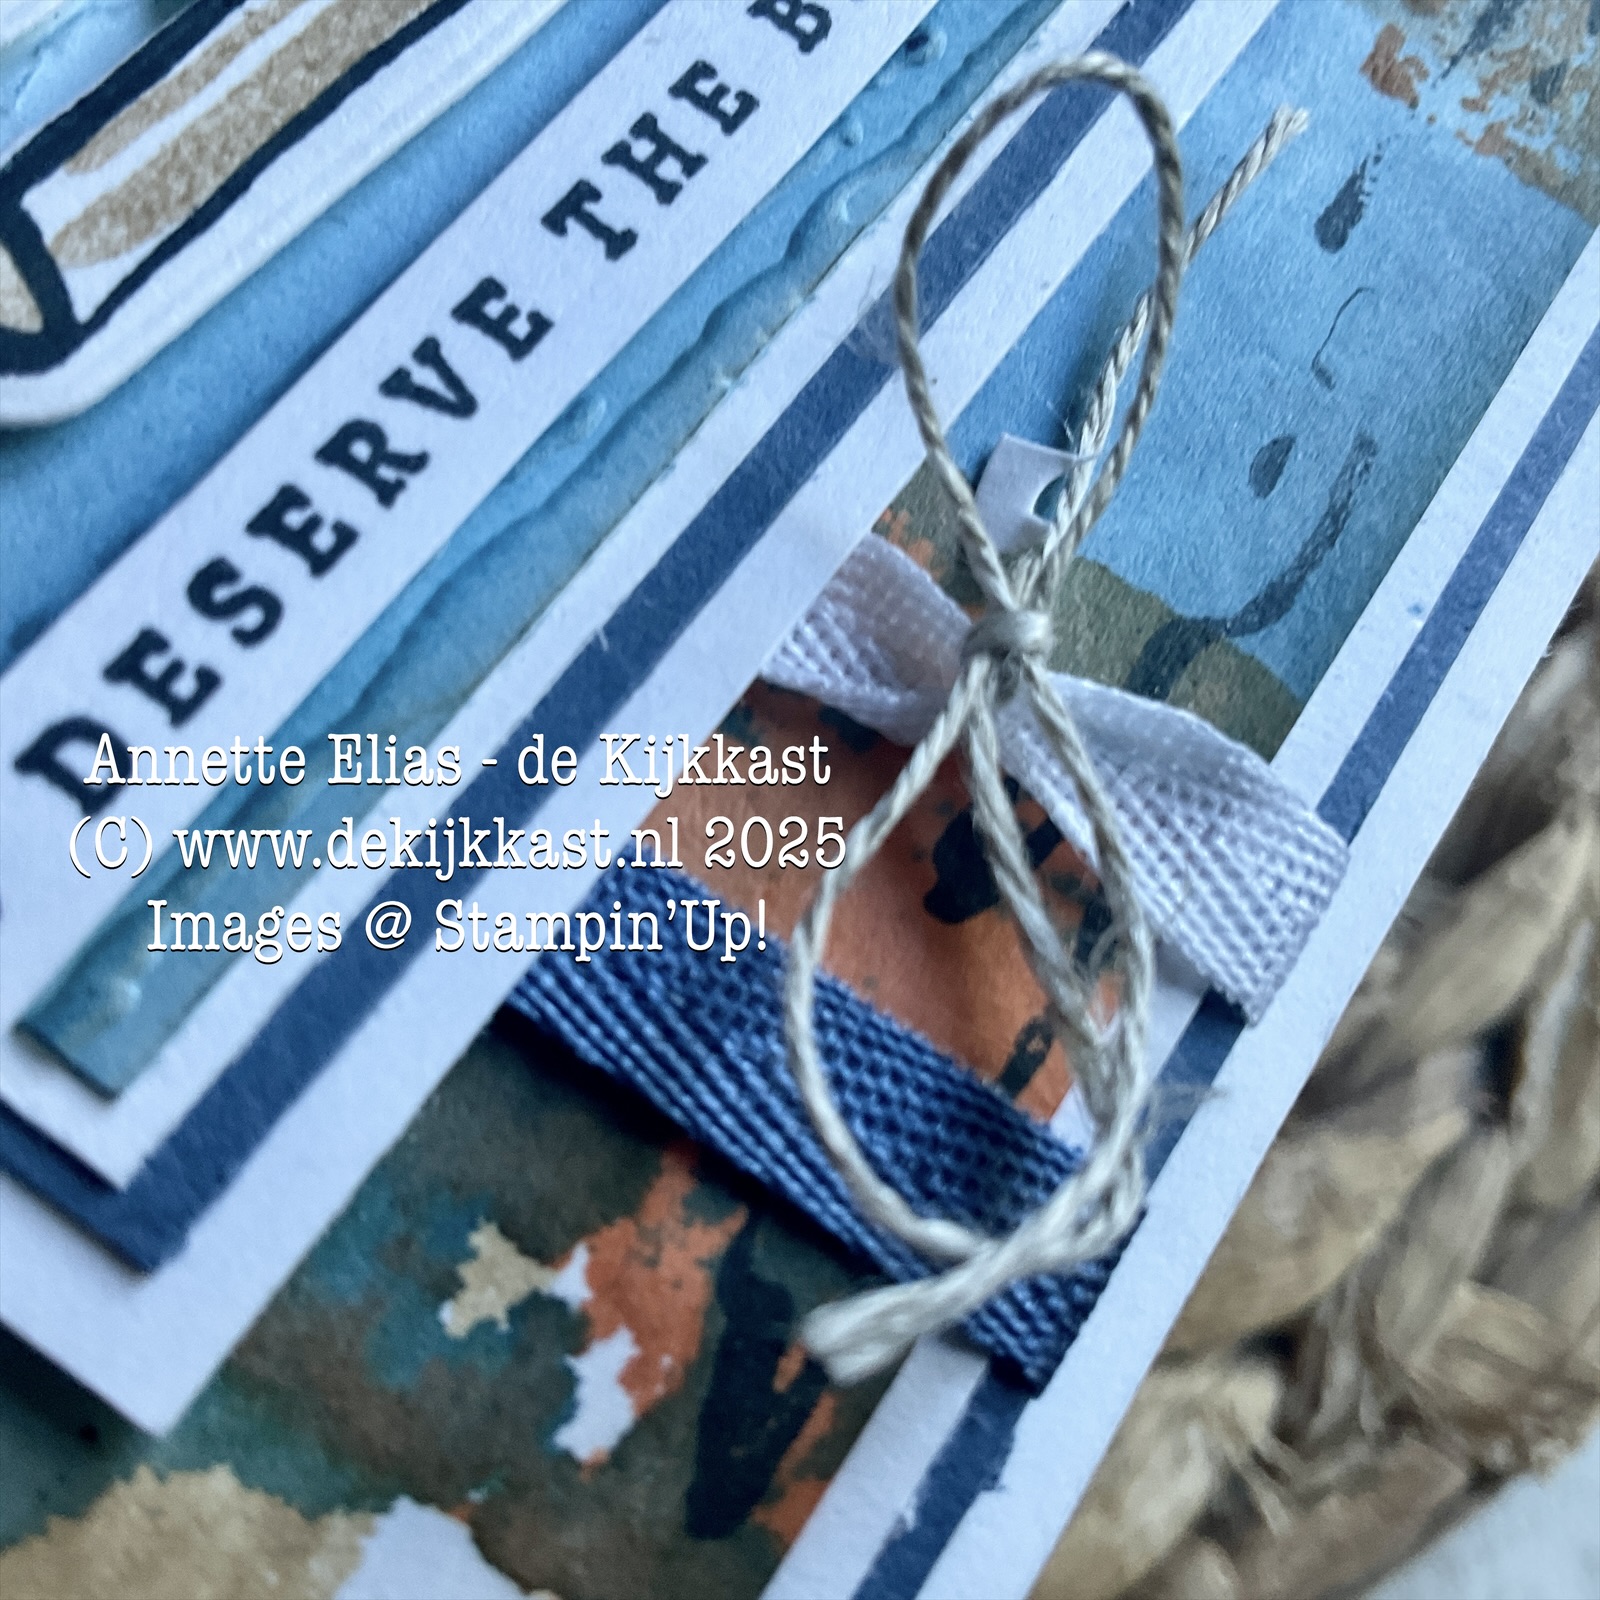


Met wat stukjes Linnen Draad maakte ik strikjes om de lintjes. Het naturelkleurige draad kleurt mooi bij het geheel!
With some Linen Thread I made small bows around the ribbon. The natural colour looks great with the colour scheme!

Ik voegde de tekst toe, en als extra accentje ook nog het woord Ahoy! Leuk om zo een extra tekstje ter decoratie te gebruiken!
I added the sentiment, and as an extra accent I also added the word Ahoy! It is nice to use a text as an embellishment!

Zo is het een stoere, maar vrolijke,frisse kaart geworden! En wow, wat is deze stempelset superleuk he! Met deze techniek kan nog veel meer! Vind je het leuk om dit soort technieken te leren? Kijk dan eens in de Kijkkast Workshopagenda of sluit je aan bij onze Kijkkast workshop-club!
All together it became a rustic but happy, fresh card! And wow, isn't this a great stampset?
There is much more you can do with this technique! Would you like to learn more of this? Then check the Kijkkast Workshopagenda or become a member of our Kijkkast WorkshopClub!

Heel erg leuk dat je vandaag bij de Kijkkast bent komen kijken! Heb je vragen? Stel ze mij gerust! Onderaan dit bericht vind je een lijst met alle gebruikte producten, en deze zijn allen te bestellen bij de Kijkkast! Ik help je graag! Dan is het nu tijd om verder te hoppen, de links naar de andere designers vind je hier onder! Heel veel plezier alvast, en hopelijk tot snel! XXX Annette💚
I really love the fact you visited de Kijkkast today! Please just ask when you have any questions! Below you will find a list of all the products I used. All products can be ordered through de Kijkkast. I will be happy to help you! I now invite you to hop to the other designers to see what they made. Have fun, and feel free to visit de Kijkkast any time you like! XXX Annette💚
Wat heb ik gebruikt:
Stempels: Sunrise Sailing
Papier: Cardstock: Basic White, Thick Basic White, Misty Moonlight
Inkt: Crumb Cake, Misty Moonlight, Timid Tiger, Secret Sea
Dies: Sunrise Sailing Dies
Embossing: Sunrise Sailing Hybrid 3 D Embossingfolder
Embellishments: Startsetje Lint met Misty Moonlight & Wit, Linnen Draad
Tools: Stampin'Cut & Emboss Machine, Stampin'Spritzers, Blending Brushes, Clearblocks B, C, D, Heat Tool, Take Your Pick Tool, Paper Trimmer

Eerstvolgende (MEE)besteldagen:
Maandag 2 juni 19.00 uur
Maandag 9 juni 19.00 uur

Laatste kans producten!
Op is op!
BEMACHTIG ZE NU HET NOG KAN!
Dat kan 7 dagen per week, 24 uur per dag!
Zo veel MOOIS!
Er zijn weer nieuwe ONLINE ONLY-PRODUCTEN!
Volop nieuwe items, die niet in de catalogi staan!
Je vindt ze >>HIER<<
Voel je welkom bij de Kijkkast VIP Lounge!
Extra voorbeelden, Kijkkast Lives, Online open huis, extra tips, gratis workshops!

Lees HIER hoe ook jij Kijkkast VIP kunt worden!
💓De allerbeste DEAL: Het Stampin'Up! Startpakket!💓
Kies voor 175 euro en betaal slechts 129 euro
Krijg vervolgens minimaal 20 procent korting op volgende bestellingen
Gratis toegang VIP Lounge! en meer!
Lees HIER alle info!

Altijd leuke koopjes in het KOOPJESREK, op is op!
KIJKKAST WORKSHOPS!!

Check >>>HIER<<< het nieuwe workshopprogramma voor de komende tijd!!!
en spaar voor gratis producten!
***Met diverse Clubvoordelen ;o)***
Catalogus aanvragen:

Wil jij de NIEUWE JAARCATALOGUS ontvangen?
Vraag deze nu bij mij aan via een >>email<<! Opsturen of afhalen is mogelijk!
Meer info is te vinden op de Catalogus Info
.png)
.png)
.png)
.png)


.png)

.png)


