Posts tonen met het label Dragonfly Dreams. Alle posts tonen

zaterdag 19 mei 2018

Thinking Outside Of The Box Bloghop: Seethrough-Window-Box (met stap voor stap tutorial)


*This Blogpost is in Dutch AND English!*


Welkom bij de MEI Bloghop van het internationale Thinking Outside of the Box-Design Team!
Je bent hier zojuist begonnen, of je bent hier gekomen via mijn creatieve engelse vriendin en collega  Zoe Tant


Hello and welcome to the MAY Bloghop of the Thinking Outside of the Box Design Team! You just started this bloghop here, or you got here through my creative colleague and friend from the UK Zoe Tant


Het thema van deze maand is het maken van een Window Box, een doosje met in de deksel een raampje verwerkt.
Theme of this month is making a Window Box, a box with a window in the lid!
 https://scontent-ams3-1.xx.fbcdn.net/v/t1.0-9/32580658_1995898863816025_8251328441354289152_n.jpg?_nc_cat=0&oh=8286fec1f41372a03fdf1a34236321dc&oe=5B9053DF
Zulke doosjes zijn ideaal om een kadootje in te stoppen, en de ontvanger meteen een glimpje van de inhoud te gunnen.

These boxes are great packagings for gifts, and gives the receiver an immediate glimpse of what's in the box!


Een leuk kadootje verdient een mooie verpakking, dus ik besloot er een doosje in een speciale vorm van te maken. Ook heb ik er een paar van de nieuwe kleuren voor gebruikt. Highland Heather en Gorgeous Grape! Geweldige kleuren! Deze zijn met ingang van juni, als de nieuwe catalogus geldig is, verkrijgbaar!

A nice gift deserves a nice box so I decided to make a box with an unusual shape. Also I used some of the new colors: Highland Heather and Gorgeous Grape! I love these colors! hey will be available for ordering in June, when the new catalog goes live!

Maar ondanks de ongebruikelijke vorm is het doosje nog steeds heel eenvoudig te maken. Er zijn meeerdere manieren om dit te doen, maar ik heb het zo uitgewerkt dat je zonder ingewikkelde methodes zo'n gave trapezoide vorm kunt maken. In een stap voor stap fototutorial zal ik je vertellen hoe je het maakt.

But despite the special shape of the box it is still rather simple to make! There are several ways to make a trapezoid shaped box but after some trying I came up with this simple way. In a step by step tutorial I wil tell you how!

Basis van het doosje
Basic Part of the box

Voor de basis van het doosje heb je een stuk Gorgeous Grape cardstock nodig van 21 x 21 cm.  Ril dat rondom op 4,5 cm van elke zijde

For the basic part of the box you need a piece of cGorgeous Grape cardstock of 21 by 21 cm. Score this at 4,5 cm from each side
Aan alle vier de zijden markeer je nu steeds de punten op 1,5 cm van de rillijnen, zoals afgebeeld op de foto hieronder.

On all four sided you mark the spot at 1,5 cm of the scored lines, as shown in the picture below

Ril nu de lijnen van de puntjes naar het punt waar de eerder gerilde lijnen elkaar kruisen, zoals aangegeven is met rood op de foto hieronder.

Now SCORE the lines between the marked points and the points where the other lines cross, as shown in red on the picture below


Knip nu eerst de vierkantjes op de vier hoeken weg. Daarna knip je van de flappen links en rechts de driehoekjes weg. Bij de flappen boven en beneden laat je deze zitten. Hier ga je straks de hoekjes vouwen op de gerilde lijnen.

Now cut away te four squares on the corners of your cardstock. After that you cut away the triangle shapes an the sides of the left and right flaps. On the other flaps, the flaps above and below the trangles stay where the are. These lines will be folded.

Dit is het moment om je basisdoosje te decoreren. Hier heb ik dat gedaan met de Eastern Beauty stempelset en Gorgeous Grape inkt.

This is the moment to decorate this part of your box. I used the Eastern Beauty stampset and Gorgeous Grape Ink to do that.
Hierna kun je het doosje in elkaar plakken, door lijm of tear and tape op de driehoekige flapjes te doen. Het basisdoosje krijgt dan al zijn trapezoide vorm

After this you can put glue or Tear and Tape Adhesive on the triangular flaps and put the basic box together. It already has its special shape now.

De deksel
The Lid

Het deksel bestaat uit meerdere lagen met daartussen ook het "raampje"

The lid is made in layers, with the "window"in between them

Het eerste deel
First part


Neem een stuk Highland Heather Cardstock van 11,8 bij 11,8 cm, en ril dit op 1,5 cm van alle zijden.
Vervolgens knip je kleine "hapjes"uit de flapjes, zoals te zien is op de foto.

Take a piece of Highland Heather Cardstock of 11,8 x 11,8 cm and score it at 1,5 cm from each side. Now cut little nodges as shown on the picture below.

Vervolgens neem je de grootste Circle die uit de st Layering Circle framelits en snijd je een cirkel uit het midden van je cardstock

After this you take the largest circledie from the Layering Circles Framelits and cut a circle out of the middle of your piece of cardstock.

Zet nu het eerste deel van de deksel in elkaar door de flapjes te plakken.

Now finish this part of the lid by attaching the flaps to the sides. 

Tweede deel van de deksel
Second part of the lid

Neem een stuk Gorgeous Grape Cardstock van 9,5 x 9,5 cm en stans hieruit de ornamentcirkel uit de set Eastern Medallions Thinlits. Uiteraard precies in het midden.

Take a piece of Gorgeous Grape Cardstock of 9,5 x 9,5 cm and cut out the ornament Circle of the Eastern Medallions Thinlits. Make sure you put it exactly in the middle


 Nu neem je de Circledie van 4,1 cm doorsnede uit de Layering Circles Framelits en snijd dit uit het midden

Now take the Circle die of 4,1 cm and cut it from the middle of the ornament Circle.
Nu kun je dit deel versieren met de ornamentstempels uit de set Eastern Beauty.

Now decorate the lid with ornamentstamps from the Eastern Beauty Stampset.

Tenslotte plak je op de achterzijde hiervan een stuk Window Sheet van 9 x 9 cm. Dit gaat het best met Tear and Tape Adhesive. Vervolgens plak je rondom, ook op de achterzijde, Foam Adhesive Strip, een paar milimeter van de zijkanten.

Now attach a piece of 9 x9 cm Window sheet on the back. It is best to do this with Tear and tape Adhesive. Now put pieces of Foam Adhesive Strips on all for sides, but keep away a few milimets from the edges of the cardstock.

Derde deel van de deksel
Third part of the lid

Neem een stuk Highland Heather Cardstock van 10 x 10 cm and snijd ook hier met behulp van de grootste Circledie een opening in het midden.

Now take a piece of Highland Heather Cardstock of 10 x 10 cm and again cut out a round opening using the biggest Circledie.

Plak nu het bestempelde deel op het Higland Heather deel

Now attach the stamped layer to the Highland Heather layer.

En plak dit geheel op het deel dat we als eerste maakten

And attach this part tot the part we made first.

Afwerking
Finishing

Pons nu drie rondjes uit met de 3/4 inch circelpons. Vouw twee er van dubbel.

Now Punch out three circles with  the 3/4 inch Circlepunch. Fold two of them in the middle

Als je de twee gevouwen rondjes tegen elkaar plakt met een vlakje, kun je deze gebruiken als "handgreepje".. het derde circeltje plak je aan de binnenkant van de deksel, om het netjes af te werken.

When you glue the two folded circles together you can use them as a handle in the middle of the window. The third circle is used on the inside to make it look nice.

Zoals je ziet heb ik het doosje afgewerkt met een mooie libelle uit de set Dragonfly Dreams die ik met Gorgeous Grape inkt op Highland Heather Cardstock heb gestempeld en heb uitgestanst met de bijpassende dies. Met de Wink of Stelle Glitterbrush bracht ik op de vleugels wat glans aan.

As you can see I decorated the box with a stamped dragonfly which I stamped wit the Dragonfly Dreams stampset on Highland Heather Cardstock with Gorgeous Grape Ink and cut it out with the matching Diesset. I used the Wink of Stella Glitterbrush to make the wings Sparkle.

Wat pareltjes zorgen voor de "finishing touch"

 I added some pearls for a subtle "finishing touch"

Dat is voldoende versiering voor dit doosje.

That is all decoration this box needs.

Ik hoop dat je dit project leuk vindt en het ook eens gaat proberen te maken!

I hope you like this box and that you give it a try to make one yourself!

Maar natuurlijk wil je ook graag zien wat de andere designers hebben gemaakt! Hieronder vind je nog een lijst met alle gebruikte materialen. Heel veel plezier bij je vervolg van deze Thinking out of the Box Bloghop! De volgende blogbijdrage kun je vinden bij Dena Rekow! Ik weet zeker dat zij iets moois heeft gemaakt! Ik hoop je snel terug te zien bij de Kijkkast xxx Annette

But ofcourse you want to see what the other designers made too! Below this blogpostyou will find a list of all the used products below. Now it is time to go to the blog of Dena Rekow!   I am sure she made something beautiful! Please feel welcome to come back to the Kijkkast whenever you like! xxx Annette


http://www.thecreativitycave.com/my_weblog/2018/05/thinking-outside-the-box-blog-hop-box-with-window-lid.html


https://stampingscene.blogspot.com/2018/05/quick-and-easy-teacher-gifts-for.html


En voor het geval je de weg kwijt raakt:
And in case you get lost:

1 Shannean Moncrieff- Australie
2. Tanja Kolar- Duitsland
3. Yoshiko Endo- Japan
4. Zoe Tant- Groot Brittanie
5. Annette Elias- Nederland (Hier ben je nu!)
6. Dena Rekow- Verenigde Staten
7. Beate Wacker- Oostenrijk
8. Aude Barbara- Frankrijk

Gebruikte producten:
Products I used:

Stempels: Eastern Beauty, Dragonfly Dreams,
Papier: Cardstock: Highland Heather, Gorgeous Grape
             Window Sheet
Inkt: Gorgeous Grape
Dies: Layering Circles Framelits dies, Eastern Medallions Thinlits Dies, Detailed Dragonfly Thinlits Dies
Pons: 3/4 circle Dies
Embellishments: Pearl Basic Jewels, Wink of Stella Glitterbrush


Nieuw: Bemachtig uitlopende producten voor het te laat is!
Kijk hier voor alle informatie
Last-Chance Products


Eerstvolgende (mee-)besteldagen:
  Maandag  21 mei om 19.00 uur
Maandag 28  mei om 19.00 uur

en spaar voor gratis producten!
***Met diverse Clubvoordelen ;o)***


Wil jij graag de nieuwe Stampin'Up! catalogus ontvangen?? 
Vraag er eenvoudig eentje aan door mij een EMAIL te sturen


vrijdag 24 november 2017

Kleur op kleur! -Totally Techniques-Stampin'Blends


***This Blogpost is in English and Dutch!***


Welkom bij deze bloghop van het International Totally Techniques Designteam!

  Welcome to this Bloghop of the International Totally Techniques Designteam!


Pas geleden werd ik voor dit team uitgenodigd, en natuurlijk heb ik daar, als liefhebster van allerlei technieken, ja op gezegd. Het is altijd leuk om samen inspiratie te delen met jullie, en dat krijg je nu vanuit de hele wereld!

  Recently I was invited to join this team, and as I love techniques, ofcourse I gladly accepted! It is always great to share ideas and possibilities with our stamps, inks and other matching products. 


Deze maand staat het werken met de Stampin'Blends centraal!

  This month we focus on working with the Stampin'Blends!


Als je aan alcolomarkers denkt, denk je al snel aan heldere kleuren, maar er kan veel meer, dus leek het me leuk jullie in mijn bijdrage te laten zien dat je ook andere leuke effecten kunt bereiken.

  When you think about alcoholmarkers, very soon you think about bright colors, but there is so much more you can do! I like to show you one of these possibilities!
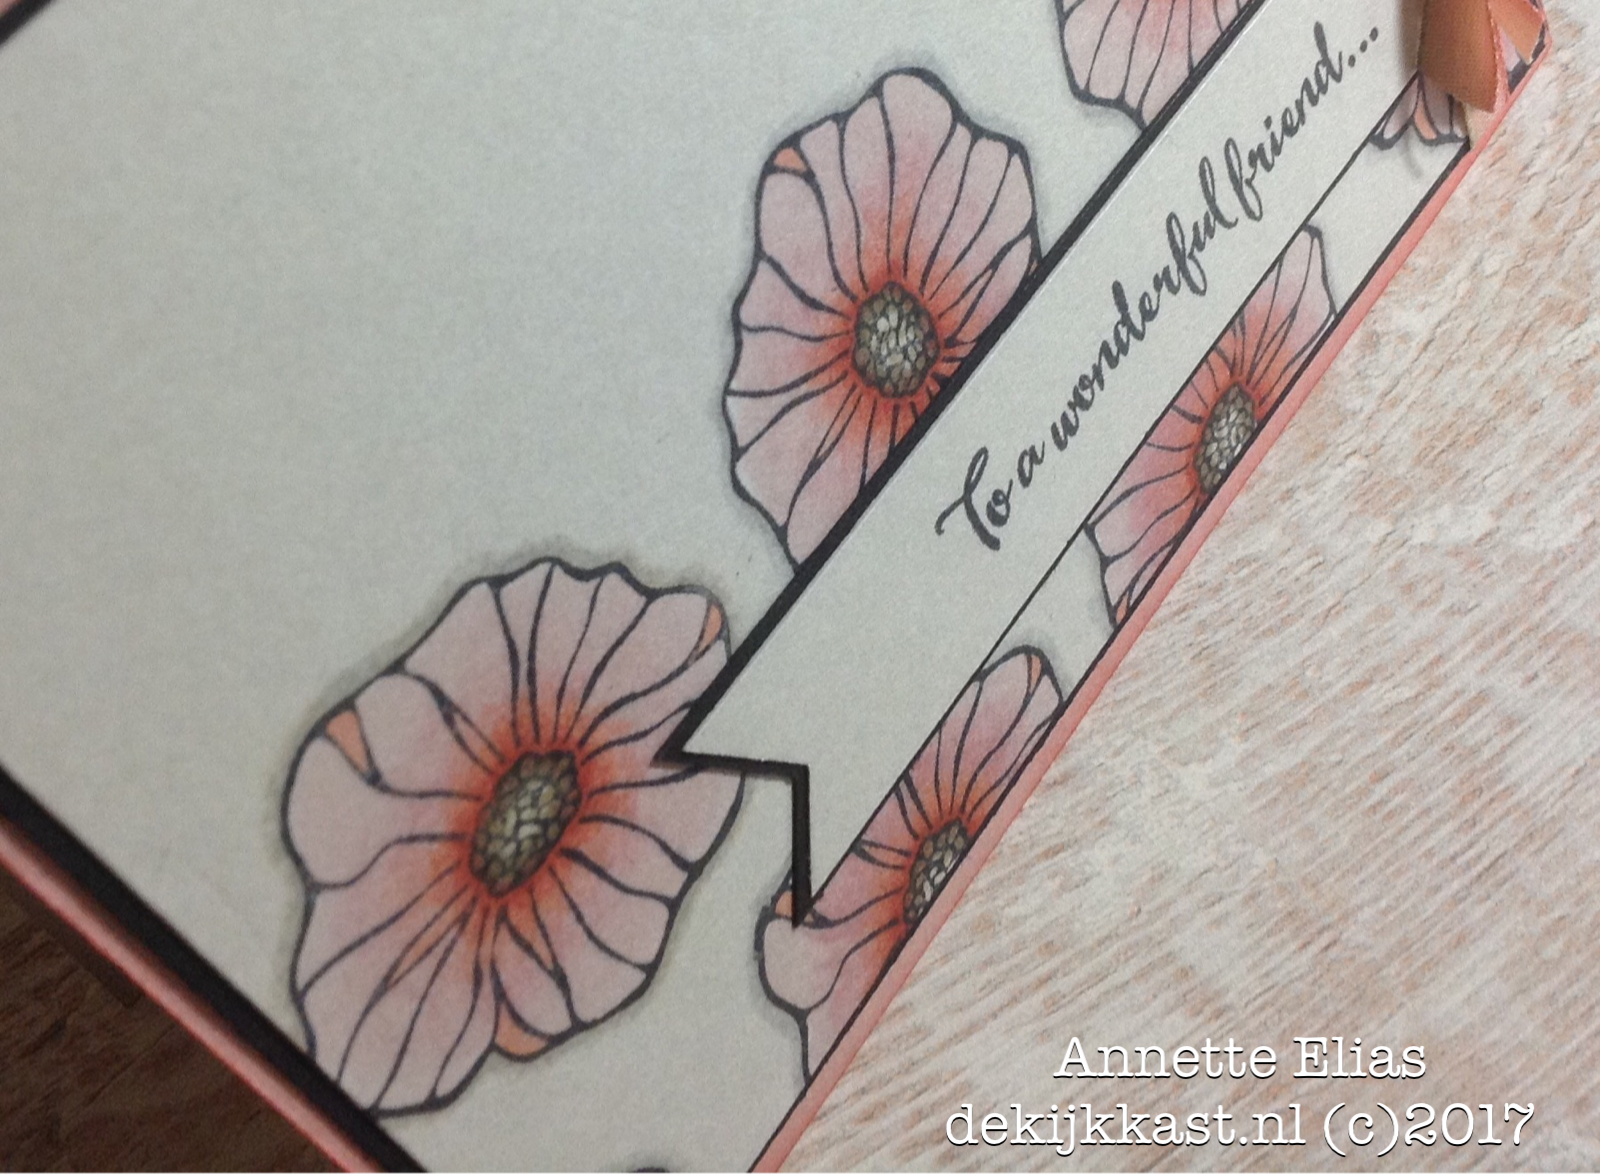
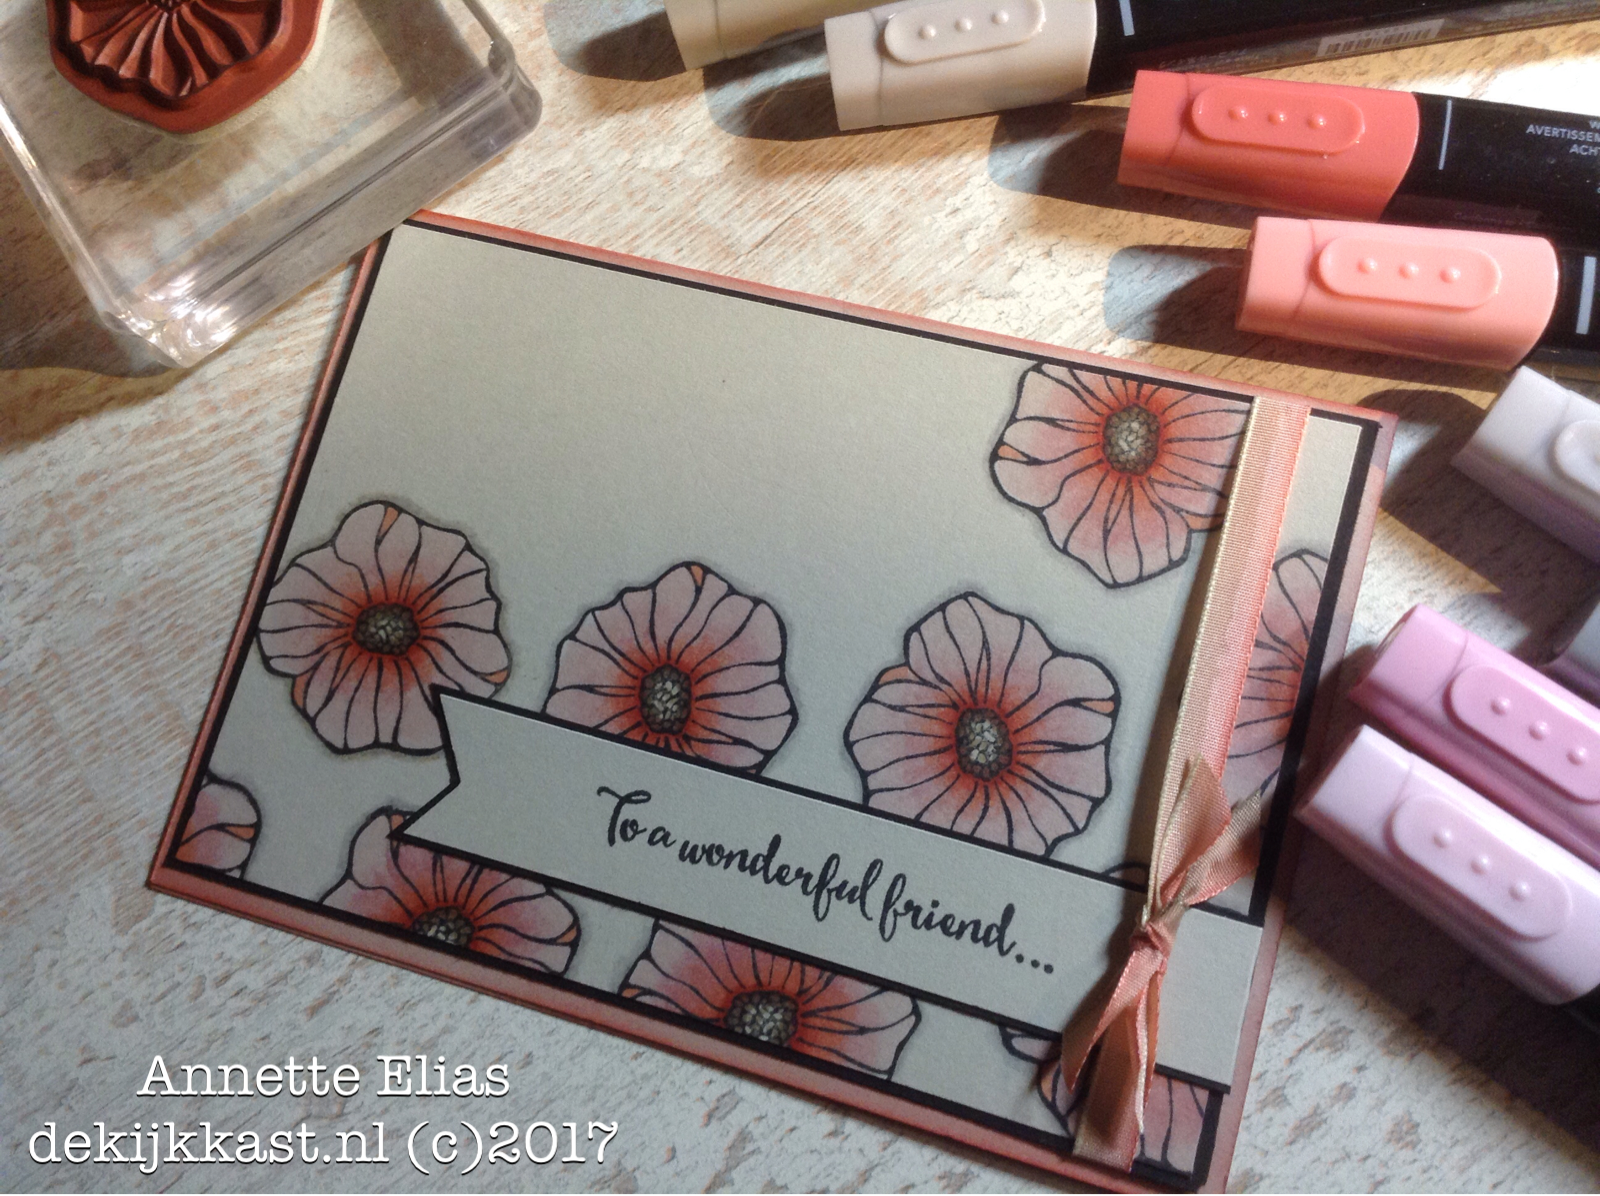
Door nu eens niet op Whisper White maar op Sahara Sand Cardstock te werken krijgen de kleuren al meteen een andere uitstraling.

  By not working on whisper White but on Sahara Sand cardstock, all the colors get a completely different look!
De Sahara Sand ondergrond maakt alle kleuren zachter, en een beetje vergrijsd.

  The Sahara Sand gives all colors a muted, greyish look!
Ik gebruikte vier sets van de Blends, Calypso Coral, Pink Pirouette,Crumb Cake en Smoky Slate. Van alle vier gebruikte ik de Light en de Dark versie! Deze kleuren geven in combinatie met de ondergrond een heel zacht eindresultaat.

De prachtige bloem komt uit de set Oh so Eclectic, die tot en met zondag in de aanbieding is, in verband met de Online Extravaganza!

Ook kregen de bloemen een zachte schaduw die ik voorzichtig vervaagde.

  I used four different colors of the Blends: Calypso Coral, Pink Pirouette, Crumb Cake and Smoky Slate (all light and dark) and the beautiful artsy flower comes from the Oh So Eclectic Stampset! All Flowers got a subtle shadow by using the light Smoky Slate Stampin'Blend and fade this a bit with the Color Lifter.


Vanwege de zachte kleuren heb ik de versiering heel rustig gehouden. Ik heb alleen wat Ombregekleurd lint gebruikt, dat ik een beetje bijkleurde met de Lichte Crumb Cake Stampin'Blend zodat ie net nog iets mooier bij de rest paste.

  I Kept the decoration simple to keep the focus on the soft colored flowers, and I adjusted the colors of the Ombre Ribbon a bit by using the Light Crumb Cake Blend for that.


Ik raad je absoluut aan om lekker te gaan experimenteren met kleuren op kleur, want dat is ZO gaaf om te doen! De resultaten zullen je verrassen!

  So my tip for you is to experiment with different colored backgrounds! It is fun and you will be surprised by the effects!
En wil je deze, en nog veel meer technieken leren, dan ben je uiteraard van harte welkom in de Stampin'Blends Workshops die binnenkort beginnen bij de Kijkkast! In december begint een groep, en begin januari begint ook nog een groep. In vier maandelijkse workshops leer je dan een hele berg technieken en spaar je je eigen Stampin'Blends collectie bij elkaar! Kijk HIER maar eens!

Maar natuurlijk kun je de Blends ook zelf bestellen en bij elkaar sparen. Onderaan dit bericht vind je alle gebruikte materialen!

Nu wil je natuurlijk ook graag de andere bijdragen zien voor deze bloghop! Met de linkjes kun je doorhoppen naar de andere leden van het Totally Techniques Designteam, en zo een kleurrijk rondje maken langs allerlei mooie Stampin'Blends creaties!

Ofcourse you like to see the other contributions too, so have fun and follow the bloghop and get lots of fun ideas, tips and new techniques to play with these beautiful alcoholmarkers!

Wil je terug, ga dan naar Barbara Meyer


Wil je verder, ga dan naar Patrice Halliday-Larsen

En mocht je nu de weg kwijtraken, heb je hier alle links!

And In case you get lost...


1. Patrice Halliday-Larsen (New Zealand) - Hamilton
2. Nadine Weiner (Germany) – Gau-Algesheim (Berlin)
3. Marine Wiplier (France)
4. Shannean Moncrieff (Australia) - Cairns
5. Zoe Tant (UK) - Horncastle, Lincolnshire (Lincoln)
6. Barbara Meyer (Austria) - Vienna
7. Annette Elias (Nederland)- Wognum N-H (Hier ben je nu, wat leuk dat je er bent!)

Wat heb ik gebruikt:
Used Materials:

Stempels: Oh so Eclectic, Dragonfly Dreams (tekst)
Papier: Cardstock: Sahara Sand, Basic Black
Inkt: Memento Black, Calypso Coral
Stampin'Blends: Calypso Coral, Crumb Cake, Smoky Slate, Pink Pirouette, allemaal Light& Dark, Color Lifter
Pons: Triple Banner
Tools: Stampin'Sponges
Embellishments  Ombre Ribbon Calypso Coral

bedankt voor je bezoek en...hopelijk tot snel!

Thank you for visiting my blog, and I hope to see you back soon!

Annette Elias, the Netherlands


Eerstvolgende (mee-)besteldagen:
Zondag 26  november om 19.00 uur

Maandag 4 december om 19.00 uur


en spaar voor gratis producten!
***Met diverse Clubvoordelen ;o)***


Heb je de nieuwe Catalogus nog niet in huis? 
Vraag er eenvoudig eentje aan door mij een EMAIL te sturen
HERFST-WINTERCATALOGUS