vrijdag 31 mei 2019

Een vleugje Vintage-Totally Techniques-Stencil Sponging

***This Blogpost is in English and Dutch!***


Welkom bij deze bloghop van het International Totally Techniques Designteam! We hebben deze maand ook weer een leuke techniek "uitgediept" en laten je samen diverse voorbeelden zien! Leuk dat je er bent!

 Welcome to this Bloghop of the International Totally Techniques Designteam! This month we have chosen another fun technique again and together we will show you several examples of it!  Happy to see you here!


 De techniek van deze maand is Stencil Sponging, oftewel het gebruiken van een Stencil of  Mask, waarmee je met een sponsje en inkt mooie "afdrukken"maakt.

Technique of this month is Stencil Sponging. This is using a stencil or mask and a sponge with some ink, to make a nice image or impression. 

Het geeft vaak een mooi zacht effect en je maakt er dan ook prachtige achtergronden mee.

Most times it gives a soft effect, so that makes the technique perfect for making nice backgrounds!


Het mooist is het als de achtergrond en de "blikvanger"van je kaart mooi met elkaar matchen, en daardoor elkaar versterken.

You get the best result when the background and the vocal point of a card match nicely, and that way make eachother stand out more!


Zo krijg je een mooie eenheid in je project! Daarvoor is het natuurljk mooi als je een bijpassend stencil of mask hebt. Mocht je denken dat je nooit bij elke set een bijpassend mask hebt of kunt vinden, dan kun je ze natuurlijk altijd zelf maken!

This way you get a nice "unity"in your project. To get this effect ofcourse it is nice to have a matching stencil. I guess now you will think that you can never have a matching one for every stampset... but .... did you think of making your own masks already?


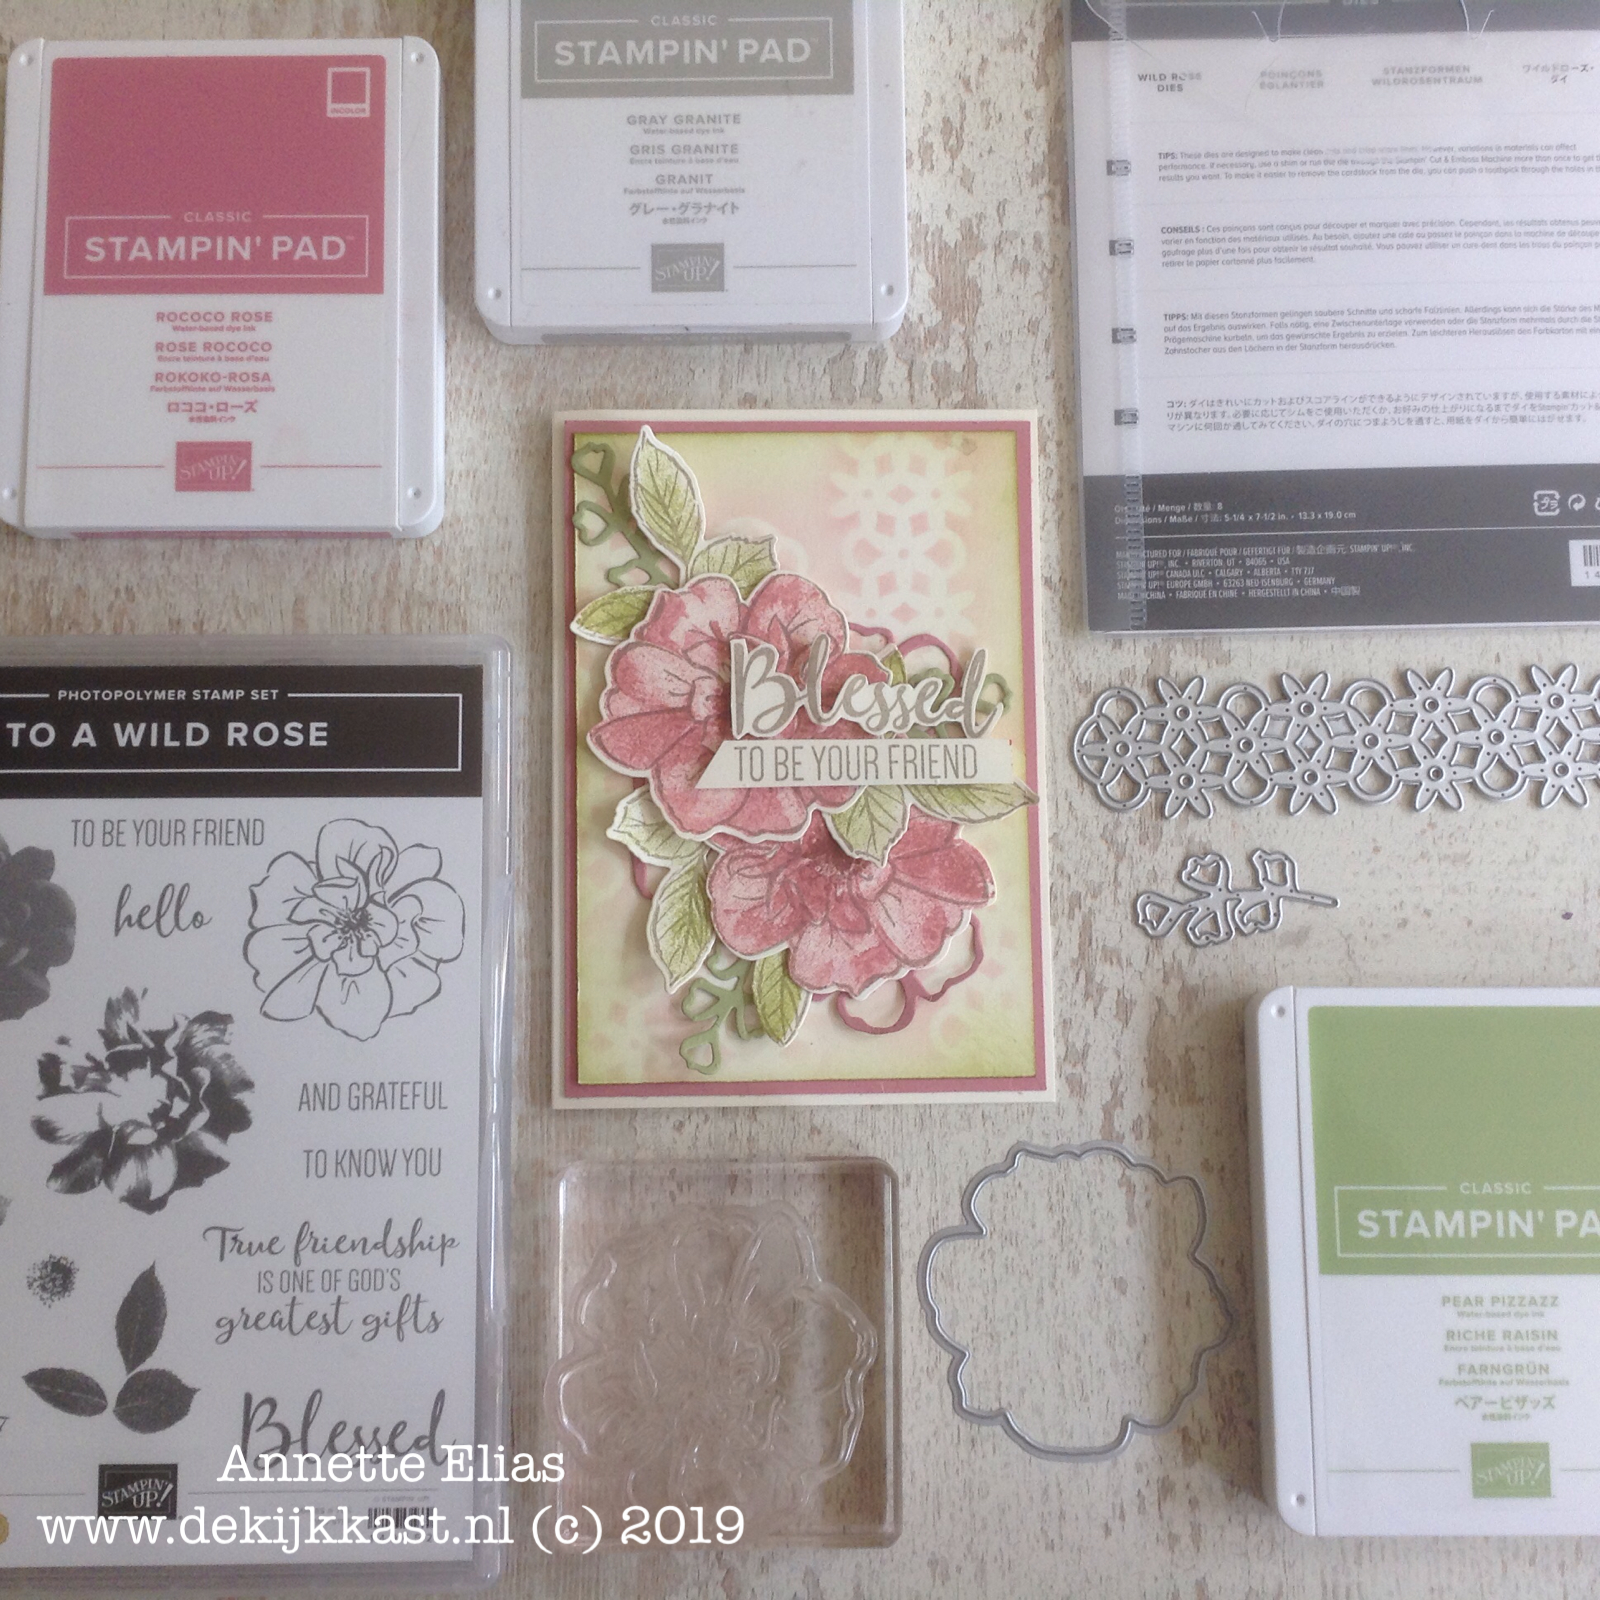
Voor mijn kaart van vandaag gebruikte ik de set "To a Wild Rose"en de bijpassende "Wild Rose" Dies. (Deze set staat in de NIEUWE JAARCATALOGUS, en is vanaf vier juni te bestellen) In deze set zitten diverse opengewerkte stansen die je uitstekend uit een stukje Window Sheet kunt stanzen. In dit geval deed ik dat uit de langwerpige die uit deze set. Zo maak je supersimpel je eigen stencil! Je ziet hier de stencil op de voorgrond, ik heb mijn best gedaan het licht er  op te laten vallen zodat je hem een beetje kunt zien.

For my card of today I used the stampset "to a Wild Rose"and the matching "Wild Rose"dies. ( This set is in the NEW ANUAL CATALOG and can be ordered from june 4th) In this set there are several "open" dies ((detailed with open pieces) that can be used. In this case I took the long die and diecut it from a piece of Window Sheet. This way you can easily make your own stencil that can be used over and over again. I tried to show the stencil on the picture above, I hope you can see it!


Door het stencil hier op verschillende plaatsen neer te leggen en er heel zachtjes overheen te sponzen met de nieuwe In Color Rococo Rose en een Stampin'Sponge heb ik heel simpel een achtergrond gemaakt.

By taking he stencil, placing it on different places on my cardstock and sponcing lightly over it with some Rococo Rose Ink ( one of the new In Colors!) and a Stampin'Sponge, I made this subtle background.


Een bijpassende achtergrond maakt het kaartje gewoon net wat mooier! Het stencil kun je gewoon in je stempeldoosje opbergen en steeds weer gebruiken als je dat wilt! Altijd leuk om zo je spulletjes optimaal te gebruiken!

The matching background makes the card look nicer and more special! The stencil can be put in the stampcase and be used over and over again! This technique gives optimal usage of our gorgeous products. Don't you love that too?


En je hebt er eigenlijk niet eens zo veel producten of kennis voor nodig.

*Stempels en dies kunnen samen als bundle worden besteld met 10% bundlekorting.*

And you don't need that many products or advanced "skills"for it!

*Stamps and dies can be ordered as a bundle, with a 10% bundlediscount*


Deze stempels en dies zijn helemaal mijn smaak!!!  Het is een Distinktive set, met diverse stempels die je in stappen over elkaar kunt stempelen ( two step stamping) waarbij je volop kunt varieren. Ik heb er deze week een hele dag mee zitten werken  Ik kon gewoon niet meer stoppen. Wat een pracht! Ik heb er dan ook meteen een mooie workshop mee samengesteld. Deze staat al in de WORKSHOPAGENDA.  ( de eerste nieuwe workshops staan er op, in de komende weken zullen er steeds workshops en evenementen toegevoegd worden!)

Oh I love those stamps and dies. It is a Distinktive set with stamps that can be used in steps ( two step stamping) but you can make endless varieties with them. I have been playing a whole day with the bundle this week. I just couldn't stop and assembled a beautiful workshop with them. This workshop can be found in the WORKSHOPAGENDA. ( more workshops and events will follow!)


Ik stempelde de bloemen en blaadjes en stanste ze uit. Met de dies stanste ik nog wat extra bijpassende onderdelen uit. Samen met de achtergrond en de tekst zorgt dat voor een leuke laagjeslook!

I stamped the flowers and leaves and diecut them. I asl diecut some extra detailed pieces to embellish the flowercluster even more. Combined with the raised sentiment and the sponged background it got a nice layered look.


Het eindresultaat is een kaart met een zachte uitstraling en een vleugje vintage. 

The endresult is a softlooking card with a bit of vintage.


Dat komt natuurlijk ook door de kleuren. Mooi he, deze nieuwe In Color Rococo Rose. Het is volgens mij het best te omschrijven als een frisse oudroze tint!

That is also caused by the colors. Don't you love that new Rococo Rose? It can best be described as a fresh oldpink color I think.


Dit was weer mijn projectje voor vandaag. Ik hoop dat je door de voorbeelden in deze bloghop je dies weer eens even met andere ogen gaat bekijken! Via de links hieronder kun je zien wat de andere Designteamleden hebben gemaakt! Helemaal onder aan dit berichtje staan alle door mij gebruikte producten. Heel erg bedankt voor je bezoek aan de Kijkkast. Ik stel het enorm op prijs als je me in een reactie laat weten wat je er van vindt! Kom gerust weer eens terug, of nog beter, kom eens gezellig een workshop doen of nodig me uit bij je thuis een workshop te verzorgen! Ik help je graag om nieuwe kennis en inspiratie op te doen, je stempelspulletjes optimaal te gebruiken en zo nog meer plezier te krijgen in het stempelen!XXX Annette

This was my project for today. I hope you get inspired by all the examples we made and that you will check your diessets to see what stencils you can make with them! Through the links below you can see what the other designteammembers made. A reaction to this blogpost is very much appreciated.  Thanks for visiting de Kijkkast, and feel welcome to come back soon!XX Annette


You are invited to the Inlinkz link party!


Wat heb ik gebruikt/ Used Products:
Stempels: To A Wild Rose
Papier: Cardstock: Very Vanilla, Thick Very Vanilla, Rococo Rose, Pear Pizzazz
Window Sheets
Inkt: Rococo Rose, Pear Pizzazz, Gray Granite
Dies: Wild Rose Dies
Tools: Stampin'Sponges, Big Shot, Die Brush


Eerstvolgende (mee)besteldagen:
Dinsdag 4 juni om 19.00 uur
Maandag 10 juni om 19.00 uur


 -0-0-
en spaar voor gratis producten!
***Met diverse Clubvoordelen ;o)***


Wil jij straks graag de NIEUWE JAARCATALOGUS ontvangen?? 
Vraag er eenvoudig eentje aan door mij een EMAIL te sturen
Of doe een bestelling, dan voeg ik hem er gratis bij!


zaterdag 25 mei 2019

Thinking Outside Of The Box Bloghop: Superlieve Wikkel-doosjes (met stap voor stap tutorial)


 *This Blogpost is in Dutch AND English!*

Welkom bij de MEI Bloghop van het internationale Thinking Outside of the Box-Design Team!
Je bent hier zojuist begonnen, of je bent hier gekomen via mijn getalenteerde en lieve Britse Collega ZOE

Hello and welcome to the MAY-Bloghop of the Thinking Outside of the Box Design Team! You just started this bloghop here, or you got here through my talented and sweet colleague from the UK  

Thema van deze maand is een Wikkeldoosje... Deze naam heb ik er zelf aan gegeven, want als team hadden we er eigenlijk niet echt een naam voor. Deze naam omschrijft voor mij tamelijk goed wat het doosje is... een basisdoosje met een wikkel daar omheen! 

Theme of this month is a folded Box... This time it was hard to find the right name for this type of box. In fact it is a box that has a basic part, and a part that folds around that.


Dit is mijn uitvoering!

This is my version!

 Het buitenste deel maak je los, waarna je het "gewikkelde"deel verder open kunt vouwen

When the closure is opened, the outer part of the box can be folded open.


 Het doosje is perfect als kadoverpakking. Wat lekkers, wat geld of een kadokaart passen er met gemak in

The box is a great way to present a gift. Some money, something to eat or a gift card will fit easily.

 Voor mijn doosje gebruikte ik een van de Suites uit de nieuwe jaarcatalogus die vanaf 4 juni in gaat. Een van de allermooiste suites als je het mij vraagt!! de "Come Sail Away"Suite!

For my box i used one of the Suites from the new anual catalog that will start at june 4th. One of the most beautiful Suites if you ask me! The "Come Sail Away"Suite!


Ofcourse I will tell you how I made this box!

The folding Part- Het wikkeldeel.


Voor het wikkeldeel nam ik een strook Soft Suede Cardstock van 9 x 29,7 cm.
Ik naam deze horizontaal voor me en maakte rillijnen op 5-7,5-18,5 en 21 cm
I burnished the lines with my bonefolder.

For the folding part I took a piece of Soft Suede Cardstock of 9x 29,7 cm.
I took this horizontally and scored it at 5-7,5-18,5 and 21 cm
De vouwlijnen vouwde ik en wreef ik aan met mijn bonefolder.

 Vervolgens naam ik Balmy Blue Cardstock en sneed stukjes van 
8,7x4,7
8,7 x 2,2 ( 2 keer!)
8,7x8
8,7x10,7
en deze plakte ik op de vlakjes van de wikkel.

After that I took some Balmy Blue cardstock and cut pieces of
8,7x4,7
8,7 x 2,2 ( 2 times!)
8,7x8
8,7x10,7
And adhered those to the Folding part.


En tenslotte nam ik wat van het Come Sail Away DSP en sneed daarvan stukjes van
8x4
8x1,5 ( 2 keer!)
8x10
8x7,7

Ik sponsde de randjes met Soft Suede Inkt en plakte ook deze weer op de wikkel.

Now I took some of the Come Sail Away DSP and cut pieces of 
8x4
8x1,5 ( 2 times!)
8x10
8x7,7

I sponged the edges with Soft Suede Ink and also adhered the pieces to the folding part.

het basisdoosje/ the basic box


 Voor het basisdoosje nam ik een stuk Whisper White Cardstock, van 20 x 17,7 cm en rilde dit aan alle vier de zijden op 2,3 en 4,6 cm

For the Basic Box I took a piece of Whisper White Cardstock and scored it at all four sides at 2,3 and 4,6 cm


 Ik knipte de vlakjes die gemarkeerd zijn met een rode X weg.

I cut away the pieces marked with the red X


 Daarna knipte ik de kleine hoekjes weg zoals die met rood zijn aangegeven.

Then I cut away the little nodges that are marked with red.

 Nu is het makkelijk het doosje in elkaar te plakken. Eerst de kleine flapjes (zie foto) en dan de grote flappen. Door deze naar binnen te vouwen en te plakken krijgt het doosje extra stevigheid.

Now it is easy to assemble the box. Fort glue the small flaps and then the big flaps. By folding and glueing the big flaps inwards the box get extra sturdy.

Dit doosje plakken we nu in de Wikkel. Het klopt dat het aan de boven en onderkant precies past en aan de zijkant er nog een klein stukje over is. Dat staat straks netjes!

Now we adhere the box to the folding part. You will see that at the sides the wrapper has some extra space, so make sure you centre the box., This way it will look nice and neat when the box is closed.

 De decoratie van het doosje is ook meteen de sluiting! De ovalen heb ik gemaakt met de Layering Ovals framelits. De bootjes zijn geestempels op Whisper White en hebben een veegje Balmy Blue Inkt gekregen, net als het ovaal. Het anker is gestempeld op Balmy Blue. Alles is uitgestanst met de  Smooth Sailing Dies. De randjes zijn nog een beetje gesponsd met Soft Suede en op het ovaal heb ik nog wat gestempeld.

The decoration is also the closure of the box! I made the ovals with the Layering Oval Framelits. I Stamped, diecut and sponged all the pieces to make them look a bit weathered.

Alles bij elkaar gevoegd maak je er een soort klein schilderijtje van.

Together it makes a nice scene!

Voor dat ik het ovaal vastplakte stempelde ik op de wikkel nog wat stoere knopen.

Before I adhered the oval I stamped some cool knots on the folding part.

En aan het ankertje kwam een stukje van het Bakers Twine dat ook bij de Come Sail Away Suite hoort! Zo maak je er een leuke embellishment van.

And on the Anker I tied a piece of the new bakerstwin that is also part of the Come Sail Away Suite. This way it becomes a nice embellishment.

Even oppassen bij het vastmaken van het ovaal... Deze plakte ik op het onderste flapdeel, de grootste, maar zo dat de bovenste flap er tussen kan vallen. Om die ruimte te maken gebruik ik Stampin'Dimensionals.

Be careful attaching the oval... I adhered this to the lower flap( the biggest one) but is a way that makes it possible for the upper flap ( the smallest) to fit in! I used Stampin'Dimensionals for this.


Wat extra decoratie in de vorm van dit mooie naturel lint maakt het helemaal af en past erg mooi bij het kleurenschema.

Some extra embellishing the natural ribbon makes the box looks finished and looks beautifully in the color scheme.


Simpel maar leuk om te maken! 

De nieuwe catalogus gaat LIVE op 4 juni. Heb je geen demonstratrice en zou je graag de catalogus willen ontvangen (en geloof mij... dat wil je... want hij is echt ongelooflijk mooi, volgens mij en vele anderen de mooiste ooit!) neem dan gerust CONTACT met mij op! Dan maken we dat in orde. Ook bij andere vragen mag je natuurlijk altijd even een berichtje sturen. Ik help je graag!

Very Easy and fun to make!

The new catalog will go Live on june 4th. If you would like a copy of this gorgeous book of beautiful products, and you do not a have a demonstrator yet,  feel free to contact me. I am happy to help!


En dan is het nu al weer tijd om de bloghop te vervolgen. Ik weet zeker dat de andere dames iets supergaafs hebben gemaakt! Onderaan deze blogpost vind je een lijst met alle gebruikte materialen. Heb je opmerkingen of wil je reageren vind ik het heel erg leuk iets van je te horen! Voor nu wil ik je hartelijk bedanken voor je bezoekje aan de Kijkkast! En hopelijk tot snel! XXX Annette

And now it is time to contiue this bloghop and see what the other ladies made. I am sure it will be awesome! Below you will find a list of all the used materials. I would love to hear from you when you have any comments or reactions. So please let me know! For now I thank you for visiting de Kijkkast and hope to see you back soon! XXX Annette


De volgende "halte"is bij: 
Next stop is at:
>>>DENA<<<
 in the USA!


Bloghoproll:

>Shannean Moncrieff (Australia)


  • Tanja Kolar (Germany)
  • Zoe Tant (UK)
  • Annette Elias (Netherlands)
  • Dena Rekow (USA)
  • Beate Wacker (Austria)
  • Aude Barbara (France)
  • Barb Stewart (Canada)
  • Fiona Carson ( New Zealand)


  • Wat heb ik gebruikt:
    Stempels: Sailing Home
    Papier: Cardstock: Soft Suede, Balmy Blue, Whisper White
                 DSP: Come Saile Away
    Inkt: Soft Suede, Balmy Blue
    Dies: Smooth Sailing Dies, Layering Ovals Framelits
    Embellishments: Bakerstwine-Sahara Sand/Nicht of Navy, Magnolia Ribbon Pack
    Tools: Stampin'Sponges, Big Shot, Bone Folder