***This Blogpost is in English and Dutch!***
Welkom bij deze bloghop van het International Totally Techniques Designteam! We hebben ook deze
maand weer een leuke techniek "uitgediept" en laten je samen diverse voorbeelden zien!
Leuk dat je er bent!
Welcome to this Bloghop of the International Totally Technique Designteam! This month we have chosen another fun technique again and together we will show you several examples of it! Happy to see you here!
Deze keer werken we met de Faux Silk Techniek!
This time we will work with the Faux Silk Technique!

Het is een techniek waarmee je mooie achtergronden kunt maken, en die -zoals de naam van de techniek al verklapt- lijkt op zijde!
It is a technique for making nice backgrounds, that -as the name of the technique already says- looks like silk!
 \
Alhoewel het op zijde lijkt, komt er geen centimetertje zijde aan deze techniek te pas! Het is een gave, al oudere techniek, die we vandaag in een nieuw jasje gaan steken!
Although it looks a bit like silk, there isn't a single inch of Silk involved in this technique! It is an older technique, but the fun thing of older techniques that you can keep giving them a new look!

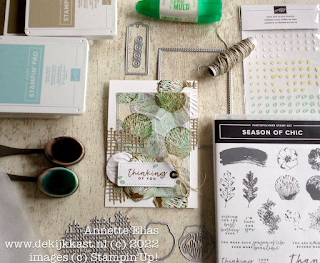
Vandaag heb ik er mijn eigen draai aan gegeven. En ik gebruikte er deze geweldige nieuwe set voor! Season Of Chic! In deze set zitten afbeeldingen met een Grungy uiterlijk, waarmee je het hele jaar door vooruit kunt! De bijpassende Chic Dies passen perfect bij de Grungy look van de set! Deze producten zijn te vinden in de nieuwe jaarcatalogus!
Today I have given the technique a summery look. The set I used for my project is Season Of Chic! In this set are several images with a grungy look, which cover all the seasons of the year. The matching Chic Dies complement the grungy look! This bundle can be found in the new Annual Catalog!

In een stap voor stap beschrijving laat ik je zien hoe ik deze kaart maakte!
In a step by step instruction I will show you how I made this card!

Het is ontzettend leuk om te doen!
It is so much fun to do it!


Eerst kleurde ik een stuk Basic White Cardstock met Blending Brushes en inkt in de kleuren Pool Party en Crumb Cake. Dit hoeft niet heel perfect te zijn, het is even een kleuraccent dat later voor een leuk contrast zorgt.
First I coloured a piece of Basic White Cardstock with Blending Brushes and ink in Crumb Cake and Pool Party! It doesn't have to be perfect! It is nice to get some contrast later.


Toen pakte ik er de schelpstempels bij. Deze zijn bedoeld om in twee stappen te stempelen, en zo deed ik hier eerst de basis in Mint Macaron, en dan de details in Soft Suede.
First I took the shell stamps, They are meant to stam in two steps. So I first stamped the basic stamp in Mint Macaron, and then the details in Soft Suede.


Voor deze techniek is het nodig het hele papier te voorzien van een plaklaagje. Maar om te voorkomen dat de inkt zou uitlopen deed ik dat hier door dun Multi Purpose Liquid Glue op mijn Silicon Craft Sheet aan te brengen en daar dan het papier op te leggen en even aan te drukken! En klaar is kees!
For this technique you have to make the whole paper sticky. To make sure I would not make the ink run while adding the Multi Purpose Liquid Glue I added a thin layer on a Silicon Craft Sheet and pressed my coloured paper onto the glue


Terwijl het gekleurde papier even lag te drogen nam ik een stuk Tissuepapier, dat ik laatst vond in de verpakking van een nieuw jurkje ;o) Ik kreukelde het in elkaar en weer uit elkaar, maar ik maakte het niet te glad. Ik leegde het gekreukelde papier op mijn gekleurde paneel en drukte het licht aan. Hoe meer rimpeltjes hoe beter. Ik gebruikte een schoon clearblock om het nog iets meer aan te drukken. Daarna draaide ik het paneel om en knipte al het overtollige tissue papier weg.
While the coloured paper was drying a bit, I took a piece of Tissuepaper that I found in the packaging of my new dress ;o) I crincled it up and folded it open, but not too much, I wanted to keep wrinkles! I layed the crincled paper om the coloured paper en lightly pressed it into the glue. The more wrinkles the better! I used a clean clearblock to press some more. Then I turned the panel and cut away all the excess paper


Op het paneel herhaalde ik vervolgens het stempelen van de beide schelp stempels, net als ik in de voorgaande stap had gedaan. Ik liet hier en daar de afbeeldingen een beetje overlappen. Het moest er liefst een beetje "willekeurig"uitzien! Door de kreukeltjes krijg je geen perfecte afdrukken, maar dat is hier juist leuk! Na het stempelen stanste ik met de Stitched Rectangle Dies een mooi stuk uit het paneel.
On this panel I repeated the stamping with both sheel stamps, just like in an earlier step. I made the images overlap here and there and tried to let it look "random". The wrinkles in the paper don't allow you to stamp the images perfectly, but that is exactly what we want here! After the stamping I diecut a nice part of the panel with the Stitched Rectangle Dies.

En dit is het paneel in de Faux Silk techniek! Het ziet en voelt echt zijdeachtig, en door het stempelen op en onder het papier krijg je een supergaaf diepte effect! En... door de druk van de Stampin'Cut & Emboss machine wordt het prachtig glad gewalst! Dat is dus een heel toffe "bijwerking"!
This is the panel in the Faux Silk technique. It really feels and looks silky! And the stamping on and under the toplayer gives lots of fun depth! And... because of the pressure of the Stampin'Cut & Emboss Machine the paper is perfectly flattened! Such a great side effect!


Ik stempelde en stanste wat extra schelpjes, en maakte ook met de geweldige detailstansjes mooi witte schelpen. Met de geweldige structuur stans maakte ik wat mooie netachtige structuren, en ik stempelde een tekst uit de set die ik met de Tailor Made Tags Dies uitstanste.
I stamped and diecut some extra shells, and also made some white detailed shells with the details dies. With this gorgeous structure die I diecut a few fun detailed pieces. I also stamped a text and diecut it with the Tailor Made Tags Dies.

Tijd om alles bij elkaar te voegen!
Time to assemble all the elements!


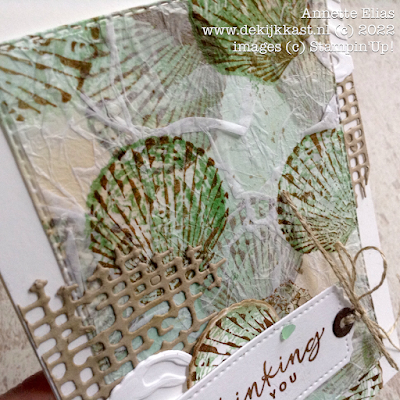
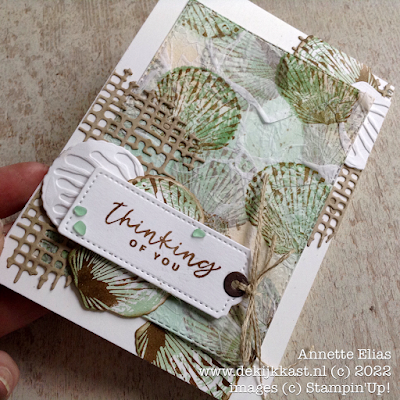

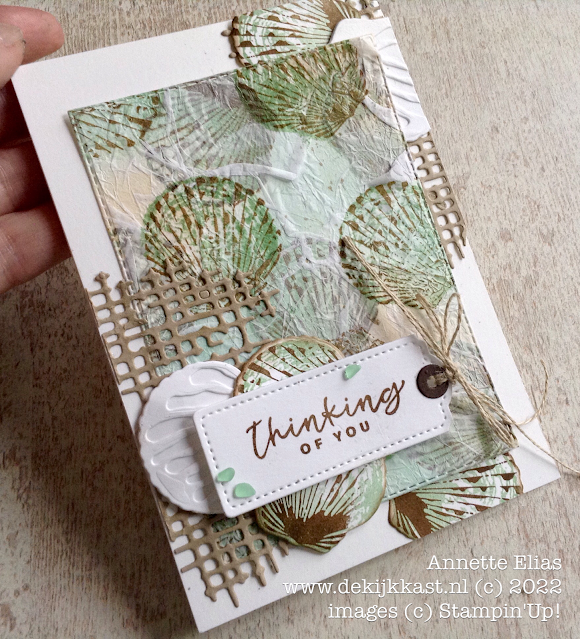





De open structuren kwamen op de hoeken van de kaart!
The open structures were added in the corners of the card.

En de hoeken kleede ik verder aan met de gestanste schelpen en tenslotte het label!
Wat Faux Sea Glass Shapes en wat Linen Thread passen natuurlijk naadloos bij het strandsfeertje van deze kaart! Dat maakt het net af!
And the corners were now furter decorated with the diecut shells and on top of them I added the label!
Some Faux Sea Glass Shapes and some Linen Thread fit perfectly with the beachlook of this card!

En de gemaakte achtergrond geeft zo veel diepte en structuur!
And the background gives so much depth and structure!
Wat een gewellllldige set is dit, Season of Chic echt een fantastische aanwinst! Ik houd van de grungy look!
Such a gorgeous set to work with! Season of Chic is such a valuable addition to my stamp collection! I just love that Shabby Chic, grungy look!

En wat een goeie match is het met deze Faux Silk Technique! Zo leuk om deze techniek weer eens toe te passen!
And isn't it a great match with this Faux Sil TEchnique? It was so much fun using this technique again!
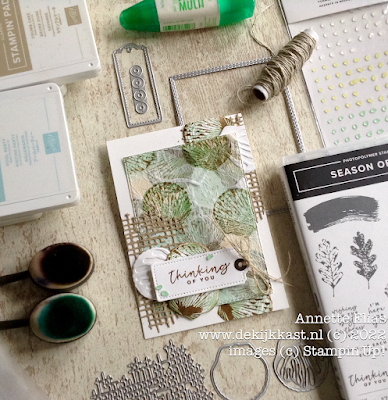

Maar natuurlijk is deze techniek op veel meer manieren en variaties toe te passen! Leuk om uit te proberen!
But ofcourse you can match it with so many more sets! It is fun to try it!

Heel erg leuk dat je vandaag bij de Kijkkast bent komen kijken! Heb je vragen? Stel ze mij gerust! Onderaan dit bericht vind je een lijst met alle gebruikte producten, en deze zijn allen te bestellen bij de Kijkkast! Ik help je graag!
Dan is het nu tijd om verder te hoppen, de links naar de andere designers vind je hier onder! Heel veel plezier alvast, en hopelijk tot snel! XXX Annette
I really love the fact you visited de Kijkkast today! Please just ask when you have any questions! Below you will find a list of all the products I used. All new products can be ordered through de Kijkkast. I will be happy to help you!
I now invite you to hop to the other designers to see what they made. Have fun, and feel free to visit de Kijkkast any time you like! XXX Annette💚Wat heb ik gebruikt:
Stempels: Season Of Chic
Papier: Cardstock: Thick Basic White, Basic White, Crumb Cake, Early Espresso
Recycled vloeipapier
Inkt: Crumb Cake, Soft Suede, Pool Party, Mint Macaron
Dies: Chic Dies, Stitched Rectangle Dies, Tailor Made Tags Dies
Embellishments: Faux Sea Glass Shapes, Linen Thread
Tools: Stampin'Cut & Emboss Machine, Blending Brushes, Silicon Craft Sheet

Eerstvolgende (MEE)besteldagen
Maandag 31 mei om 19.00 uur
Maandag 6 juni om 19.00 uur

De Kijkkast-MEI-actie: Gebruik de actuele hostcode 3PXBVB2W
en ontvang bij een bestelling vanaf 85 euro
nu gratis een hele rol Back & White Gingham Ribbon t.w.v. 8,50!
TIP: Bestel je voor 200 euro of meer mag je voor 10 procent van je bestelbedrag


💓De allerbeste DEAL: Het Stampin'Up! Startpakket!💓
Kies voor 175 euro producten uit en betaal slechts 129 euro
Laat dit vervolgens gratis (zonder verzendkosten!) naar je huis versturen.
Je krijgt hierbij ook nog gratis catalogi ed meegestuurd!
en bestel -als je dat wilt- voortaan je eigen stempelmaterialen met altijd minstens 20 procent korting!

Actie, alleen van 3 tm 31 mei:
Krijg bij je startpakket GRATIS IN-COLOR producten twv 81 euro!
💓Lijkt dit jou ook een topidee? Neem snel contact met mij op! Dan help ik je verder!💓

Catalogus aanvragen:

Wil jij de dikke nieuwe Jaarcatalogus en/of Minicatalogus ontvangen? Vraag ze nu bij mij aan!
Klik HIER voor alle info!
Kijkkast Thuisworkshops!


Binnenkort te boeken, de nieuwe Happy at Home Workshopbox!!
Meld je snel aan!
Wil je ook een supercomplete Kijkkast WORKSHOP doen vanuit je eigen huis?
Klik hier voor alle info over de >> Happy-At-Home Workshopbox! <<
en spaar voor gratis producten!
***Met diverse Clubvoordelen ;o)***