Posts tonen met het label Stylish Christmas. Alle posts tonen

zondag 9 december 2018

Kerst maar dan een beetje anders... *Kre8tors Bloghop theme Christmas*

*This blogpost is in Dutch and English!*


Hallo, en welkom bij de Kre8tors Bloghop!

Hello and welcome, to the Kre8tors bloghop!

Afbeelding kan het volgende bevatten: tekst

Thema van de maand is: Kerstmis!!

Theme of this month is: Christmas!!

Ik had zin om even een andere niet-traditionele kerstlook te maken. Ik koos voor moderne kleuren met daarbij zilveren accenten  en een flinke dosis "Grunge"!

I felt like making a different "Christmaslook", so I used Non traditional modern colors with silver accents and a good portion of "grunge"!

Ik had er zo'n lol in dat ik bijna niet kon stoppen. Dus ik maakte een hele stapel!

I had so much fun that I could hardly stop! So I made a stack of cards!

 Ik zal kort omschrijven hoe ik ze maakte!

I will add a short desription of how I made them!

Stylish Christmas Clear-Mount Stamp Set

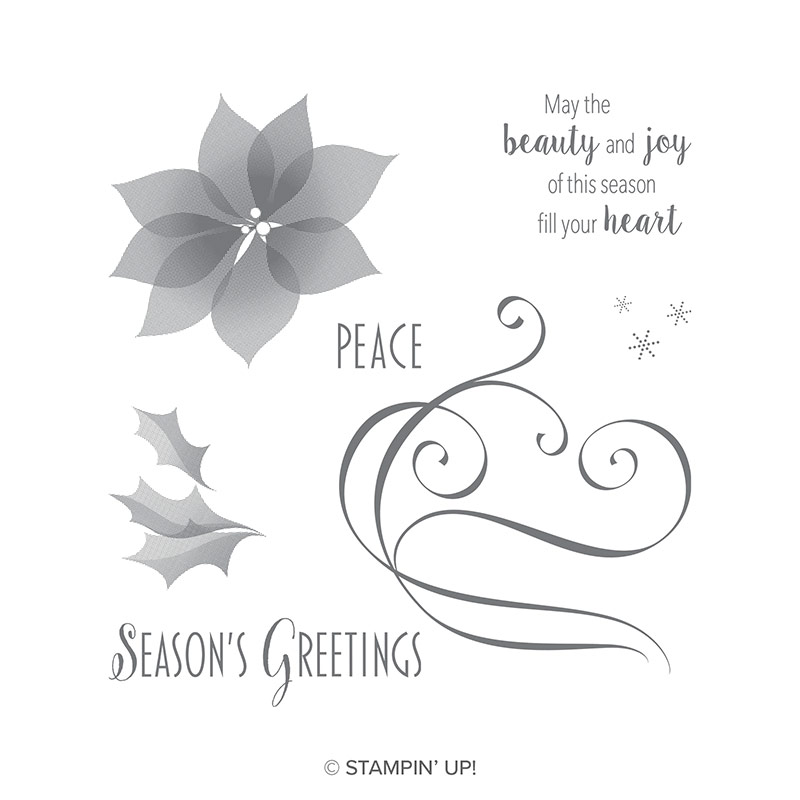
De hoofdrol in deze kaarten wordt gespeeld door de prachtige stempelset Stylish Christmas. Dit is een "Distinktive"stempelset wat wil zeggen dat het detail en diepte effect in de stempels ongeevenaard is. Het lijkt net of de afdruk van de Poinsetttie en het blad in lagen gestempeld is maar dat is niet het geval. Dit laagjeseffect zit in de stempel "ingebouwd"!

The mainpart is played by de beautiful stampset Stylish Christmas. This is a "distinktive"stampset. The Poinsettia and the leaf look as if they were layered but this is all "built in"the stamps. This gives optimal depth and structure to the stamped images.

https://stampinup-content.azureedge.net/images/EC/147794G.jpg

De andere set die ik gebruikte is de Buffalo Check achtergrondstempel. Een prachtige set uit de Herfst-Wintercatalogus. ( nu dus nog verkrijgbaar!) Deze keer heb ik de stempel op een flink "grungy"manier toegepast.

 The other stamp I used is the Buffalo Check backgroundstamp. It is in de Seasonal Catalog. It is a beautiful and versatile stampset which I used in a grungy way this time.


Ik begon met het maken van een hele stapel achtergrondjes met De Buffalo Check stempel. Ik beinkte de stempel en depte hem af met keukenrol, of ik depte het papier slechts heel licht in/op de beinkte stempel. Daardoor kreeg ik een lekker ruig en stoer effect.

I started with making a stack of backgrounds with the Buffalo Check stamp. I inked the stamp and removed part of the ink with a tissue, or I touched the ink only very lichtly with my paper. This way I got me a pile of grungy imperfect checked backgrounds.

 Ook stempelde ik een aantal kerstrozen in Highland Heather and Gorgeous Grape en knipte die uit. Daarna deed ik het zelfde met de blaadjes en de Granny Apple Green inkt.

I also stamped a number of Poinsettia's in Highland Heather and Gorgeous Grape and fuzzy cut them. I did the same with the leaves and Granny Apple Green Ink.


En toen was het gewoon een kwestie van snijden, schuiven, composities maken, dingen toevoegen en weglaten tot ik tevreden was met het resultaat. Ik voegde een portie zilver toe door de Swirlstempel steeds met versamart te stempelen en dan te heat-embossen met zilver embossingpoeder. Ook kwamen er op alle kerstrozen wat Metallic Pearls in zilverkleur.


After this it was just a matter of cutting, sliding, arranging, adding and removing elements until I was happy wiith the result. On each card I added silver by stamping the swirlstamp with versamark and then heat-embossing it with Silver Embossingpowder. Also on every Poinsettia I added some Metallic Pearls in Silver.


 Elke kaart werd een beetje anders, ik ging uit van de stukjes en elementen die ik op mijn tafel had liggen.

Every card became a bit different. I just used what I had laying on my table.


 En ik leefde me ook lekker uit met de teksten door ze op verschillende manieren te verserken en ook woordjes zelf te combineren tot mijn eigen teksten.

I also went creative with the sentiments. I used them in different ways and also made my own by making new combinations with parts of different sentiments in the set.


Met de laatste restjes maakte ik nog wat van mijn zo geliefde kaartformaatje: de Finchies!

With the last leftover bits I made some of my well loved card size, the Finchies!


Makkelijk te maken kaartjes die er toch origineel uitzien!

Easy to make card which still look a bit different from the normal Christmascards!

Het zilver geeft het net een vleugje Chic!

The silver adds a bit of "chic"

 Anders maar nog steeds kersterig toch? Welke kaart vind jij het leukst geworden? Ik ben heel benieuwd en hoor het graag! Laat het me weten in een reactie onder deze post, dan loot ik volgende week en stuur ik misschien jou wel je favoriete kaart toe!

Different but still Christmassy, don't you think? Which card do you like the most? Let me know in a reaction. I will toss next week and maybe you will be the one I will pick to send you your favourite card.


Ik hoop dat je weer wat inspiratie hebt opgedaan! Het zou heel leuk zijn als je me liet weten wat je van deze stijl vindt. Mocht je vragen hebben of iets willen bestellen mag je natuurlijk altijd even CONTACT opnemen! Superbedankt voor je bezoekje en graag tot snel! xxxAnnette

I hope I gave you some new inspiration! I'd love to hear what you think about this style! If you have any questions please feel welcome to contact me!! Thanks voor visiting de Kijkkast and feel welcome to come back soon! xxxAnnette


De volgende "halte"in deze bloghop is bij: /Next  stop in our bloghop is at:Geen automatische alt-tekst beschikbaar.


Ik ben benieuwd wat voor feestelijks zij gemaakt heeft!
I Look forward to see what fun project she made!

Roll Call List


Annette Elias ( Hier ben je nu, you are here now!)


Wat heb ik gebruikt/ Used Products:
Stempels: Stylish Christmas, Buffalo Check
Papier: Whisper White, Thick Whisper White, Highland Heather, Gorgeous Grape
Inkt: Gorgeous Grape, Highland Heather, Granny Apple Green, Versamark
Embellishments: Metallic Pearls, Silver Embossingpowder
Pons: Circle Tab
Tools: Heat Tool, Embossing Buddy, Paper Snips


Eerstvolgende (mee)besteldagen:
Maandag 10 december om 19.00 uur
Donderdag 13 december om 19.00 ( Laatste meebestelling die gegarandeerd voor de kerst binnen is!)


-O-O-

en spaar voor gratis producten!
***Met diverse Clubvoordelen ;o)***

2018-2019 JAARCATALOGUS


Wil jij graag de jaarcatalogus en/of de NIEUWE voorjaarscatalogus ontvangen?? 
Vraag er eenvoudig eentje aan door mij een EMAIL te sturen
Of doe een bestelling in december, dan voeg ik hem er gratis bij!

2018 HERFST/WINTER CATALOGUS


zaterdag 24 november 2018

Thinking Outside Of The Box Bloghop: Triangel-doosje (met stap voor stap tutorial)

*This Blogpost is in Dutch AND English!*


Welkom bij de NOVEMBER Bloghop van het internationale Thinking Outside of the Box-Design Team!
Je bent hier zojuist begonnen, of je bent hier gekomen via Carrie, mijn Britse stempelcollega.

Hello and welcome to the NOVEMBER Bloghop of the Thinking Outside of the Box Design Team! You just started this bloghop here, or you got here through Carrie, my fellow demonstrator from England


Deze keer maken we Triangeldoosjes. Een Triangeldoosje heeft altijd iets speciaals, alleen al door zijn driehoekige vorm!

This month we all make Triangular boxes. A triangel box always has something special, thanks to its unusual shape!


Aangezien de kadootjesmaand er aan komt, wilde ik een doosje maken waar ik meteen een kadootje in kon doen. Een van de kadootjes die ik toch wel regelmatig kado geef is een mooie PEN! Dat vroeg dus om een lang en smal doosje!

Since the month of presents is coming, I wanted to make a box in which I could put a gift rightaway. One of the presents I do give regularly is a PEN! So I had to come with a long and skinny one!


 En hier zie je goed de triangelvorm

And here you can see its triangel shape!


Het doosje heeft een schuifhulsje als sluiting. In dit geval zit er een Wink of Stella Glitterbrush in. Een perfect december-kadootje voor creatieve vriendinnen! Maar natuurlijk past ook een normale Balpen, Vulpen of Marker prima!

The box is closed with a slider. In this case I put a Wink of Stelle Glitterbrush in it, which makes it a perfect decembergift for all my crafty friends! But ofcourse any other normal pen will fit too!

En natuurlijk vertel ik weer hoe ik het maakte, zodat jij  er ook mee aan de slag kunt!

And of course I will tell you how I made it, so you can make it too!

Het Doosje/The Box

Voor het doosje heb je een stukje Very Vanilla Thick Cardstock nodig van 21 bij 9 cm.
Dit ril je op 2,5-5-en 7,5 cm

For the box you need a piece of Very Vanilla Thick Cardstock of 21 x 9 cm. 
Score this at 2,5-5-en 7,5 cm


 Nu neem je het cardstock in de breedte en rilt dit op 2 cm van elke zijkant

Now take the cardstock horizontally and score it at 2 cm from both sides


Draai je cardstock om, en bestempel het cardstock met Lovely Lipstick and Shaded Spruce
maak je geen zorgen over de witte lijntjes die nu zichtbaar worden. Dit draagt bij aan de vintage look ;o)

Now turn the cardstock and stamp the cardstock with Lovely Lipstick and Shaded Spruce ink. Don't worry about the white lines that appear. This gives a nice vintagelook!

 Ik gebruikte hiervoor de Stempelset Stylish Christmas! (deze staat in de jaarcatalogus!) 

I used the beautiful Stampset Stylish Christmas for this! (from the annual Catalog)

Draai het cardstock weer om. Leg het met het smalste strookje naar je toe en knip de twee gemarkeerde vlakjes weg

Turn the cardstock again, lay it in front of you with the smallest part closest to you and cut away the marked lines


Markeer nu bij de overgebleven zijvlakjes het midden zoals op de foto is aangegeven en trek de lijnen zoals ik daar heb gedaan

Now mark the middle of the leftover "squares" as shown on the picture below and draw lines like I did.


Knip nu de stukjes weg zoals op onderstaande foto te zien is.

Now cut away pieces as shown on the picture below.


Draai je cardstock weer om, vouw alle lijnen goed scherp met je bonefolder en inkt alle vouwlijntjes en zijden met Lovely Lipstick inkt en een Stampin'Sponge

Now turn back the cardstock to the other side, burnish all the lines with your bonefolder, and sponge all the folded lines and sides with Lovely Lipstick ink and a Stampin'Sponge


Zet het doosje in elkaar door de driehoekige flapjes op elkaar te plakken met wat Tear& Tape Adhesive

Now finish the box by putting the triangular flaps together with some Tear&Tape Adhesive.


De sluiting/ The slider

Voor het schuifhulsje dat als sluiting dient heb je een stukje Lovely Lipstck Cardstock nodig van 6 x 9,5 cm. Ril dit op 2,7 - 5,4 - 8,1 cm. Doe wat Tear&Tape op het kleinste deeltje.

For the slider you need a piece of Lovely Lipstick Carstock of 6 x 9 cm and score this at 2,7 - 5,4 - 8,1 cm. Put some Tear & Tape on the smallest part.


Ril goed alle lijntjes en plak de huls in elkaar.

Burnish all the lines and shape it into a slider.


Decoratie/Decoration

Neem een reststukje Very Vanilla Cardstock, Stempel de kerstroos en twee keer de blaadjes, knip deze uit met een klein randje er om heen en spons de randjes met de zelfde inkten.

Take a leftover piece of Very Vanilla Cardstock, stamp the Poinsettia and twice the leaves and fuzzycut them. Sponge the edges a bit with the same colors


Vorm de bloem en blaadjes een beetje door ze licht te kreuken en de randjes om te krullen MBV je Bonefolder. Stempel een tekst naar keuze (deze komt uit de set Great Joy) en pons deze uit met de Classic Label Pons. Nu ga je deze onderdelen plakken op je schuiver/huls. Het is handig om deze dan even om je doosje te doen, zodat je de weet waar je ze kunt plaatsen.

Shape the flower and leaves by crumpling them lightly, and curl the edges a bit with a Bonefolder. Nu stamp a sentiment that you like (this one is from the set Great Joy) and punch it out with the Classic Label Punch. Now attach all the parts to the slider. It is best to put this slider on your box when you do that. That way it is easier to see where to put them.


Zorg dat de onderkant plat blijft zodat je doosje goed plat kan blijven staan. Als je het leuk vindt kun je de kerstbloem en blaadjes nog een licht glimmertje geven met je Wink of Stella Glitterbrush, en er een paar Metallic Pearls op doen

Make sure the bottomside stays flat, so the box will stand up better. If you like you can give the Poinsettia and leaves some glamour by adding some Wink of Stella. And you can also add some Metallic Pearls to finish it off!

En nu...

And now...
 ...is het tijd om je prachtige kadoosje te vullen met je kado!

....it is time to fill your lovely giftbox!

 Het sluit perfect....

It closes perfectly.....


... en blijft netjes dicht door de mooie sluiting!

.... And stays nicely closed by the Slider!

 Zorg dat je zelf nog even van je creatie geniet voor je je kadootje weggeeft ;o)

Make sure you enjoy your project yourself for a little while before you give it away ;o)


Met deze verpakking heb je van een simpel kado iets speciaals gemaakt!

With this box you turned something ordinary into a lovely gift!

 Nou, ik hoop dat je het weer een leuk en inspirerend ideetje vindt! Natuurlijk kun je de looks steeds aanpassen aan de gelegenheid en de persoon! Ik zou zeggen, leef je uit! Enne...... laat mij eens weten wat je er mee gemaakt hebt... en of de werkbeschrijving duidelijk was voor je. Daar kan ik weer mee verder! Je vindt onderaan dit bericht een lijst met alle producten die ik heb gebruikt. Heb je vragen, heb je iets nodig of kan ik je ergens mee helpen? Neem dan gerust even contact met me op!

Well, I hope you enjoyed my project! Ofcourse you can always adapt the look to the circumstances and the person who receives it. Be creative and have fun! And... Please let me know, what did you make, did you like it and was my description clear enough. This really helps me for future tutorials and ofcourse it is also just fun to hear from you!


 Nu is het tijd om verder te "hoppen".... De volgende "Blog-Hop-Halte" in deze bloghop is bij DENA in the USA! Heel veel plezier! 
xxx Annette Elias- de Kijkkast

Now it is time to hop to the next designer.... Next "Blog-Hop-stop"is at DENA from the US! Have fun! 
xxx Annette Elias-de Kijkkast


En voor het geval je verdwaalt:
And In case you get lost:
1 Tanja Kolar (Duitsland)
2 Yoshiko Endo ( Japan)
3 Carrie Bates (UK)
4 Annette Elias (Nederland) 
5 Dena Rekow (Verenigde Staten)
6 Beate Wacker (Oostenrijk)
7 Barb Stewart (Canada) 

Gebruikte producten:
Stempels; Stylish Christmas, Great Joy
Papier: Cardstock: Thick Very Vanilla, Lovely Lipstick, Very Vanilla
Inkt: Lovely Lipstick, Shaded Spruce
Pons: Classic Label Punch
Embellishments: WInk of Stella Glitterbrush, Metallic Pearls
Tools: Stampin'Trimmer, Bone Folder


Eerstvolgende (mee)besteldagen:
Zaterdag 24 november om 12.00 uur
Maandag 26 november om 12.00 uur
Woensdag 28 november om 12.00 uur
Maandag 3 december om 19.00 uur


-O-O-

ALLEEN IN NOVEMBER: Snowflake Showcase!
Exclusieve Producten-Speciale Kijkkast-aanbieding!


Van 23 tm 28 november... Online Extravaganza!


en spaar voor gratis producten!
***Met diverse Clubvoordelen ;o)***

2018-2019 JAARCATALOGUS


Wil jij graag de nieuwe jaarcatalogus en/of herfstwintercatalogus ontvangen?? 
Vraag er eenvoudig eentje aan door mij een EMAIL te sturen

2018 HERFST/WINTER CATALOGUS