Posts tonen met het label Daffodil Daydream. Alle posts tonen

zondag 20 februari 2022

Funfoldkaart met Daffodil Afternoon - Kre8tors Bloghop - Sale-A-Bration

*This blogpost is in Dutch and English!*

Hallo, en welkom bij de Kre8tors Bloghop!

Hello and welcome, to the Kre8tors bloghop!


Na een poos weggeweest te zijn (had je ons gemist?) is deze bloghopgroep in 2022 weer gestart met een toffe inspiratieronde! Superleuk om weer met deze geweldige groep te hoppen!

After being away for a while( Did you miss us?) this bloghopgroup has started hoppig again in 2022 with a nice  round of inspiration. So much fun to hop with this group!

Deze keer is ons thema de Sale-A-Bration! Deze duurt immers nog maar 8 dagen, dus laten we nogmaals wat SAB items in het zonnetje zetten, nu het nog kan!

This time our theme is Sale-A-Bration! This period lasts only 8 more days, so this is a good moment to highlight some of those gorgeous SAB items once again, now we still can!

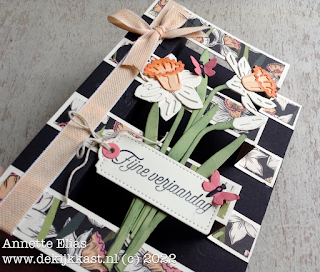
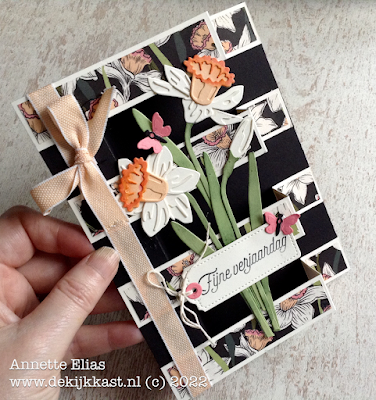
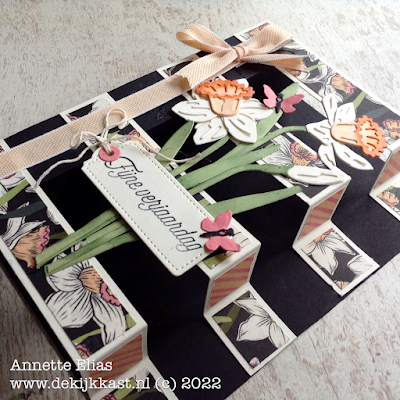
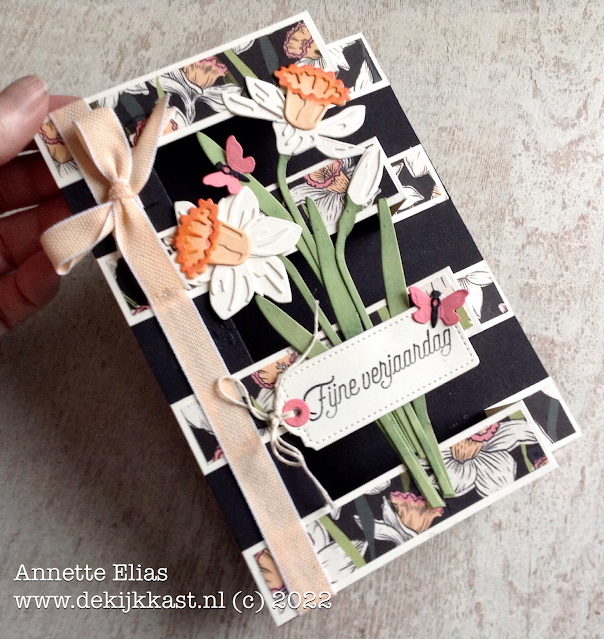
Ik ben vandaag voor een gave funfoldkaart gegaan met een vleugje voorjaarsgevoel, dankzij de geweldige narcissen!

I went for a cool funfoldcard, with a little bit of spring in it, thanks to the lovely daffodils!
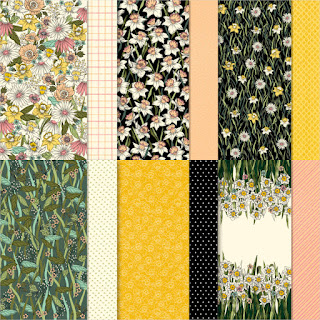

Het Sale-A-Brationproduct dat ik gebruikte is het Daffodil Afternoon Designpapier! Geweldig, fleurig maar ook een beetje sjiek papier, door de kleurstelling en de combinatie met het zwart! Dit hele pak papier kun je nu nog gratis uitkiezen bij een bestelling vanaf 60 euro! Ik vind het zulk mooi papier!

The Sale-A-Bration Item that I used is the Daffodil Afternoon Designer Series Paper. It is lovely, flowery but also classy looking paper, thanks to the colours and the addition of the black! This whole pack of paper can be chosen with a 60 euros order. it is so pretty!


Ik koos een van de mooie dessins uit het pak papier uit en gebruikte dat voor mijn kaart.Zoals je wellicht inmiddels wel weet vind ik het ontzettend leuk om af en toe nieuwe kaartvormen te bedenken. Deze keer wilde ik een kaartmodel maken dat ik een poos geleden al had bedacht, maar nu veranderde ik dat model een beetje naar een slimline formaat. 
Daardoor werd het een quadruple Z-fold kaart! En ja, ik maakte er een video van!

I chose one of the beautiful designs from the paperpack and used that for my card. As you may know by now I love designing new cardshapes and -folds every now and then. But for this hop I wanted to try a cardshape I designed a few years ago ago, and adapted to a slimline size. 
Now it is a quadruple Z-fold card! And yes I made videotutorial of it!
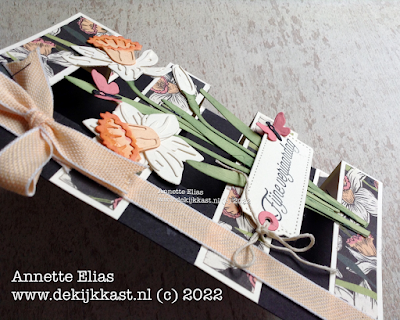

Het is een kaart die veel dimensie heeft en het geeft het gevoel dat de bloemen "zweven". Het gebruik van Basic Black Cardstock voor de basis vergroot dit effect.

It is a card that has a lot of dimension and it gives the illusion of "floating"flowers. The use of Basic Black for the base makes the effect even bigger.
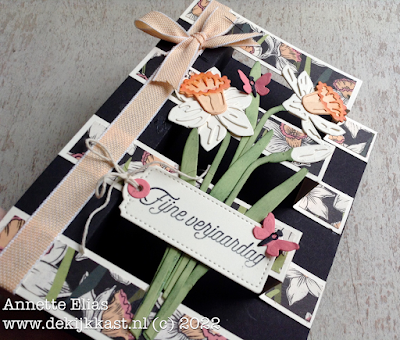

Het designpapier bracht ik in strookjes aan. En daarop kwamen de prachtige, uitgestanste narcissen.

The Designer Series paper was added in straps and on top of that i added the diecut daffodils.
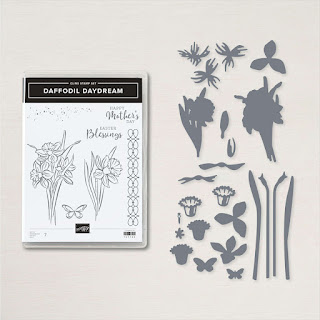

De bloemen maakte ik met de Daffodil Dies, die onderdeel zijn van de Daffodil Daydream set. Stempels en stansen zijn te vinden in de Mini Catalogus en zijn natuurlijk een "perfect match"met het designpapier!

The flowers were diecut with the Daffodil Dies, that are part of the Daffodil Daydream Bundle. Stamps and dies are both in the Mini Catalog, and ofcourse they are a perfect match with the Designer Series Paper!
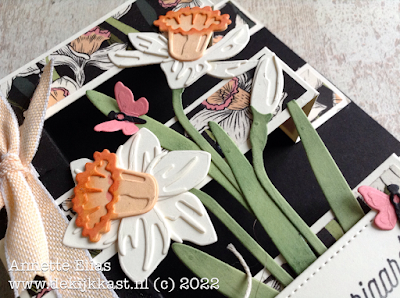

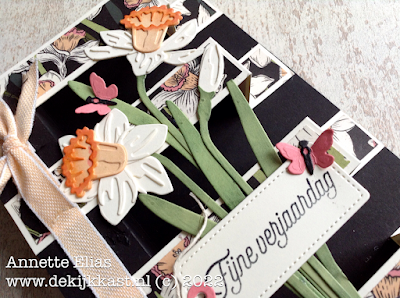
Je stanst de bloemen in laagjes uit en vervolgens plak je deze heel simpel in elkaar! Om het nog mooier bij dit vel DSP te laten passen sponsde in de randjes van de "trompet" met inkt en een Sponge Dauber.

The flowers are diecut in lauers and then added on top of eachother and asembled. To make it match even better with the sheet of DSP I sponged the edges of the "trumpet"part with ink and a Sponge Dauber.
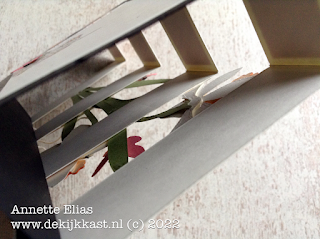

Hier zie je hoe de bloemen gedeeltelijk LOS blijven, en gedeeltelijk aan de stroken worden bevestigd.

Here you can see how the flowers stay loose partly, and are partly adhered to the strokes.
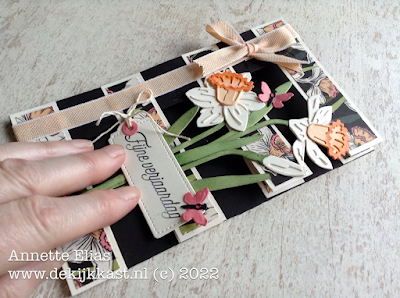

Natuurlijk kun je de kaart heel simpel plat vouwen en in een slimline enveloppe versturen.

Ofcourse you can simple flatten the card and put it in a slimline envelope.


Aan de achterzijde is plaats om je persoonlijke boodschap te schrijven. Natuurlijk decoreerde ik dit paneel met een gestempelde afbeelding uit de Daffodil Daydream stempelset, die ik kleurde met Stampin'Blends. Als extra afwerking voegde ik een strook van het DSP toe. Zo is alles weer een geheel.

On the backside of the card there is plenty of room to write a personal message. Ofcourse I decorated this panel with a stamped image from the Daffodil Daydream stampset, and coloured this with Stampin'Blends. As an extra touch I added one more strip of the DSP so it all matches nicely.
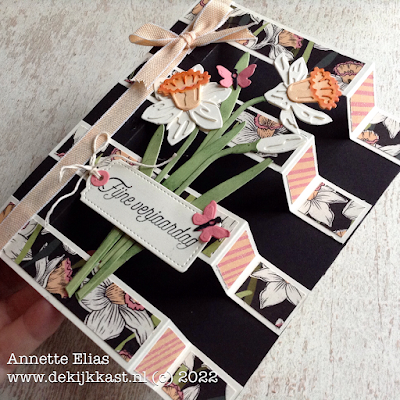

Om net even een leuk accentje te hebben voegde ik kleine stukjes van contrasterend DSP toe. Natuurlijk komen de kleuren van de streepjes overal weer in terug.

To add a fun accent I added little pieces of a contrasting design of the DSP. Ofcourse the colours are also found in other parts of the card.
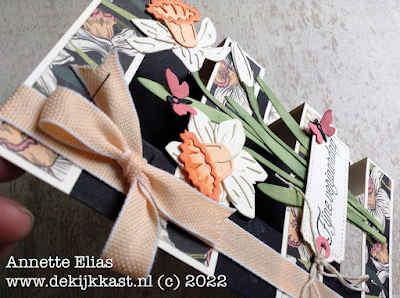

Aan de linkerkant wikkelde ik prachtig lint om de kaart, en voegde ik een zwierige strik toe!

On the left I added some beautiful ribbon, and a lushious bow.


De tekst komt uit de set Speciale Momenten. Ook dit is een Sale-A-Brationgeschenk! Ik stanste het label uit met de Tailored Made Tag Dies. De leuke vlindertjes zitten trouwens bij de Daffodil Dies, en die heb ik hier en daar op de kaart terug laten komen.

The text is from Speciale Momenten (Special Moments) which is also a Sale-A-Bration Item! I diecut it with the Tailor Made Tags Dies. The fun butterflies are made with the Daffodil Dies and you can find a few more of them on the card.
Mijn plan was hierbij een maakvideo toe te voegen, maar door de storm (ik denk tenminste dat dat de oorzaak is....) lukt he mij niet tijdig de video te uploaden. Deze zal ik dus nog toevoegen, samen met de maten!! Kom daarvoor dus vooral nog even terug! Ik blijf proberen!

My plan was to add a video here, to explain how I made this card. But due to the storm here in the Netherlands (well I presume that is why it doesn't work) I was not able to upload the video in time. I will add this later, together with all the cutting sizes etc. So please come back for that! I will keep on trying!

Dit was weer mijn project voor vandaag! Dankjewel voor je bezoek aan de Kijkkast! Voel je welkom terug te komen en mocht je vragen hebben of producten willen bestellen, kun je me altijd even een MAIL sturen! Ik help je graag! Voor nu, een fijne dag, en veel plezier met het vervolg van deze feestelijke bloghop! XXX Annette

This was my project for today! Thank you for visiting de Kijkkast! Feel welcome to come back any time, and in case you have any questions, feel free to send me an EMAIL! It is my pleasure to help you! For now... have a nice day and have fun with this happy bloghop! XXX Annette


De volgende bloghopbijdrage is bij:
Next Bloghopstop is at:

Hop nu naar/now hop to MELISSA

Roll Call List


Melissa Tennison (US)

Libby Fens - Libby Stamps (US)

Tricia Butts (US)

Angie McKenzie (US)

Sharon Dalton (AU)

Ann Krucek - Corner of Plaid and Paisley (US)

Amy Grendel (CA)

Deb Naylor - The Flying Stamper (US)

Kirsteen Gill (US)

Jacqui Lawrence (UK)

Laura Mackie (UK)

Annette Ball (CA)

Kristie Wilson (US)

Jan Musselman (US)

Dana Sullivan - The Stampin' Chic (US)

Cheryl Taylor - Stampin n Crafting with Cheryldiana (UK)

Sandra Roberts (UK)

Annette Elias - De Kijkkast (NL)


Wat heb ik gebruikt:

Stempels: Daffodil Daydream, Speciale Momenten (SAB)

Papier: Cardstock: Basic Black, Thick Very Vanilla, Pale papaya, Flirty Flamingo

             DSP: Daffodil Afternoon DSP (SAB)

Inkt: Memento Black, Flirty Flamingo, Evening Evergreen

Dies: Daffodil Dies, Tailor Made Tags Dies

Stampin'Blends: Pale Papaya, Flirty Flamingo, Old Olive, Gray Granite

Embellishments: Woven Ribbon Pale Papaya, Bakers Twine Essentials Pack


Eerstvolgende (MEE)besteldagen
Maandag 28 februari om 19.00 uur (LAATSTE SAB meebestelling!)
Maandag 7 maart om 19.00 uur


De Kijkkast-FEBRUARI-actie: Gebruik de actuele hostcode R2ERKYUS
en ontvang bij een bestelling vanaf 95 euro 
nu gratis een pakje Bleu Adhesive Backed Gems twv 9,75 euro!

TIP: Bestel je voor 200 euro of meer mag je voor 10 procent van je bestelbedrag 
GRATIS producten uitkiezen!


Het grootste stempelfeest van het jaar!
Sale-A-Bration, 4 januari-28 februari
Het grootste stempelfeest van het jaar!
Kies GRATIS producten uit bij je bestelling! 
Klik HIER voor alle info!


💓De allerbeste DEAL: Het Stampin'Up! Startpakket!💓
Kies voor 175 euro producten uit en betaal slechts 129 euro
Laat dit vervolgens gratis (zonder verzendkosten!) naar je huis versturen.
Je krijgt hierbij ook nog gratis catalogi ed meegestuurd!
*****Tijdens de Sale-A-Bration mag je bij dit alles 
tijdelijk ook nog twee gratis stempelsets naar keuze uitkiezen!****
en bestel -als je dat wilt- voortaan je eigen stempelmaterialen met altijd minstens 20 procent korting!
Lijkt dit jou ook een topidee? Neem snel contact met mij op! Dan help ik je verder!


Catalogus aanvragen:


Wil jij de nieuwe catalogus, SAB brochure en/of Minicatalogus ontvangen? Vraag ze nu bij mij aan!
Klik HIER

  
NIEUWE THUISWORKSHOP!!!! Meld je NU aan!
Binnenkort te boeken, de nieuwe Happy at Home Workshopbox!!
Meld je snel aan!
Wil je ook een supercomplete Kijkkast WORKSHOP doen vanuit je eigen huis?
Klik hier voor alle info over de  >> Happy-At-Home Workshopbox! <<


en spaar voor gratis producten!
***Met diverse Clubvoordelen ;o)***


vrijdag 17 december 2021

Een fijne verjaardag met nieuwe stempels - Totally Techniques - Shaving Foam Stencilling Technique

  ***This Blogpost is in English and Dutch!***


Welkom bij deze bloghop van het International Totally Techniques Designteam! We hebben ook deze
maand weer een leuke techniek "uitgediept" en laten je samen diverse voorbeelden zien!
Leuk dat je er bent!

Welcome to this Bloghop of the International Totally Technique Designteam! This month we have chosen another fun technique again and together we will show you several examples of it! Happy to see you here!


Deze keer staat als techniek Shaving Foam Stencilling centraal! Eigenlijke een combinatie van twee technieken! je maakt er aparte, en lekker kleurige achtergronden mee!

This time our focus is on the Shaving Foam Stencilling technique! In fact it is a combination of two techniques! It makes lovely, colourful backgrounds!


Ik maakte er een lekker frisse lentekaart mee, met prachtige stempels, maar daarover straks meer!

I made a fresh springlike card with it, with some lovely stamps, but  I will tell you more about that later!


Want laten we beginnen bij de techniek en de materialen die je daarvoor nodig hebt:
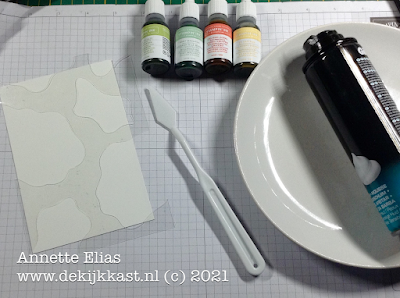
Cardstock, een stencil/mask, Palette Knives, Ink Refills, een schoon bordje, en een bus scheerschuim.

Let's start with the technique and the products you need for it:
Cardstock, a stencil/mask, Palette Knives, Ink Refills, a clean plate, and a spraycan with Shaving Foam.


Ik wilde dat de achtergrond bij de stempels zou passen die ik zou gaan gebruiken.

I wanted to make a background that would look nice with the stamps I was planning to use!


Daarom maakte ik mijn eigen mask. Ik gebruikte hiervoor een stuk Window Sheet dat iets groter is dan een kaart. Hieruit stanste ik verschillende openingen met de Layering Diorama Dies. Dat zijn leuke grillige natuurlijke vormen! Het mask legde ik klaar op een paneeltje van Basic White Cardstock.

That is why I made my own mask/stencil! To make this I took a piece of window Sheet that is bigger than cardsize and diecut organic shapes from it with the Layering Diorama Dies. I like the natural looking shapes. I stacked the stencil on a piece of Basic White Cardstock


Daarna deed ik op het bordje een dotje scheerschuim. Let er op dat je echt scheerschuim gebruikt en geen gel, als je ook deze techniek wilt doen. En neem niet te veel, want je hebt echt maar heel weinig nodig! Ik spreidde met een Paletmes het schuim uit tot een dun maar wel dekkend laagje.

Then I put some Shaving Foam on the plate. When you want to do this technique too, make sure you don't use gel but foam, or it will not work. And you need only very little of it. I spread it out to get a thin but well covering layer with a Palette Knive.


Ik koos vier kleuren Ink Refills die passen bij de sfeer van de stempelset. Pear Pizzazz, Mint Macaron, So Saffron en Calypso Coral.

I chose four ink Refills in colours that would match nicely with the stampset: Pear Pizzazz, Mint Macaron, So Saffron and Calypso Coral.


Met de eerste Refill kleur druppelde ik in het scheerschuim. Dit herhaalde ik met de andere kleuren, net zo lang tot alle vier kleuren op het schuim lagen.

With the Refills I added drops on the Shaving Foam, like in the first picture, until I had done this with al four of them.


Met het puntje van het Paletmes ging ik nu door het schuim heen zodat de kleuren een beetje begonnen te marmeren.  

With the tip of the Palette Knive I started drawing randomly through the foam until all the drops started looking like this. A bit like marble!


Nu komt het echte kliedergedeeltje ;o) Ik veegde het Paletmes eerst goed schoon, en vervolgend pakte ik er een laagje mee op van het schuim. Dit begon ik uit te smeren over het gemaakte Mask en het cardstock, tot alles bedekt was. Dit werkt alsof je boter uitsmeert op een broodje. ;o)

Now comes the messiest part ;o) I first cleaned the Palette Knive and picked up a bit of the top layer of the shaving foam, I started spreading this over the Stencil and Cardstock, a bit like spreading butter over a sandwich. ;o)


Het is belangrijk het mask goed stil op het cardstock te laten liggen. Je kunt dit vastplakken met Washi Tape, maar vasthouden kan ook. Ik schraapte zo alle overtollige schuim van het geheel af. Daarna veegde ik, met het stencil nog steeds op z'n plek, alles schoon met een stuk keukenpapier.

It is important to keep the stencil on its place. You can use Washi tape for this, or you can just hold it with your hand. I scraped all the foam off the mask and the cardstock, and with the Stencil still on the right place, I whiped up all the leftovers with some kitchenpaper.


Nu pas kun je het stencil weghalen, en zien hoe het geworden is!

Now it is time to remove the stencil and see what you made.


Omdat ik nog een heleboel inkt en schuim over had, maakte ik meteen nog maar een paar achtergrondjes!

Since I still had some foam and ink left, I decided to make some more of these backgrounds.


En omdat ik weggooien zonde vind, besloot ik meteen nog twee vellen a 4 te vullen met de allerlaatste restjes. Leuk om op een later moment een keer te gebruiken.

I since I don't like wasting things, I decided to use the last leftovers to colour two sheets of a 4 cardstock to make backgrounds I could use some other time!

Maar  eigenlijk vond ik die achtergronden wel mooi bij elkaar passen dus ik sneed panelen in twee maten en zette de randjes flink aan met inkt en Blending Brushes, en een Sponge Dauber.

But I happened to love these backgrounds toethes so I cut them to different sizes and inked the edges with Blending Brushes and a Sponge Dauber.


Samen versterken de lagen elkaar! En ze passen goed bij de bloemen!

The layers go very well together! And with the flowers!


De stempelset Daffodil Daydream is een splinternieuwe stempelset die in de aankomende Mini Catalogus staat die vanaf 4 januari geldig is. 
Narcissen, ik houd er zo van! Ze stralen vrolijkheid, frisheid en uitbundigheid uit! De afbeeldingen kleurde ik in met inkt in dezelfde kleuren als de achtergrond in combinatie met Blender Pens. Daarna stanste ik ze uit met de Daffodil Dies. Met de Wink of Stella Glitterbrush laat ik ze lekker glitteren.

The stampset Daffodil Daydream is a brand new stampset from the coming new Mini Catalog that will start on the 4th of january. 
Daffodils, I just love them so much. They are such happy, fresh, and exuberant flowers! The images were coloured with Blender Pens and Ink in the same colours as in the background. Then I diecut them with the Daffodil Dies. With the Wink of Stella Glitterbrush I made the flowers look glittery


In de nieuwe  Daffodil Daydream stempelset zit ook een prachtige randstempel. Deze heb ik in de achtergrond subtiel terug laten komen.
De Nederlandse tekst is OOK nieuw, deze komt uit de nieuwe aankomende Sale-A-Brationset Speciale Momenten! Met de Treasured Tags Pick a Punch maakte ik er een sierlijk label van.

In the new Daffodil Daydream stamset is also a lovely borderstamp. I used this very lightly in the background.
The Dutch text is new too, it is from the new Sale-A-Brationset Speciale Momenten! With the Treasured Tags Pick a Punch  I turned it into a lovely label.


Ik ben erg blij met hoe de kleurrijke achtergrond past bij de afbeelding. Het geeft hier een beetje een Shabby Chic effect! Ik moet eerlijk zeggen dat ik van te voren niet wist wat ik van deze techniek zou vinden... maar het was echt veel leuker dan ik had verwacht! Het is heel makkelijk en heel effectief! En het is veel minder kleiderig dan ik van te voren had gedacht. Dankzij het schuim is alles heel makkelijk weg te vegen en schoon. En..... je kaarten gaan er heerlijk door ruiken!

I love the way the colourful background matches with the flowers! It gives it a Shabby Chic effect! I must say in advance I did know whether I would like this technique, but now I know that I do! It is very easy, and very effective! And it was less messy than I expected. Thanks to the foa it easily rinses of your hands and tools, and.... it makes you cards smell great! ;o)


Heel erg leuk dat je vandaag bij de Kijkkast bent komen kijken! Heb je vragen? Stel ze mij gerust! Onderaan dit bericht vind je een lijst met alle gebruikte producten, en deze zijn allen te bestellen
bij de Kijkkast! Ik help je graag!
Dan is het nu tijd om verder te hoppen, de links naar de andere designers vind je hier onder! Heel veel plezier alvast, en hopelijk tot snel! XXX Annette

I really love the fact you visited de Kijkkast today! Please just ask when you have any questions! Below you will find a list of all the products I used. All new products can be ordered through de Kijkkast. I will be happy to help you!
I now invite you to hop to the other designers to see what they made. Have fun, and feel free to visit de Kijkkast any time you like! XXX Annette
💚

You are invited to the Inlinkz link party!

Click here to enter

Wat heb ik gebruikt: 
Stempels: Daffodil Daydream, Speciale Momenten (SAB)
Papier: Cardstock: Basic White, Thick Basic White, Pear Pizzazz
Window Sheet
Inkt: Black Memento, So Saffron, Pear Pizzaz, Calypso Coral
Refills: So Saffron, Pear Pizzaz, Calypso Coral, Mint Macaron
Pons Treasured Tags Pick a Punch
Dies: Daffodil Dies, Layering Diorama Dies
Embellishments: Flowers for Every Season Ribbon Combo Pack, Wink of Stella Glitterbrush
Tools: Palette Knives, Stampin'Cut & Emboss Machine, Blender Pens, Sponge Daubers
Overig: Scheerschuim, keukenrol

Eerstvolgende (MEE)besteldagen
Maandag 20 december om 19.00 uur
Maandag 27 december om 19.00 uur


De Kijkkast-DECEMBER-actie: Gebruik de actuele hostcode 9TEH4GVZ
en ontvang bij een bestelling vanaf 75 euro 
nu gratis een pakje Holiday Rhinestones twv 7,25 euro!

TIP: Bestel je voor 200 euro of meer mag je voor 10 procent van je bestelbedrag 
GRATIS producten uitkiezen!


Bestel de uitlopende producten voor ze op zijn. Klik op de afbeelding om te zien wat er beschikbaar is!

Klik op de afbeelding en kijk in het koopjesrek (hoge kortingen!)


💓De allerbeste DEAL: Het Stampin'Up! Startpakket!💓
Kies voor 175 euro producten uit en betaal slechts 129 euro
Laat dit vervolgens gratis (zonder verzendkosten!) naar je huis versturen.
Je krijgt hierbij ook nog gratis catalogi ed meegestuurd!
en bestel -als je dat wilt- voortaan je eigen stempelmaterialen met altijd minstens 20 procent korting!
Lijkt dit jou ook een topidee? Neem snel contact met mij op! Dan help ik je verder!


Catalogus aanvragen:

Wil jij de nieuwe catalogus en/of Minicatalogus ontvangen? Vraag hem nu bij mij aan!
Klik HIER

  
NIEUWE THUISWORKSHOP!!!! Meld je NU aan!
Nu online: Happy-At-Home workshopbox nr 3!
Meld je snel aan!
Wil je ook een supercomplete Kijkkast WORKSHOP doen vanuit je eigen huis?
Klik hier voor alle info over de  >> Happy-At-Home Workshopbox! <<


en spaar voor gratis producten!
***Met diverse Clubvoordelen ;o)***