Posts tonen met het label Whimsy & Wonder Specialty DSP. Alle posts tonen

zaterdag 13 november 2021

Zachte kleuren, zachte kaart... Ink Stamp Share Bloghop - Stampers Showcase

 *This blogpost is in Dutch & English*


Hallo en hartelijk welkom bij de Ink Stamp- Share Showcase Bloghop! Dit is een extra bloghop naast onze maandelijkse versie.
In deze bloghop laten de deelnemers zien waar ze zoal mee bezig zijn. Een heel vrije invulling dus! Dat levert altijd een heerlijk afwisselende berg inspiratie op!

Hello and welcome to the Ink Stamps Share Bloghop. This is an extra bloghop, that comes next to our usual monthly Hop. In this Showcase Bloghop you can just show, whatever you have been working on! So there will probably be lots of versatility!


Vandaag post ik een kerstkaart, waarop ik lekker ben gaan mixen en matchen met diverse producten!

Today I show you this christmascard, on which I have been mixing and matching with several products!


Daar rolde deze zachte, vriendelijke moderne kaart uit!

The result is a soft, friendly modern card!


Door producten te combineren die je niet meteen bij elkaar zou verwachten krijg je een verrassend resultaat!

By combining products that you would not soon pick together you get a fun, surprising result.


De gebruikte stempelset is Poinsettia Petals en daarbij de Poinsettia Dies. Beiden zijn te vinden in de Jaarcatalogus!

The stampset I used is Poinsettia Petals, together with the matching Poinsettia Dies. Both are in our Annual Catalog.

Door de kerstster te stempelen in Polished Pink en Mint Macaron krijgt de bloem meteen een heel eigentijdse look.

By stamping the Poinsettia in Polished Pink and Mint Macaron the flower immediately gets a different, modern look!

Door dit te combineren met het Whimsy & Wonder Specialty DSP voer je de pastelkleuren verder door!

By matching this with the Whimsy & Wonder Specialty DSP you add more pastel colours


Ik maakte de achtergrond door met diverse stukjes van dit DSP een achtergrond samen te stellen, als een soort collage.  Gewoon een beetje schikken tot je tevreden bent, en hoplakee!

I made the background by taking some different sized pieced of the dsp and make a background with them, like a small collage.


Ik voegde wat kleine Rhinestones toe in Polished Pink en ook wat spettertjes die ik maakte met een Stampin'Write Marker.

I added some small Polished Pink Rhinestones, and some splattering, made with a Stampin'Write Marker.

De tekst stempelde ik op een reststrookje Blushing Bride Cardstock, waar ik een banner van maakte met de Banners Pick a Punch en deze vervolgens mooi golvend, een beetje losjes op de kaart plakte. Dit geeft een leuk, speels effect.

The text was stamped on a scrap piece of Bllushing Bride cardstock, whick was turned into a banner with the Banner Pick a Punch. I added it in a wavy shape on my card. This has a lovely a playful effect

Door onderdelen op te bollenen te verhogen krijg je een gaaf diepte effect! Met een Bone Folder bolde ik de blaadjes en de banner op.

By shaping and raising bits you get lots of dimension! With the Bone Folder I shaped the petals and the banner.


Door overal de zelfde kleuren toe te passen, past alles uiteindelijk toch prima met elkaar!

By using the same colours for all elements everything seems to blend together nicely.


Ook deze kaart is onderdeel van mijn persoonlijke "kerstkaartenchallenge"waarin ik allerlei kersttrends omzet in kerstkaartjes! Deze keer kan ik trend nummer 26 wegstrepen, Magical Sweet Pastel Christmas! Deze trend is speels en zoetig, en bevat veel pastels in combinatie met wit en wat glitter en mag best een beetj4e gek zijn. Volgens mij zit dat er allemaal in!
Klik HIER om alle kaarten uit deze serie te zien!

This card is also part of my personal "Christmascardchallenge" in which I turn all kind of Christmastrends into Christmascards. This time I can take trend 26 from my list. This was Magical Sweet Pastel Christmas This trend is playful, quirky and sweet, and has lots of pastels together with white and some glitter. I think that goal is achieved! Click HERE to see all the cards in this serie.

Hoe leuk is het om zo elke keer weer een heel nieuwe stijl te maken met de Poinsettia Petals stempelset. Ik maakte er eerder al diverse voorbeelden mee, een tutorial en een video! Klik HIER om alle voorbeelden met deze set te bekijken!

How fun is it to make a totally different cardstyle each time with this Poinsettia Petals set! Earlier I made lots of different other projects with this set, a tutorial and a video! Click HERE to see all those other projects with this set!


Zo, dit was dan weer mijn bijdrage voor deze keer!
Natuurlijk zijn alle gebruikte producten te bestellen bij de Kijkkast.
Onderaan deze blogpost vind je een lijst met alle gebruikte materialen en kleuren.
Heb je vragen? Mail dan gerust even. Ik help je graag verder!
Wil je een reactie plaatsen? Hartstikke leuk, en dankjewel alvast!
En dan is het nu tijd om verder te hoppen naar de volgende creatie!
Heel veel plezier, dank voor je bezoek aan de Kijkkast, en tot snel! XXX Annette

So, this was my attribution for this Bloghop! I hope you liked it!
All the used products can be ordered through de Kijkkast.
Below this blogpost is a list of all the used products.
When you have any questions about this project, please just ask, I will be happy to help you!
Would you like to post a reaction? I would really appreciate that!
And now it is time to continue this bloghop.
Have fun hopping, thanks for visiting de Kijkkast, and I hope you will come back here soon! XXXAnnette


Hop nu naar/Now hop to Victoria

Roll Call
Jo Blackman
Angie McKenzie
Sue McDonald
Kim Price
Alison Carter
Polly Crouch
Cindy Mitchell-Clark
Karen Egan
Gez Carpenter
Linda Moore
Mo Rootes
Jill Chapman
Tricia Butts
Susan Simpson
Deb Naylor
Annette Elias
Victoria Littlewood

Wat heb ik gebruikt:
Stempels: Poinsettia Petals
Papier: Cardstock: Basic White, Thick Basic White, Polished Pink, Mint Macaron, Blushing Bride
             DSP: Whimsy & Wonder Specialty Designer Series paper.
Inkt: Polished Pink, Blushing Bride, Mint Macaron
Dies: Poinsettia Dies
Stampin'Write Marker Polished Pink
Embellishments: Rhinestone Basic Jewels, 2021-2023 In Color Jewels, Open Weave Ribbon Polished Pink
Tools: Stampin'Cut & Emboss Machine, Blending Brushes, Bone Folder


16-18 november PRIJZENSTORM! 
Veel korting op cardstock, kaartkarton en stansen!
Klik op de afbeelding voor alle info!

Eerstvolgende (MEE)besteldagen
Maandag 15 november om 19.00 uur-> UItgesteld naar:
Dinsdag 16 november om 19.00 uur en
Donderdag 18 november om 19.00 uur


De Kijkkas-OKTOBER-actie: Gebruik de actuele hostesscode UAF3VDP7
en ontvang bij een bestelling vanaf 95 euro 
nu gratis een pakje Wonderful Gems twv 9,75 euro!

TIP: Bestel je voor 200 euro of meer mag je voor 10 procent van je bestelbedrag 
GRATIS producten uitkiezen!


De allerbeste DEAL: Het Stampin'Up! Startpakket!
Kies voor 175 euro producten uit en betaal slechts 129 euro
Laat dit vervolgens gratis (zonder verzendkosten!) naar je huis versturen.
Je krijgt hierbij ook nog gratis catalogi ed meegestuurd!
en bestel -als je dat wilt- voortaan je eigen stempelmaterialen met altijd minstens 20 procent korting!
Lijkt dit jou ook een topidee? Neem snel contact met mij op! Dan help ik je verder!


Catalogus aanvragen:

Wil jij de nieuwe catalogus en/of Minicatalogus ontvangen? Vraag hem nu bij mij aan!
Klik HIER

  
NIEUWE THUISWORKSHOP!!!! Meld je NU aan!
Nu online: Happy-At-Home workshopbox nr 3!
Meld je snel aan!
Wil je ook een supercomplete Kijkkast WORKSHOP doen vanuit je eigen huis?
Klik hier voor alle info over de  >> Happy-At-Home Workshopbox! <<


en spaar voor gratis producten!
***Met diverse Clubvoordelen ;o)***


zondag 24 oktober 2021

Decoreren met restjes - 3d Trimmer Bloghop - Use your Scraps


*This blogpost is in Dutch & English*


Vandaag doe ik weer mee met deze gave Bloghop: De 3d Paper Trimmer Blog Hop!
Een bloghop vol doosjes en andere 3D projecten die gemaakt kunnen worden met die geweldige Stampin'Up Paper Trimmer!! Welkom, en leuk dat je komt kijken!

Today I join this Blog Hop again: The 3D Paper Trimmer Blog Hop!
A Blog Hop full of fun 3D projects that can be made with the awesome Stampin'Up! Paper Trimmer! Welcome, and I am happy to see you here!


Voor vandaag werd ons gevraagd iets met restjes te maken. En restjes... ach, die hebben we allemaal wel. toch? Maar wat doe je daar nou mee?

For today we were asked to make something on which you use some scraps. Well, don't we alle have them? But what can you do with them?


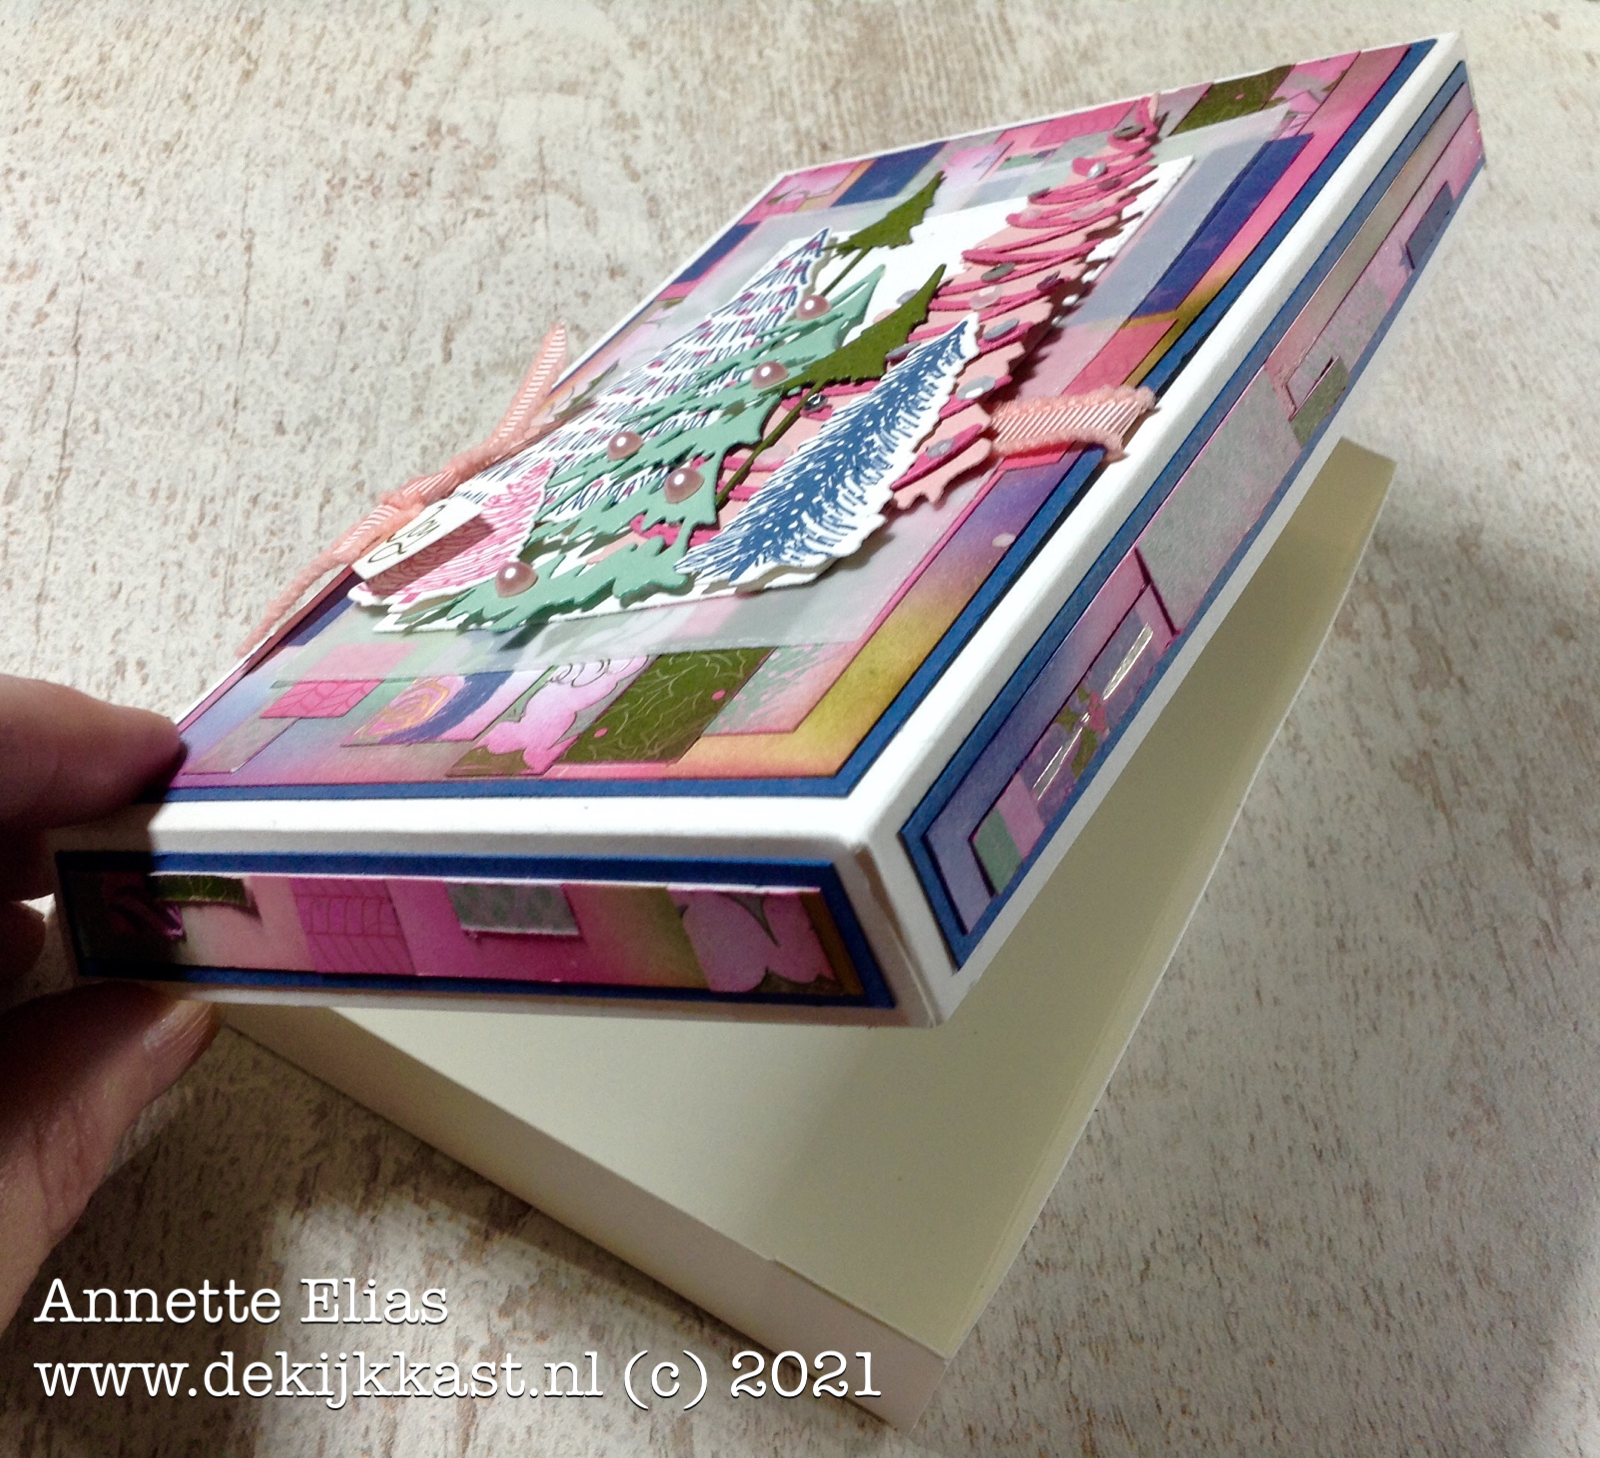
Deze keer gebruikte ik ze om een grappig kerstig doosje mee te decoreren!

Today I used them to decorate a funny Christmasbox!

Het werd eigenlijk een beetje een "gekkig"doosje! Maar eerlfijk gezegd vond ik dat juist wel leuk!;o)

In fact it became kind of a quirky one, but to be honest I don't mind about that at all ;o)


In deze blogpost laat ikje zien hoe ik mijn restjes omzette in mijn zelf gemaakte collagepapier, en hoe ik de doos maakte en afwerkte!

In this blogpost I will tell you how I turn my little leftovers into collagepaper, and how I made and finished this box


Mijn restjes komen allemaal uit dit pak Whimsy & Wonder Specialty Designer Series Paper. Zo weet ik sowieso dat alle stukjes bij elkaar passen. Dit ontzettend leuke, vrolijke kerstpapier is te vinden in de Mini Catalogus.

My scraps are all from this Whimsy & Wonder Specialty Designer Series Paper. Tat way I don't have to worry about mixing and matching, I know all pieces will match perfectly.


Ik nam kleuren inkt die bij mijn restjes passen, en een leeg stuk Basic White Cardstock. Dit vel kleurde ik met de inkt en de Blending Brushes. Dat hoeft helemaal niet zo netjes ;o) Daarna ging ik zorgvuldig alle restjes op het gekleurde vel plakken.

I took inkcolours that match my scraps and a blank piece of Basic White Cardstock. I coloured the cardstock with the ink and the Blending Brushes. This doesn't have to be tidy or perfect. Then I carefully glued the scraps on my coloured cardstock.


Daarna stempelde stanste en plakte ik diverse grappige kerstbomen, uiteraard ook weer in bijpassende kleuren. Hiervoor gebruikte ik de Whymsical Trees stempels en de bijpassende Christmastrees Dies, Net als het Designpapier is deze set te vinden in de Mini Catalogus. Zoals je ziet kun je er een grappig allegaartje aan bomen en boompjes mee maken. De set heeft een grappige, speelse stijl!

Next step was stamping, diecutting and glueing a bunch of funny Christmastrees, ofcourse again in matching colours. For this I used the Whymsical Trees Stampset and the matching Christmastrees Dies. Just as well as the DSP is in our MiniCatalogus. As you can see it is a funny, messy mix of playful and quirky trees. This set really has a whymsical style!


In de tussentijd had ik ook al mijn basisdoos gemaakt. Ik maakte hem uit een vel Thick Basic White Cardstock. Het is een heel simpel model, en hoe het in elkaar gezet wordt spreekt eigenlijk voor zich. De maten staan hier onder.

In the meantime I had also prepared my box already. I made it out of a sheet of Thick Basic White cardstock. It is a very simple box and when you cut & score it you will see how to assemble it. I wrote down the sizes below.

Cardstockmaat/ Cardstock Size: 21 x 29 cm
Ril op de lange zijde op / score on the long side at: 2 - 13,5 - 15,5 - 27 cm
Ril op de korte zijde op / score on the short side at 2 - 19 cm

Ik gebruikte mijn gemaakte collagepapier om de bovenzijde en de zijkanten van het doosje te bekleden.

I used the collagepaper that I had made to dress up the top and the sides of the box.


Om de bomen er lekker uit te laten springen stanste ik twee rechthoeken uit Vellum Cardstock en Basic White Cardstock, en die kwamen op de bovenkant van de doos.

The make the trees pop a bit more I diecut two rectangles from Vellum Cardstock and Basic White cardstock and adhered these on top of the box

En ik voegde oook nog wat mooi bijpassend lint toe!

And I also added some matching ribbon.


Ik schoof wat met de bomen tot ik tevreden was en plakte toen alles vast met Dimensionals, voor extra diepteeffect.

I moved the trees around until I was happy with the result and then adhered them all using Dimensionals to create depth.


Hier zie je goed hoe goed de bomen en de achtergrond met elkaar "Blenden"

Here you can see how well the trees and the background blend together.


Maar dat was ook niet zo moeilijk, want stempels, dies, het designpapier en ook het lint komen allemaal uit de zelfde Whimsy & Wonder Collectie! Alles is dus op elkaar afgestemd!

But that was not difficut at all. The stamps, the dies, the Designer Series Paper and even the ribbon are all from the same Whimsy & Wonder Suite collection! So they were made to match!


Zo gaat het doosje open, en het is groot genoeg om een kerstkadootje in te verpakken, of..... een leuk stapeltje bijpassende kaarten in te stoppen. Misschien ga ik dat laatste wel doen, ik was toch al zo fijn aan de slag met de materialen en heb er  nog volop ideetjes mee!!

This is how the box opens. It is big enough for a nice Christmasgift, or...... I could fill it with some matching Christmascards. I think I will go for that last option. It is so much fun to work with these products! And I still have so many more ideas!


Heel erg leuk dat je vandaag bij de Kijkkast bent komen kijken! Heb je vragen? Stel ze mij gerust!  Onderaan dit bericht vind je een lijst met alle gebruikte producten, en deze zijn allen te bestellen
bij de Kijkkast! Ik help je graag! 
Dan is het nu tijd om verder te hoppen, de links naar de andere designers vind je hier onder! Heel veel plezier alvast, en hopelijk tot snel! XXX Annette

I really love the fact you visited de Kijkkast today! Please just ask when you have any questions! Below you will find a list of all the products I used. All new products can be ordered  through de Kijkkast. I will be happy to help you! I now invite you to hop to the other designers to see what they made. Have fun, and feel free to visit de Kijkkast any time you like! XXX Annette

Hop nu naar Sonja/Now hop to Sonja


Elisabeth Pirolt - Little Lizzy’s Crafts (AT) - https://www.little-lizzys-crafts.at/2021/10/24/resteverwertung-beim-3d-paper-trimmer-blog-hop/
Angela Köber - https://stempelfamilie.blogspot.com/2021/10/3d-paper-trimmer-blog-hop.html
Annette Elias - De Kijkkast - NL https://dekijkkast.blogspot.com/2021/10/decoreren-met-restjes-3d-trimmer.html
Sonja Kindler - kreativ-mit-sonja (D) - https://kreativ-mit-sonja.de/3d-paper-trimmer-2021-10/

Wat heb ik gebruikt:
Stempels: Whymsical Trees
Papier: Cardstock: Thick Basic White, Basic White, Misty Moonlight, Mossy Meadow, Mint Macaraon, Blushing Bride, Polished Pink, Vellum
              DSP: Whimsy & Wonder Specialty DSP
Inkt: Misty Moonlight, Mossy Meadow, Mint Macaraon, Blushing Bride, Polished Pink, Sahara Sand
Dies: Christmas Trees Dies, Stitched Rectangle Dies
Embellishments: Pastel Pearls,  Flayed Grosgrain Ribbon Blushing Bride, Subtle Shimmer Sequins
Tools: Stampin Cut & Emboss Machine, Blending Brushes


Eerstvolgende (MEE)besteldagen
Maandag 25 oktober om 19.00 uur
Maandag 1 november om 19.00 uur


De Kijkkas-OKTOBER-actie: Gebruik de actuele hostesscode AC3CRFFG
en ontvang bij een bestelling vanaf 95 euro 
nu gratis een pakje Matte Decorative Dots twv 9,75 euro!

TIP: Bestel je voor 200 euro of meer mag je voor 10 procent van je bestelbedrag 
GRATIS producten uitkiezen!


De allerbeste DEAL: Het Stampin'Up! Startpakket!
Kies voor 175 euro producten uit en betaal slechts 129 euro
Laat dit vervolgens gratis (zonder verzendkosten!) naar je huis versturen.
Je krijgt hierbij ook nog gratis catalogi ed meegestuurd!
en bestel -als je dat wilt- voortaan je eigen stempelmaterialen met altijd minstens 20 procent korting!
Lijkt dit jou ook een topidee? Neem snel contact met mij op! Dan help ik je verder!


Catalogus aanvragen:

Wil jij de nieuwe catalogus en/of Minicatalogus ontvangen? Vraag hem nu bij mij aan!
Klik HIER

  
NIEUWE THUISWORKSHOP!!!! Meld je NU aan!
Nu online: Happy-At-Home workshopbox nr 3!
Meld je snel aan!
Wil je ook een supercomplete Kijkkast WORKSHOP doen vanuit je eigen huis?
Klik hier voor alle info over de  >> Happy-At-Home Workshopbox! <<


en spaar voor gratis producten!
***Met diverse Clubvoordelen ;o)***