Welkom bij deze bloghop van het International Totally Techniques Designteam! We hebben ook deze
maand weer een leuke techniek "uitgediept" en laten je samen diverse voorbeelden zien!
Leuk dat je er bent!
Welcome to this Bloghop of the International Totally Technique Designteam! This month we have chosen another fun technique again and together we will show you several examples of it! Happy to see you here!
Ook deze maand doen we weer iets leuks: Ink Smooching! Dat betekent dus heerlijk kliederen met inkt!
Again we will do something fun this month: Ink Smooching! That means getting messy with ink!
Ik houd er zo van!
I just love doing that!
Met deze techniek maak je namelijk supermooie achtergronden!
Ink Smooching is a way to make lovely inky backgrounds!
En daar kun je vervolgens de tofste dingen meee maken!
And then you can make fun things with these backgrounds
Voor het doen van deze techniek heb je een paar items nodig: Basic White Cardstock, inkten, een Stampin'Spritzer, een Heat Tool, een stukje Sheet, en een waterbestendige ondergrond.
To do this technique you need a few items: Basic White Cardstock, Inks, a Stampin'Spritzer, a Heat Tool, a piece of plastic sheet, and a waterresistant worksurface.
Eerst neem je de lichtste kleur inkt, die dep je op de sheet, de inkt spray je nat met water met behulp van een Stampin'Spritzer tot er druppels op de sheet liggen, en vervolgens draai je de sheet om, en druk je deze op het cardstock. Met je vingers kun je door op de sheet te drukken de inkt nog een beetje verdelen. Als je de sheet optilt kun je op een andere plek opnieuw de inkt op het papier drukken, tot de inkt op is. Daarna droog je het cardstock met de Heat Tool.
First you take the lightest ink colous and press the pad onto the sheet. The ink is sprayed wet with the Stampin'Spritzer and water until you can see the ink form drops on the sheet. Now you turn the sheet with the inky side down on the cardstock. By pressing with your fingers you can move the ink. You can lift up the sheet, and press it down again on an other part of the cardstock, until all the ink is used. Now dry the cardstock with the Heat Tool.
Dit herhaal je met de op een na lichtste kleur, maar nu gebruik je minder inkt, en minder water, zodat je echt vlekken krijg en niet te snel het hele cardstock bedekt.
Now I repeat the steps with the second lightest ink colour, but now you use less ink, and less water, so you get spots and splodges, instead of covering most of the cardstock.
Nog een keertje doe je dit met de volgende kleur. Je kunt nu stoppen, of nog verder doorgaan!
Again you do all the steps with the next colour. Now you can stop, or you can add some more!
Meestal zijn twee, of hoogstens drie kleuren wel genoeg, wil je het geen brei van kleuren laten worden. Maar als je zoals ik hier deed, kleuren gebruikt die naast elkaar in de kleurencirkel liggen, kun je wat meer doen. Ik voegde er dan ook een vierde kleur aan toe. Daarna droog ik alles heel grondig en is min achtergrond klaar om te verwerken.
Most of the times two or three colours are more than enough, when you don't want to make one big muddy mess of it. But when you choose colours that are close to eachother in the colourcircle, you can do more. So now I added a fourth colour. Now it is time to dry it all very thoroughly, and then the background is ready to turn it into some fun project.
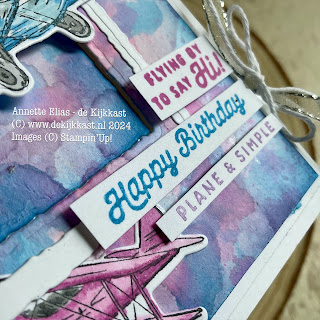
Hier heb ik het papier gedroogd, in heb heel licht de randjes aangezet met inkt en een Blending Brush, en het paneel op een stuk Basic White geplakt. het is kleurrijk en lekker kliederig, precies zoals het hoort.
Here you can see the dried paper, when the edges are lightly inked with ink and a Blending Brush, and the panel is adhered to some Basic White. It is colourful and messy, just as it should be!
Om wat diepte en definitie te krijgen plakte ik een frame op het paneel, dat ik gestanst had uit Basic White cardstock met de Deckled Rectangle dies. Met diezelfde stansen stanste ik uit het midden van het paneel een kleinere rechthoek waarvan ik de randjes beinkte.
To get some depth and defonition I adhered a frame on the panel, which I made with the Deckled Rectange Dies and Basic White cardstock. White the same dies I diecut a smaller panel from the centre of the big panel, and inked the edges of the small one.
Zo heb ik een perfecte basis voor de nostalgische vliegtuigjes!
This gives me fun base for those nostalgic planes!
Deze maakte ik met de nieuwe set Adventurous Sky!
I made these with the new set Adventurous Sky!
Ze lijken zo van de kaart te vliegen!
They seem to fly from the card!
De kleinere vliegtuigjes verwerkte ik bewust achter het frame, voor nog meer diepte!
I deliberately placed the smaller planes behind the frame to give even more dimension!
Ik kleurde ze in met Stampin'Blends, onze alcoholmarkers, natuurlijk in de kleuren van de achtergrond!
I colored them with Stampin'Blends, our alcoholmarkers, ofcourse in the colours of the background!
Kijk maar eens naar al die hoogtes. Heel subtiel, maar met veel effect!
Just look at all these heights. Very subtle, but so effective!
Ik bevestigde nog kleine uitgestanste propellors en een parel op de grootste vliegmasjien, voor wat extra detail. Zulke kleine elementen maken het net wat leuker!
I added small diecut propellors and a pearl, to give some more detail to the biggest plane. Details like that are such a nice addition!
De teksten van de set zitten vol leuke woordspelingen, dus ik gebruikte hier een leuk mixje om zo een eigen combinatie te maken.
The texts in the set are full of great verbal jokes, so I made a fun mix to make my own text with it.
Heel erg leuk dat je vandaag bij de Kijkkast bent komen kijken! Heb je vragen? Stel ze mij gerust! Onderaan dit bericht vind je een lijst met alle gebruikte producten, en deze zijn allen te bestellen bij de Kijkkast! Ik help je graag! Dan is het nu tijd om verder te hoppen, de links naar de andere designers vind je hier onder! Heel veel plezier alvast, en hopelijk tot snel! XXX Annette💚
I really love the fact you visited de Kijkkast today! Please just ask when you have any questions! Below you will find a list of all the products I used. All products can be ordered through de Kijkkast. I will be happy to help you! I now invite you to hop to the other designers to see what they made. Have fun, and feel free to visit de Kijkkast any time you like! XXX Annette💚
Welkom bij deze Stamping with Friends Bloghop! In deze bloghop krijg je wat verse stempelinspiratie van over de hele wereld! Uiteindelijk is dat een van de mooie kanten van deze fantastische hobby: De contacten en vriendschappen die je er door opdoet! afstanden en grenzen spelen hier geen rol!
Welcome to this Stamping with Friends Bloghop! In this hop we bring you some fresh stamping inspiration from all over the world! After all this is one of the big bonuses of this fantastic hobby: The contacts and friendships it brings! Distances and borders play no role here!
Vandaag zie je in deze bloghop allerlei projecten met de nieuwste In Colors voorbij komen!
Today you will see all kind of products with the newest In Colors in this hop!
Nou, op deze zomerse funfold kaart vind je bijna alle In Colors terug!
Well on this summery funfold card you will find almost all of them!
Ik houd van funfolds! Je kunt er zulke verrassende kaarten mee maken, ze zijn leuk om te maken en worden altijd blij ontvangen, en wat ik vooral zo leuk vindt: Je hebt vaak heel veel ruimte om al die vlakjes en flapjes lekker aan te kleden met papiertjes en decoratie! Ik houd er van!
I love funfolds! You can make surprising cards this way, they are fun to make, and they often are always happily received, and apart from that they often give lots of spaces and spots to decoratie with papers and embellishments! Love that!
Overal op de kaart komen bloemen terug! Zoals hier op het voorste paneel. Deze prachtige bloemen stempelde ik in vier stappen.
All over the card you will find lots of flowers. Like here on the front panel. These gorgeous flowers were stamped in four steps.
Hiervoor gebruikte ik deze weelderige Flowers of Beauty set van stempels en stansen! Er zitten zo ontzettend veel onderdelen in!
The stamps and dies I used today is this lush Flowers of Beauty set! There are so many elements in it!!
De losse bloemenstempels gebruikte ik ook op allerlei plekjes. Zowel voor achtergronden, als uitgestanst. De bloemen combineren prachtig bij het designpapier, en ik heb de gebruikte kleuren hier dan ook op aangepast!
The separate flowerstamps were used on several spots on this card. Both in background, as diecut to embellish! The flowers match perfectly with the DSP, and that is also because I chose the ink colours to match!
Kijk maar eens hoe mooi dit Unbounted Beauty, oftewel Bloemenliefde DSP is! Ik vind de kleuren en de watercolourachtige bloemen zo mooi!
Just look how pretty this Unbounted Beauty DSP is! I just love the colours and the watercolourlook of the flowers so much!
Maar deze kaart hoort natuurlijk niet plat en dicht te blijven. Tijd om de binnenkant te laten zien!
But this card was not intended to stay closed and flat! Time to show you the inside!
Als je de kaart opent beginnen er delen mee te bewegen.
When you open the card, elements start to move.
Lagen komen los van elkaar, je krijgt een diepte effect en er worden meer panelen zichtbaar.
Layers are separating, you get depth, and more panels become visible.
De kaart kan ook helemaal open, dan liggen de panelen die eerst achter elkaar lagen, nu naast elkaar.
The card can also be opened completely. Then you see the panels that were first laying on top of eachother are now laying side by side.
Maar ik denk dat het veel leuker is om de kaart rechtop te zetten! Denk je ook niet?
But I think it will be more fun to let this card stand up! What do you think?
Het verhoogde paneel aan de binnenkant versierde ik met gestempelde en uitgestanste bloemen, en natuurlijk een leuke lieve tekst in een leuk lijstje!
The raising panel on the inside was decorated with stamped and diecut flowers, and ofcourse a lovely text in a pretty little frame!
Deze maakte ik met deze set Liefde en Lichtpuntjes, de jawel NEDERLANDSTALIGE versie van de set Unbounded Love! De gave teksten die ook nog eens in een prachtig handschrift zijn uitgevoerd, en de beeldschone labels en framepjes die je op allerlei manieren met elkaar kunt combineren zijn echt fantastisch!
This text was made with the set Unbounded Love, of which I have the Dutch version here! The beautiful words in a lovely handwriting-style and the pretty labels and frames that can be layers, mixed and combined in endless ways are just fantastic!
Als decoratie stanste ik tenslotte een rits kleine bloemetjes uit het 2024-2026 In Color Glitterpapier! Ik verdeelde de bloemetjes over de kaart. Schitterend, letterlijk en figuurlijk!
To embellish it all even more I diecut a bunch of small flowers from the 2024-2026 In Color Glitterpaper and spreaded them all over the card. Simply glittery gorgeousness!
De beide stempelsets, de beide stanssets, het DSP en het glitterpapier komen allemaal uit deze fraaie suite collectie! Daar wordt een mens toch gewoon blij van?
Both stampsets, both dies sets, the DSP and the Glitterpaper are all from this gorgeous Suite Collection! It is instant happiness I think!
De 2024-2026 In Colors zijn zo lekker fris en vrolijk! Ik vind het een heerlijke aanvulling!
Deze funfold kaart maakten we ook tijdens een van de Kijkkast Stempelmomentjes! De gasten hebben er met heel veel plezier aan gewerkt!
The 2024-2026 In Colors are just so fresh and happy! They are a wonderful addition!
This funfold card was also made at a recent Kijkkast Stempelmomentje! The guest have had lots of fun making it!
Zo, dit was mijn bijdrage voor de Stamping with Friends Bloghop, en hopelijk vond je het leuk. Een reactie onder mijn blogpost stel ik altijd enorm op prijs! Alle gebruikte producten zijn via de Kijkkast te bestellen, en mocht je vragen hebben mag je altijd even contact met me opnemen. Ik help je met alle plezier! Via de links hieronder kun je de bloghop vervolgen! Dank voor je bezoek aan de Kijkkast, en heel graag tot snel! XXX Annette💓
Well, this was my attribution to the Stamping with Friends Blog Hop, and I hope you liked it. A reaction below my blogpost is always very much appreciated. When you have any questions, please feel free to ask, I will be happy to help you. Through the links below you can continue this bloghop!
Thanks for visiting de Kijkkast, and I hope to see you back soon! XXX Annette💓
Wat heb ik gebruikt:
Stempels: Flowers of Beauty, Liefde en Lichtpuntjes/Unbounded love
Papier: Cardstock: Pretty In Pink, Basic White, Berry Burst