
*This blogpost is in Dutch & English*

Vandaag doe ik weer mee met deze gave Bloghop: De 3d Paper Trimmer Blog Hop!
Een bloghop vol doosjes en andere 3D projecten die gemaakt kunnen worden met die geweldige Stampin'Up Paper Trimmer!! Welkom, en leuk dat je komt kijken!
Today I join this Blog Hop again: The 3D Paper Trimmer Blog Hop!
A Blog Hop full of fun 3D projects that can be made with the awesome Stampin'Up! Paper Trimmer! Welcome, and I am happy to see you here!

Voor vandaag werd ons gevraagd iets met restjes te maken. En restjes... ach, die hebben we allemaal wel. toch? Maar wat doe je daar nou mee?
For today we were asked to make something on which you use some scraps. Well, don't we alle have them? But what can you do with them?

Deze keer gebruikte ik ze om een grappig kerstig doosje mee te decoreren!
Today I used them to decorate a funny Christmasbox!


Het werd eigenlijk een beetje een "gekkig"doosje! Maar eerlfijk gezegd vond ik dat juist wel leuk!;o)
In fact it became kind of a quirky one, but to be honest I don't mind about that at all ;o)

In deze blogpost laat ikje zien hoe ik mijn restjes omzette in mijn zelf gemaakte collagepapier, en hoe ik de doos maakte en afwerkte!
In this blogpost I will tell you how I turn my little leftovers into collagepaper, and how I made and finished this box

Mijn restjes komen allemaal uit dit pak Whimsy & Wonder Specialty Designer Series Paper. Zo weet ik sowieso dat alle stukjes bij elkaar passen. Dit ontzettend leuke, vrolijke kerstpapier is te vinden in de Mini Catalogus.
My scraps are all from this Whimsy & Wonder Specialty Designer Series Paper. Tat way I don't have to worry about mixing and matching, I know all pieces will match perfectly.


Ik nam kleuren inkt die bij mijn restjes passen, en een leeg stuk Basic White Cardstock. Dit vel kleurde ik met de inkt en de Blending Brushes. Dat hoeft helemaal niet zo netjes ;o) Daarna ging ik zorgvuldig alle restjes op het gekleurde vel plakken.
I took inkcolours that match my scraps and a blank piece of Basic White Cardstock. I coloured the cardstock with the ink and the Blending Brushes. This doesn't have to be tidy or perfect. Then I carefully glued the scraps on my coloured cardstock.


Daarna stempelde stanste en plakte ik diverse grappige kerstbomen, uiteraard ook weer in bijpassende kleuren. Hiervoor gebruikte ik de Whymsical Trees stempels en de bijpassende Christmastrees Dies, Net als het Designpapier is deze set te vinden in de Mini Catalogus. Zoals je ziet kun je er een grappig allegaartje aan bomen en boompjes mee maken. De set heeft een grappige, speelse stijl!
Next step was stamping, diecutting and glueing a bunch of funny Christmastrees, ofcourse again in matching colours. For this I used the Whymsical Trees Stampset and the matching Christmastrees Dies. Just as well as the DSP is in our MiniCatalogus. As you can see it is a funny, messy mix of playful and quirky trees. This set really has a whymsical style!

In de tussentijd had ik ook al mijn basisdoos gemaakt. Ik maakte hem uit een vel Thick Basic White Cardstock. Het is een heel simpel model, en hoe het in elkaar gezet wordt spreekt eigenlijk voor zich. De maten staan hier onder.
In the meantime I had also prepared my box already. I made it out of a sheet of Thick Basic White cardstock. It is a very simple box and when you cut & score it you will see how to assemble it. I wrote down the sizes below.
Cardstockmaat/ Cardstock Size: 21 x 29 cm
Ril op de lange zijde op / score on the long side at: 2 - 13,5 - 15,5 - 27 cm
Ril op de korte zijde op / score on the short side at 2 - 19 cm

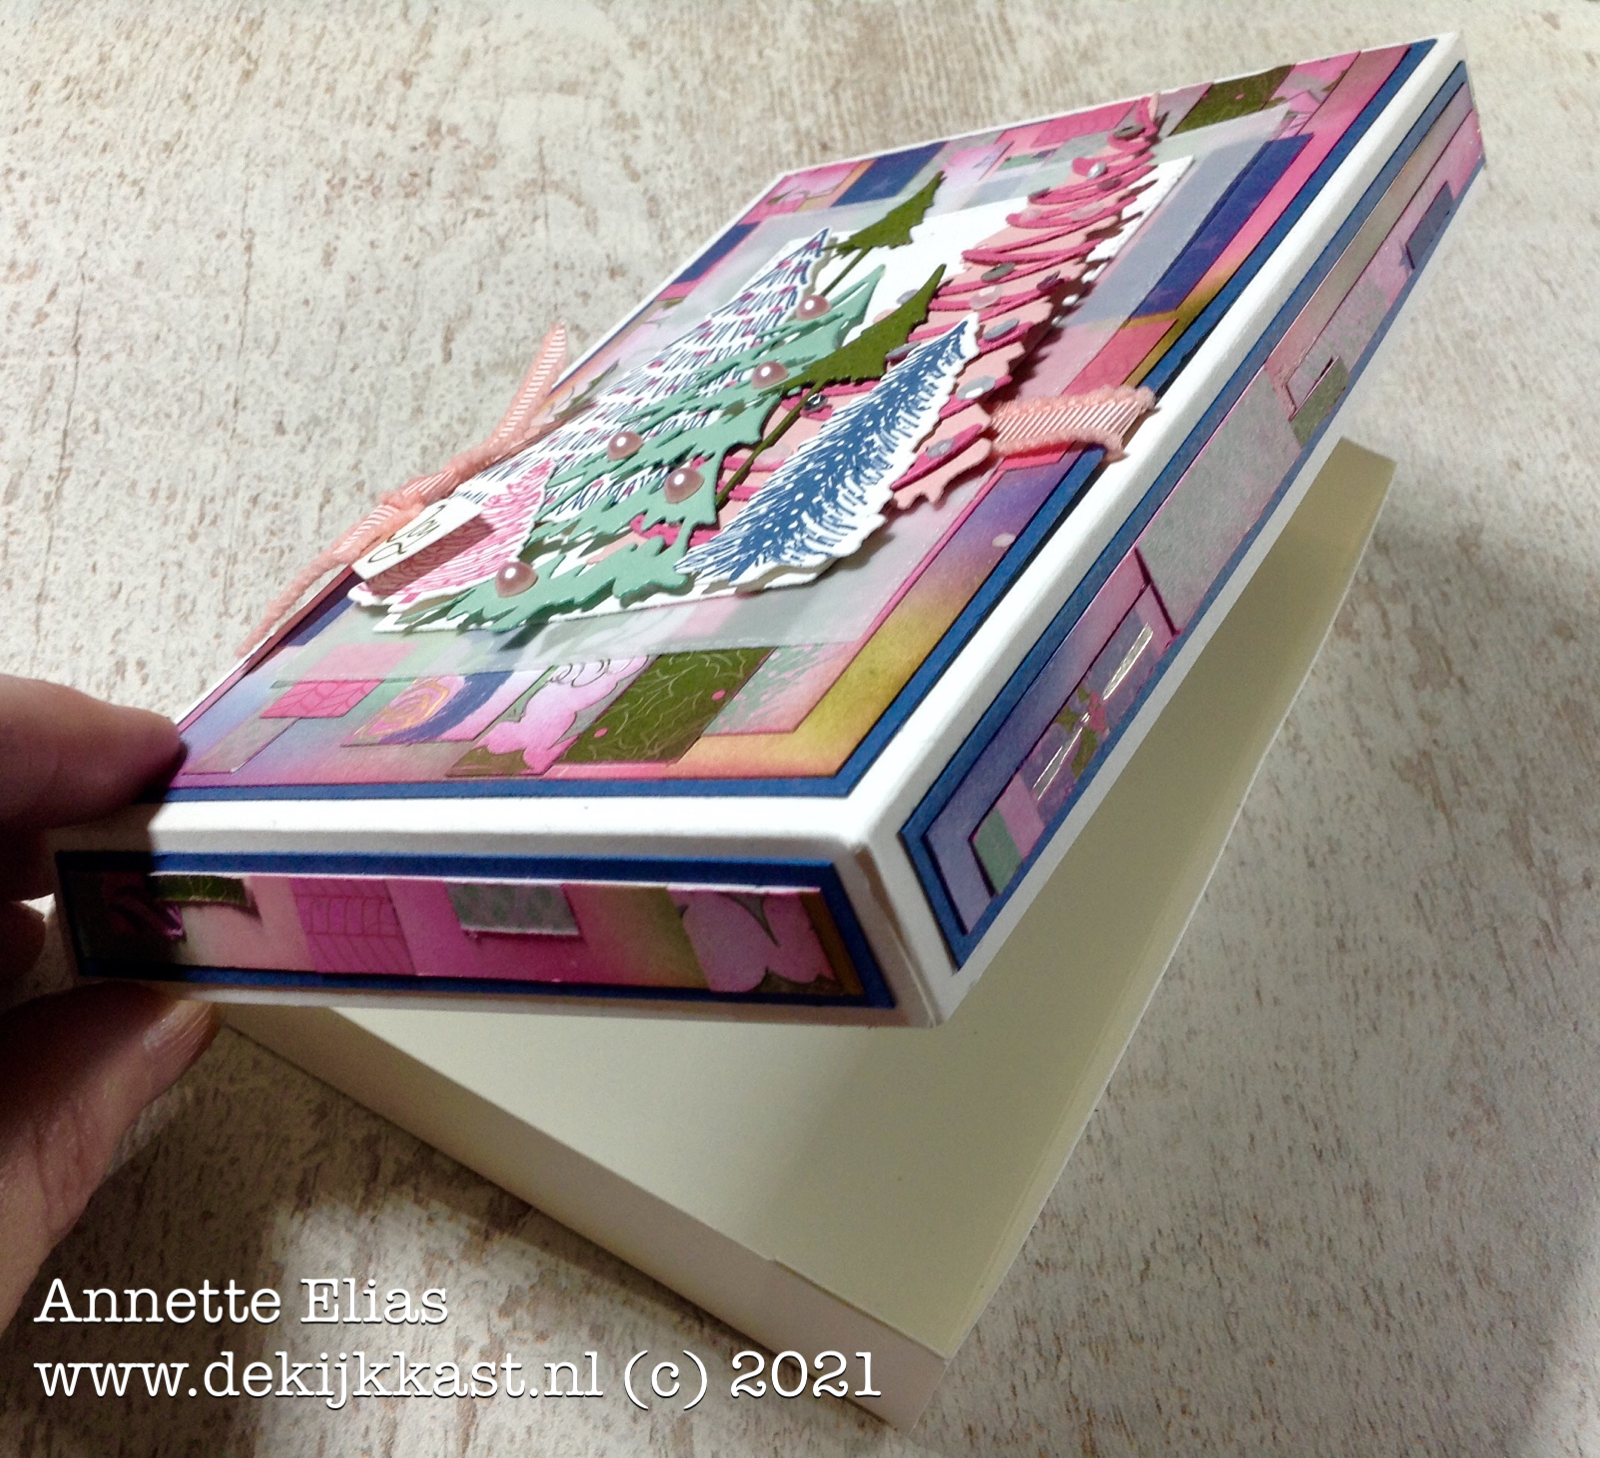
Ik gebruikte mijn gemaakte collagepapier om de bovenzijde en de zijkanten van het doosje te bekleden.
I used the collagepaper that I had made to dress up the top and the sides of the box.

Om de bomen er lekker uit te laten springen stanste ik twee rechthoeken uit Vellum Cardstock en Basic White Cardstock, en die kwamen op de bovenkant van de doos.
The make the trees pop a bit more I diecut two rectangles from Vellum Cardstock and Basic White cardstock and adhered these on top of the box

En ik voegde oook nog wat mooi bijpassend lint toe!
And I also added some matching ribbon.

Ik schoof wat met de bomen tot ik tevreden was en plakte toen alles vast met Dimensionals, voor extra diepteeffect.
I moved the trees around until I was happy with the result and then adhered them all using Dimensionals to create depth.

Hier zie je goed hoe goed de bomen en de achtergrond met elkaar "Blenden"
Here you can see how well the trees and the background blend together.

Maar dat was ook niet zo moeilijk, want stempels, dies, het designpapier en ook het lint komen allemaal uit de zelfde Whimsy & Wonder Collectie! Alles is dus op elkaar afgestemd!
But that was not difficut at all. The stamps, the dies, the Designer Series Paper and even the ribbon are all from the same Whimsy & Wonder Suite collection! So they were made to match!
Zo gaat het doosje open, en het is groot genoeg om een kerstkadootje in te verpakken, of..... een leuk stapeltje bijpassende kaarten in te stoppen. Misschien ga ik dat laatste wel doen, ik was toch al zo fijn aan de slag met de materialen en heb er nog volop ideetjes mee!!
This is how the box opens. It is big enough for a nice Christmasgift, or...... I could fill it with some matching Christmascards. I think I will go for that last option. It is so much fun to work with these products! And I still have so many more ideas!

Heel erg leuk dat je vandaag bij de Kijkkast bent komen kijken! Heb je vragen? Stel ze mij gerust! Onderaan dit bericht vind je een lijst met alle gebruikte producten, en deze zijn allen te bestellen
bij de Kijkkast! Ik help je graag!
Dan is het nu tijd om verder te hoppen, de links naar de andere designers vind je hier onder! Heel veel plezier alvast, en hopelijk tot snel! XXX Annette
I really love the fact you visited de Kijkkast today! Please just ask when you have any questions! Below you will find a list of all the products I used. All new products can be ordered through de Kijkkast. I will be happy to help you! I now invite you to hop to the other designers to see what they made. Have fun, and feel free to visit de Kijkkast any time you like! XXX Annette

Elisabeth Pirolt - Little Lizzy’s Crafts (AT) - https://www.little-lizzys-crafts.at/2021/10/24/resteverwertung-beim-3d-paper-trimmer-blog-hop/
Angela Köber - https://stempelfamilie.blogspot.com/2021/10/3d-paper-trimmer-blog-hop.html
Annette Elias - De Kijkkast - NL https://dekijkkast.blogspot.com/2021/10/decoreren-met-restjes-3d-trimmer.html
Sonja Kindler - kreativ-mit-sonja (D) - https://kreativ-mit-sonja.de/3d-paper-trimmer-2021-10/
Wat heb ik gebruikt:
Stempels: Whymsical Trees
Papier: Cardstock: Thick Basic White, Basic White, Misty Moonlight, Mossy Meadow, Mint Macaraon, Blushing Bride, Polished Pink, Vellum
DSP: Whimsy & Wonder Specialty DSP
Inkt: Misty Moonlight, Mossy Meadow, Mint Macaraon, Blushing Bride, Polished Pink, Sahara Sand
Dies: Christmas Trees Dies, Stitched Rectangle Dies
Embellishments: Pastel Pearls, Flayed Grosgrain Ribbon Blushing Bride, Subtle Shimmer Sequins
Tools: Stampin Cut & Emboss Machine, Blending Brushes
Eerstvolgende (MEE)besteldagen
Maandag 25 oktober om 19.00 uur
Maandag 1 november om 19.00 uur

De Kijkkas-OKTOBER-actie: Gebruik de actuele hostesscode AC3CRFFG
en ontvang bij een bestelling vanaf 95 euro
nu gratis een pakje Matte Decorative Dots twv 9,75 euro!
TIP: Bestel je voor 200 euro of meer mag je voor 10 procent van je bestelbedrag
GRATIS producten uitkiezen!
De allerbeste DEAL: Het Stampin'Up! Startpakket!
Kies voor 175 euro producten uit en betaal slechts 129 euro
Laat dit vervolgens gratis (zonder verzendkosten!) naar je huis versturen.
Je krijgt hierbij ook nog gratis catalogi ed meegestuurd!
en bestel -als je dat wilt- voortaan je eigen stempelmaterialen met altijd minstens 20 procent korting!
Lijkt dit jou ook een topidee? Neem snel contact met mij op! Dan help ik je verder!
Catalogus aanvragen:


Wil jij de nieuwe catalogus en/of Minicatalogus ontvangen? Vraag hem nu bij mij aan!
Klik HIER
NIEUWE THUISWORKSHOP!!!! Meld je NU aan!


Nu online: Happy-At-Home workshopbox nr 3!
Meld je snel aan!
Wil je ook een supercomplete Kijkkast WORKSHOP doen vanuit je eigen huis?
Klik hier voor alle info over de >> Happy-At-Home Workshopbox! <<
It's wonderful!
BeantwoordenVerwijderen