
***This Blogpost is in English and Dutch!***
Welkom bij deze bloghop van het International Totally Techniques Designteam! We hebben ook deze
maand weer een leuke techniek "uitgediept" en laten je samen diverse voorbeelden zien!
Leuk dat je er bent!
Welcome to this Bloghop of the International Totally Techniques Designteam! This month we have
chosen another fun technique again and together we will show you several examples of it!
Happy to 
Vandaag mochten we aan de slag met Stencils of Masks! Altijd leuk, want dat belooft geklieder met inkt enzo, en daar had ik nu net zin in! ( eerlijk gezegd ben ik daar altijd wel voor te porren, maar dat was je misschien al opgevallen ;o)
Today we were asked to work with Stencils or Masks! Ohhh that is always fun, since it always involves some messing around with inks and I happen to love that a lot!! ( you may have noticed that already ;o)

Er rolde deze keer een kerstkaart uit, in een mooi natuurlijk thema, en natuurlijke kleuren! Het doet me meteen denken aan de geur van kerst, de geur van dennegroen waarmee we met kerst altijd het huis versieren!!
This time the result was a christmascard in a nice natural theme and in natural colours! It immediately makes me think of the smell of Christmas... the lovely smell of the tree, and all the other green material we use to decorate the house!
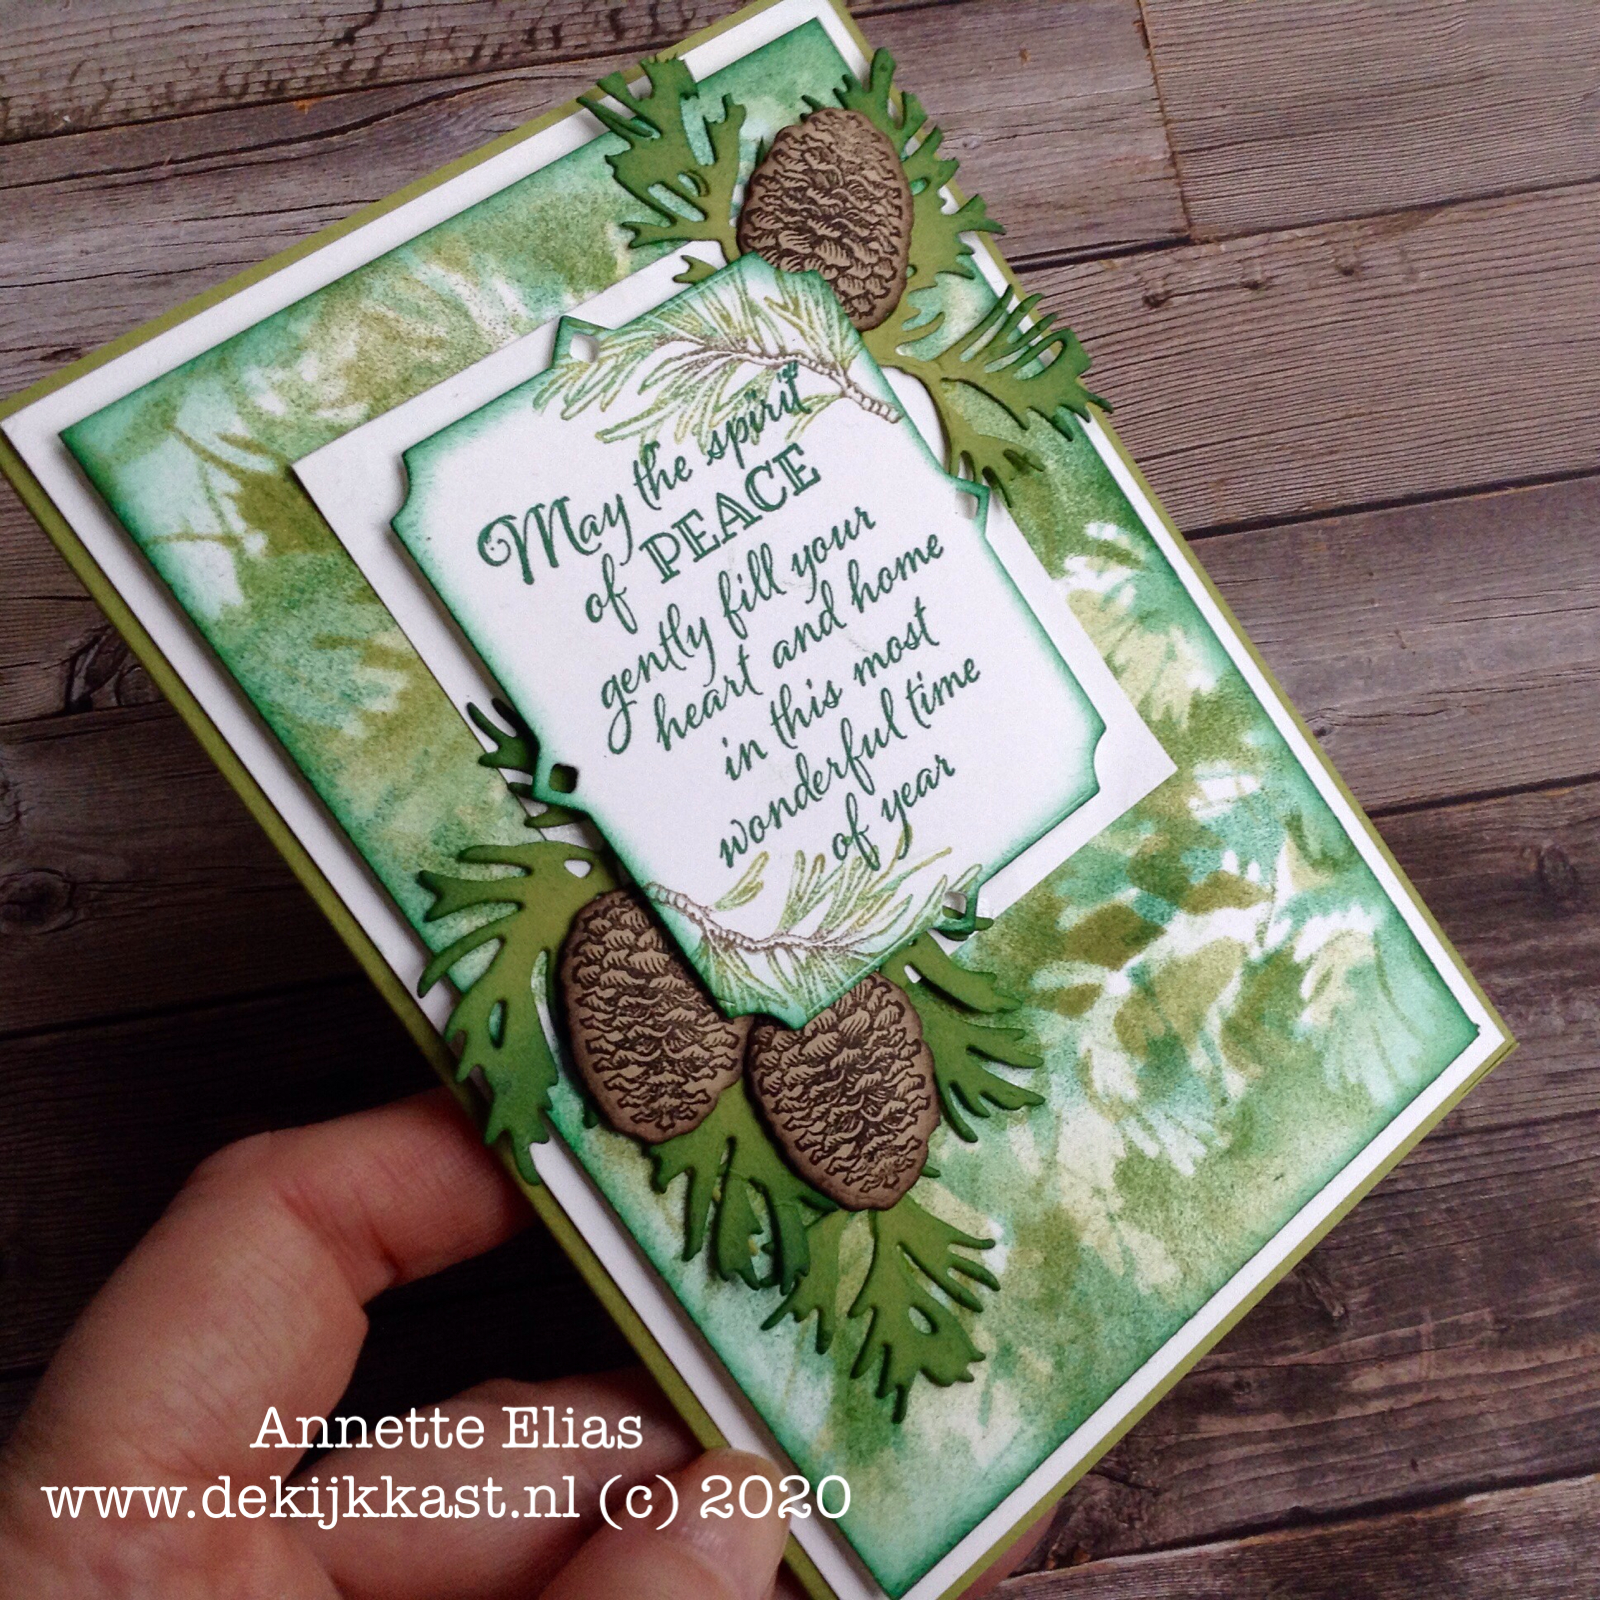
De achtergrond maakte ik helemaal zelf, met behulp van een mask, en uiteraard veel inkt!
I made the background by myself, with a mask and lots of inks as my equipments.


De beeldschone set die ik vandaag gebruikte is de stempelset Peaceful Boughs en de bijpassende Beautiful Boughs dies. Deze zijn beiden te vinden in de jaarcatalogus.
The absolutely beautiful set that I used today is Peaceful Boughs, paired with the matching Beautiful Boughs Dies. Both are in our annual catalog!

En wat zo leuk is.... Ik gebruikte een van de dies uit de set, om zelf mijn mask te maken!
And the fun fact is.... I used one of the dies of the set to make my own mask!

I diecut the shape from a piece of Window Sheet, with the biggest die from the set and took a piece of Whisper White cardstock.

Eerst sponsde ik voorzichtig over het "Mask" met wat Old Olive inkt. Ik verplaatste het mask steeds tot ik het hele cardstock een beetje gevuld had.
First I carefully sponged over the mask with some Old Olive ink. I moved it to another piece of the cardstock and repeated this until the paper was nicely filled.

Daarna deed ik ditzelfde met Garden Green inkt. Natuurlijk liet ik de vormen steeds mooi overlappen met de vorige laag.
Then I did this again, but now with Garden Green ink. Ofcourse I let the shapes overlap the shapes of the first layer.

En je kunt het wel raden denk ik.. daarna deed ik het nog een keer, maar nu met Shaded Spruce inkt. Ik zorgde dat de vormen en kleuren een beetje gelijkmatig verdeeld werden over het cardstock.
And I think you can guess what I did next... Yes... I repeated this once more, but now with Shaded Spruce ink. I made sure the shapes and colours were kind of equally spread over the panel.

Daarna sponsde ik nog even de randjes, en hoplakee, mijn achtergrond was klaar om op mijn kaart te verwerken. Makkelijk he?
After that all that was needed was some sponging of the edges, and voila, my background was ready to be used on the card. Easy peasy technique isn't it?

En het ziet er meteen lekker denneboomachtig uit, met al die mooie groentinten bij elkaar!
And it looks forest-y with all those beautiful mixed green colours together!

Tijd om te decoreren!
Time to decorate!

Met de Stampin'Write Markers bracht ik de drie groentinten en Soft Suede aan op de kleine dennentakstempel.
With the Stampin'Write Markers I added the three greens and Soft Suede to the smallest Bough stamp

Zo stempelde ik in twee hoeken van het label, meerkleurige takjes.
This way I stamped the multicoloured images in both corners.


I diecut some branches and stamped and diecut some pinecones. I sponged the edges of both.

With these I made some clusters in both corners.


Doordat ik steeds de zelfde kleuren gebruikt heb combineert alles goed met elkaar! Ik houd enorm van die natuurlijke look!
By using the same colours in alle elements everything matches beautifully! I love that natural look!

Masks and stencils are so much fun! In fact they are very affordable tools, with lots of possibilities! We have some fun stencils in the catalog, but I liked showing you today that you can also make them yourself, with your dies! So this another reason to invest in all those beautiful dies... the possibilities are endless!
Heel erg leuk dat je vandaag bij de Kijkkast bent komen kijken! Heb je vragen? Stel ze mij gerust! Onderaan dit bericht vind je een lijst met alle gebruikte producten, en deze zijn allen te bestellen bij de Kijkkast! Ik help je graag!
Dan is het nu tijd om verder te hoppen, de links naar de andere designers vind je hier onder! Heel veel plezier alvast, en hopelijk tot snel! XXX Annette
I really love the fact you visited de Kijkkast today! Please just ask when you have any questions! Below you will find a list of all the products I used. All can be ordered through de Kijkkast. I will be happy to help you! I now invite you to hop to the other designers to see what they made. Have fun, and feel free to visit de Kijkkast any time you like! XXX Annette
Wat heb ik gebruikt:
Stempels: Peaceful Boughs
Papier: Cardstock: Old Olive, Whisper White, Crumb Cake
Window Sheets
Inkt: Old Olive, Garden Green, Shaded Spruce, Early Espresso
Dies: Beautiful Boughs Dies
Stampin'Write Markers: Old Olive, Garden Green, Shaded Spruce, Early Espresso
Tools: Stampin'Sponges, Stampin'Cut & Emboss Machine
Eerstvolgende (mee)besteldagen:
Maandag 30 november, om 19.00 uur!
Maandag 7 december om 19.00 uur!
*Op elke maandag doe ik een meebestelling.
In dit geval kun je je bestelde spulletjes, veilig, en op afspraak, in Wognum op komen halen,
of ik stuur het naar je toe.
Ook bestel ik dagelijks persoonlijke orders!
Je spulletjes worden in dit geval direct vanaf StampinÚp naar jouw huis gestuurd
Welkom bij ons team!


Wil jij ook voortaan minimaal 20 procent korting hebben op al je stempelmaterialen?
Wil je ook meer doen met stempelen, of ben je gewoon een echte fan?
Houd je van gezelligheid, en betrokkenheid?
Kom er bij! Je bent van harte welkom!
Vraag mij om uitgebreide informatie, of kijk eerst eens HIER!
Wil jij graag de nieuwe JAARCATALOGUS en/of de MINI-Catalogus aug-dec ontvangen??
Vraag er eenvoudig eentje aan door mij een EMAIL te sturen.
Love your background idea! TFS
BeantwoordenVerwijderenStriking card Annette. I love making my own stencils to create backgrounds too. Zx
BeantwoordenVerwijderen