 *This Blogpost is in Dutch AND English!*
Welkom bij de NOVEMBER Bloghop van het internationale Thinking Outside of the Box-Design Team!
Je bent hier zojuist begonnen, of je bent hier gekomen via Carrie, mijn Britse stempelcollega.
Hello and welcome to the NOVEMBER Bloghop of the Thinking Outside of the Box Design Team! You just started this bloghop here, or you got here through Carrie, my fellow demonstrator from England

Deze keer maken we Triangeldoosjes. Een Triangeldoosje heeft altijd iets speciaals, alleen al door zijn driehoekige vorm!
This month we all make Triangular boxes. A triangel box always has something special, thanks to its unusual shape!

Aangezien de kadootjesmaand er aan komt, wilde ik een doosje maken waar ik meteen een kadootje in kon doen. Een van de kadootjes die ik toch wel regelmatig kado geef is een mooie PEN! Dat vroeg dus om een lang en smal doosje!
Since the month of presents is coming, I wanted to make a box in which I could put a gift rightaway. One of the presents I do give regularly is a PEN! So I had to come with a long and skinny one!
En hier zie je goed de triangelvorm
And here you can see its triangel shape!
Het doosje heeft een schuifhulsje als sluiting. In dit geval zit er een Wink of Stella Glitterbrush in. Een perfect december-kadootje voor creatieve vriendinnen! Maar natuurlijk past ook een normale Balpen, Vulpen of Marker prima!
The box is closed with a slider. In this case I put a Wink of Stelle Glitterbrush in it, which makes it a perfect decembergift for all my crafty friends! But ofcourse any other normal pen will fit too!
En natuurlijk vertel ik weer hoe ik het maakte, zodat jij er ook mee aan de slag kunt!
And of course I will tell you how I made it, so you can make it too!
Het Doosje/The Box
Voor het doosje heb je een stukje Very Vanilla Thick Cardstock nodig van 21 bij 9 cm.
Dit ril je op 2,5-5-en 7,5 cm
For the box you need a piece of Very Vanilla Thick Cardstock of 21 x 9 cm.
Score this at 2,5-5-en 7,5 cm
Nu neem je het cardstock in de breedte en rilt dit op 2 cm van elke zijkant
Now take the cardstock horizontally and score it at 2 cm from both sides
Draai je cardstock om, en bestempel het cardstock met Lovely Lipstick and Shaded Spruce
maak je geen zorgen over de witte lijntjes die nu zichtbaar worden. Dit draagt bij aan de vintage look ;o)
Now turn the cardstock and stamp the cardstock with Lovely Lipstick and Shaded Spruce ink. Don't worry about the white lines that appear. This gives a nice vintagelook!
Ik gebruikte hiervoor de Stempelset Stylish Christmas! (deze staat in de jaarcatalogus!)
I used the beautiful Stampset Stylish Christmas for this! (from the annual Catalog)

Draai het cardstock weer om. Leg het met het smalste strookje naar je toe en knip de twee gemarkeerde vlakjes weg
Turn the cardstock again, lay it in front of you with the smallest part closest to you and cut away the marked lines
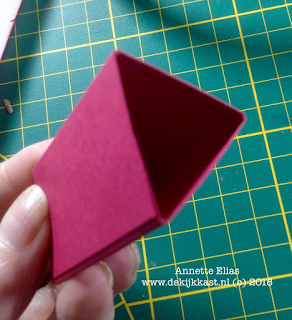
Markeer nu bij de overgebleven zijvlakjes het midden zoals op de foto is aangegeven en trek de lijnen zoals ik daar heb gedaan
Now mark the middle of the leftover "squares" as shown on the picture below and draw lines like I did.
Knip nu de stukjes weg zoals op onderstaande foto te zien is.
Now cut away pieces as shown on the picture below.
Draai je cardstock weer om, vouw alle lijnen goed scherp met je bonefolder en inkt alle vouwlijntjes en zijden met Lovely Lipstick inkt en een Stampin'Sponge
Now turn back the cardstock to the other side, burnish all the lines with your bonefolder, and sponge all the folded lines and sides with Lovely Lipstick ink and a Stampin'Sponge
Zet het doosje in elkaar door de driehoekige flapjes op elkaar te plakken met wat Tear& Tape Adhesive
Now finish the box by putting the triangular flaps together with some Tear&Tape Adhesive.
De sluiting/ The slider
Voor het schuifhulsje dat als sluiting dient heb je een stukje Lovely Lipstck Cardstock nodig van 6 x 9,5 cm. Ril dit op 2,7 - 5,4 - 8,1 cm. Doe wat Tear&Tape op het kleinste deeltje.
For the slider you need a piece of Lovely Lipstick Carstock of 6 x 9 cm and score this at 2,7 - 5,4 - 8,1 cm. Put some Tear & Tape on the smallest part.
Ril goed alle lijntjes en plak de huls in elkaar.
Burnish all the lines and shape it into a slider.
Decoratie/Decoration
Neem een reststukje Very Vanilla Cardstock, Stempel de kerstroos en twee keer de blaadjes, knip deze uit met een klein randje er om heen en spons de randjes met de zelfde inkten.
Take a leftover piece of Very Vanilla Cardstock, stamp the Poinsettia and twice the leaves and fuzzycut them. Sponge the edges a bit with the same colors
Vorm de bloem en blaadjes een beetje door ze licht te kreuken en de randjes om te krullen MBV je Bonefolder. Stempel een tekst naar keuze (deze komt uit de set Great Joy) en pons deze uit met de Classic Label Pons. Nu ga je deze onderdelen plakken op je schuiver/huls. Het is handig om deze dan even om je doosje te doen, zodat je de weet waar je ze kunt plaatsen.
Shape the flower and leaves by crumpling them lightly, and curl the edges a bit with a Bonefolder. Nu stamp a sentiment that you like (this one is from the set Great Joy) and punch it out with the Classic Label Punch. Now attach all the parts to the slider. It is best to put this slider on your box when you do that. That way it is easier to see where to put them.
Zorg dat de onderkant plat blijft zodat je doosje goed plat kan blijven staan. Als je het leuk vindt kun je de kerstbloem en blaadjes nog een licht glimmertje geven met je Wink of Stella Glitterbrush, en er een paar Metallic Pearls op doen
Make sure the bottomside stays flat, so the box will stand up better. If you like you can give the Poinsettia and leaves some glamour by adding some Wink of Stella. And you can also add some Metallic Pearls to finish it off!
En nu...
And now...
...is het tijd om je prachtige kadoosje te vullen met je kado!
....it is time to fill your lovely giftbox!
Het sluit perfect....
It closes perfectly.....
... en blijft netjes dicht door de mooie sluiting!
.... And stays nicely closed by the Slider!
Zorg dat je zelf nog even van je creatie geniet voor je je kadootje weggeeft ;o)
Make sure you enjoy your project yourself for a little while before you give it away ;o)
Met deze verpakking heb je van een simpel kado iets speciaals gemaakt!
With this box you turned something ordinary into a lovely gift!
Nou, ik hoop dat je het weer een leuk en inspirerend ideetje vindt! Natuurlijk kun je de looks steeds aanpassen aan de gelegenheid en de persoon! Ik zou zeggen, leef je uit! Enne...... laat mij eens weten wat je er mee gemaakt hebt... en of de werkbeschrijving duidelijk was voor je. Daar kan ik weer mee verder! Je vindt onderaan dit bericht een lijst met alle producten die ik heb gebruikt. Heb je vragen, heb je iets nodig of kan ik je ergens mee helpen? Neem dan gerust even contact met me op!
Well, I hope you enjoyed my project! Ofcourse you can always adapt the look to the circumstances and the person who receives it. Be creative and have fun! And... Please let me know, what did you make, did you like it and was my description clear enough. This really helps me for future tutorials and ofcourse it is also just fun to hear from you!

Nu is het tijd om verder te "hoppen".... De volgende "Blog-Hop-Halte" in deze bloghop is bij DENA in the USA! Heel veel plezier!
xxx Annette Elias- de Kijkkast
Now it is time to hop to the next designer.... Next "Blog-Hop-stop"is at DENA from the US! Have fun!
xxx Annette Elias-de Kijkkast
En voor het geval je verdwaalt:
And In case you get lost:
1 Tanja Kolar (Duitsland)
2 Yoshiko Endo ( Japan)
3 Carrie Bates (UK)
4 Annette Elias (Nederland)
5 Dena Rekow (Verenigde Staten)
6 Beate Wacker (Oostenrijk)
7 Barb Stewart (Canada)
Gebruikte producten:
Stempels; Stylish Christmas, Great Joy
Papier: Cardstock: Thick Very Vanilla, Lovely Lipstick, Very Vanilla
Inkt: Lovely Lipstick, Shaded Spruce
Pons: Classic Label Punch
Embellishments: WInk of Stella Glitterbrush, Metallic Pearls
Tools: Stampin'Trimmer, Bone Folder
Eerstvolgende (mee)besteldagen:
Zaterdag 24 november om 12.00 uur
Maandag 26 november om 12.00 uur
Woensdag 28 november om 12.00 uur
Maandag 3 december om 19.00 uur
-O-O-
ALLEEN IN NOVEMBER: Snowflake Showcase!
Exclusieve Producten-Speciale Kijkkast-aanbieding!
Van 23 tm 28 november... Online Extravaganza!


Wil jij graag de nieuwe jaarcatalogus en/of herfstwintercatalogus ontvangen??
Vraag er eenvoudig eentje aan door mij een EMAIL te sturen


Een heel leuk cadeaudoosje. Bedankt voor de duidelijke uitleg.
BeantwoordenVerwijderenAnnette - Lovely Lipstick is one of my favourite new colours and it looks beautiful on this project and who wouldn't love the gift of a Wink in Stella brush !
BeantwoordenVerwijderenGaaf cadeaudoosje Annette. Ik ben helemaal niet goed in doosjes maken, maar dit lukte in één keer zo duidelijk had je het beschreven. Groetjes, Gerrie.
BeantwoordenVerwijderen