

*This Blogpost is in Dutch AND English!*
Je bent hier zojuist begonnen, of je bent hier gekomen via Carrie, mijn Britse stempelcollega.

This month we got a nice challenge to design a nice packaging for. Something completely different! It is a Bottle Carousel! A What? Yes a Bottle Carousel! A fun object to make a normal bottle into something special. A great idea for me, especially because we have many birthdays coming up, so I need some nice presents!

Na even nadenken besloot ik een mannelijke versie te maken, in combinatie met een fijn flesje kruidenbitter, aangezien dit perfect in de herfst past en lekker Hollands is ;o)
After some thinking I decided to make a masculine version of the Carousel. I wanted to make something fitting for a nice bottle of herbal liquor, because it fits in the time of the year, and this drink is typical Dutch!

Als je wat lekkere bijpassende nootjes en zoutjes toevoegt maak je van een gewoon flesje drank net iets speciaals!
When you add some nice nuts and cheese cookies, you can make an ordinary bottle into something fun!


Natuurlijk ga ik je vertellen hoe ik het maakte
Ofcourse I will tell you how I made it!
Het bovenste deel
The upper part

1 Eerst nam ik mijn layering Circles Framelits, en ging kijken welke maat ik nodig had. Een circle die net royaal over de dop past, en een andere circel die bijna zo groot is als de fles.
1 First I took my Layering Circle Dies to check what size I needed. I took one die that fitted over the bottleneck, and a bigger one that was slighty smaller than the bottle.

I nested the two dies on some Night of Navy Cardstock and diecut them. I did this three times in total.

( Gooi de restrondjes niet weg, wie weet hebben we ze nog nodig... ;o)...)
(Don't throw away the leftover circles, we may need them later...;o)..)
2 Zoek nu twee scallop Circle dies uit de Layering Circle diesset! Eentje die wat groter is dan de kleine circel die we net hebben gebruikt, en eentje die wat groter is dan de grote cirkel.
2 Now take two scallop Circle Dies from the same Layering Circles Framelitsset. One that is a little bigger than the big circle we used earlier, and on a bit bigger than the small one too!


Gebruik de beide scallop circles samen met de kleine gladde Cirkel en leg deze steeds in elkaar op wat Wood Textures DSP. ZO maak je twee "ringen"zoals je op de foto kunt zien.
Use the two scallop Circle and the smallest normal circle and nest them on some Wood Textures DSP, and make two rings as shown on the picture.

Nu neem je de Night of Navy ringen en de Wood Textures ringen, en maakt er twee sets van, zoals op deze foto
Now take the Night of Navy Rings and the Wood Textures Rings, and make two groups as shiwn on the picture

En plak de ringen van elk groepje op elkaar. Leg beide ringen nu even weg.
And Glue the rings of each group together. Lay both rings aside.
Hangdoosjes
Hanging Boxes
1 Neem drie stukjes Night of Navy Cardstock van 20,5 bij 5,5 cm. Maak een rillijntje aan de ene korte zijde op 1 cm van de kant, en aan de overzijde op 1,5 cm
1 Take three pieces of Night of Navy Cardstock of 20,5 x 5,5 cm'. Score at the short side on 1 cm, and on the other short side on 1,5 cm


Neem de 1 cm rilzijde bovenaan en markeer de rillijn op 1,5 cm van elke zijkant.
Take the side you scored on 1 cm and mark the scoreline at 1,5 cm from each side

Nu markeer je de linker en rechterzijde op 13 cm van de bovenzijde van je strook.
Now mark the leftside and the rightside on 13 cm from the upper edge

Verbind de markeerpunten met elkaar zoals op de foto te zien is.
Connect the markingpoints as shown on this picture.

Knip nu langs de lijnen die in rood zijn getekend. Dan heb je dit:
Now cut the lines that are drawn in red. Now we have this:

2: Neem drie stukjes Night of Navy Cardstock van 11,6 x 7 cm en ril ze zoals op onderstaande foto is aangegeven
2: Take three pieces of Night of Navy Cardstock of 11,6x 7 cm. Score them all as shown on the picture below

Knip de delen weg die met rood zijn gearceerd. Dan heb je dit:
Now cut away the parts that are marked in red. Now we have this:

3 maak alle vouwlijnen van de zes gemaakte Night of Navy delen goed met je Bone Folder, dan ben je klaar voor de volgende stap
3 Now burnish all the lines of the six Night of navy parts with your Bone Folder, and be ready for the next step
Plak met Tear and Tape Adhesive de delen aan elkaar zoals in deze stap voor stap foto's te zien is
Now attach the parts to eachother with Tear And Tape Adhesive, as is shown in these step by step pictures.


Decoreren
Decoration
3 x Night of Navy 5x5 cm
3 x Wood Textures DSP of 4,7 x 4,7
Plak deze op elkaar
Glue these together

En plak deze met een Stampin'Dimensionals op de doosjes
And attach them with Stampin'Dimensionals to the boxes.

Versier de doosjes verder met de Darling Label pons, de Classic Label pons en de Nederlandse stempelset Voor Elke Gelegenheid. Voeg kleine strokjes toe van Linen Thread.
Decorate the boxes with the Darling Label Punch, the Classic Label Punch and the stampset Tabs for Everything which is called Voor Elke Gelegenheid in Dutch. Add some small bows made with some Linen Thread.

Vul de Cellophane Bags ( 5,1 bij 20,3 cm, bladzijde 193 van de jaarcatalogus) met de nootjes en zoutjes en sla de bovenkant meerdere keren om om ze vers te houden. Plak ze goed dicht.
Now fill the Cellophane Bags with your snacks and fold the upperside several times to keep them fresh. Close the bags thoroughly.
Maak nu van stukjes cardstock van 3 x 5 cm die je in de lengte dubbel vouwt kleine bagtoppers en versier die met tabjes. Hiervoor gebruikte ik de Circle Tab Pons, de 3/4 cirkelpons en weer de stempelset Voor Elke Gelegenheid
Now make some bagtoppers of some pieces of cardstock of 3 x 5 cm folded lengthwise and decorate them with tabs. I used the Circle Tab punch, the 3/4 inch Circle and the stampset Voor Elke Gelegenheid again.


Gebruik wat restjes om een leuk label te maken, en hang er een stukje Linen Thread aan.
Now make a nice tag with some leftovers, and attach a piece of Linen Thread to it.

In elkaar zetten:
Assembling:
Neem de dubbele Night of Navy Ring en verdeel de drie hangdoosjes over de cirkel zoals afgebeeld. Plak ze vast, maar zorg er voor dat de vouw in het hangdoosje vrij blijft zodat deze goed omlaag kan hangen.
Take the double Night of Navy ring and divide the hanging boxes equally as shown on the picture below. Glue them but make sure the scoreline stays outside the ring, so that the box can hang down nicely

Neem nu de andere ring en plak deze op de blauwe.
Now take the other ring and glue this on top of the blue ring.

Zo, nu kun je de ring op je fles doen, de gevulde zakjes in de doosjes doen, en het label aan de ring strikken!
We are ready now to hang the ring around the bottleneck, add the decorated bags, and attach the label to the ring!


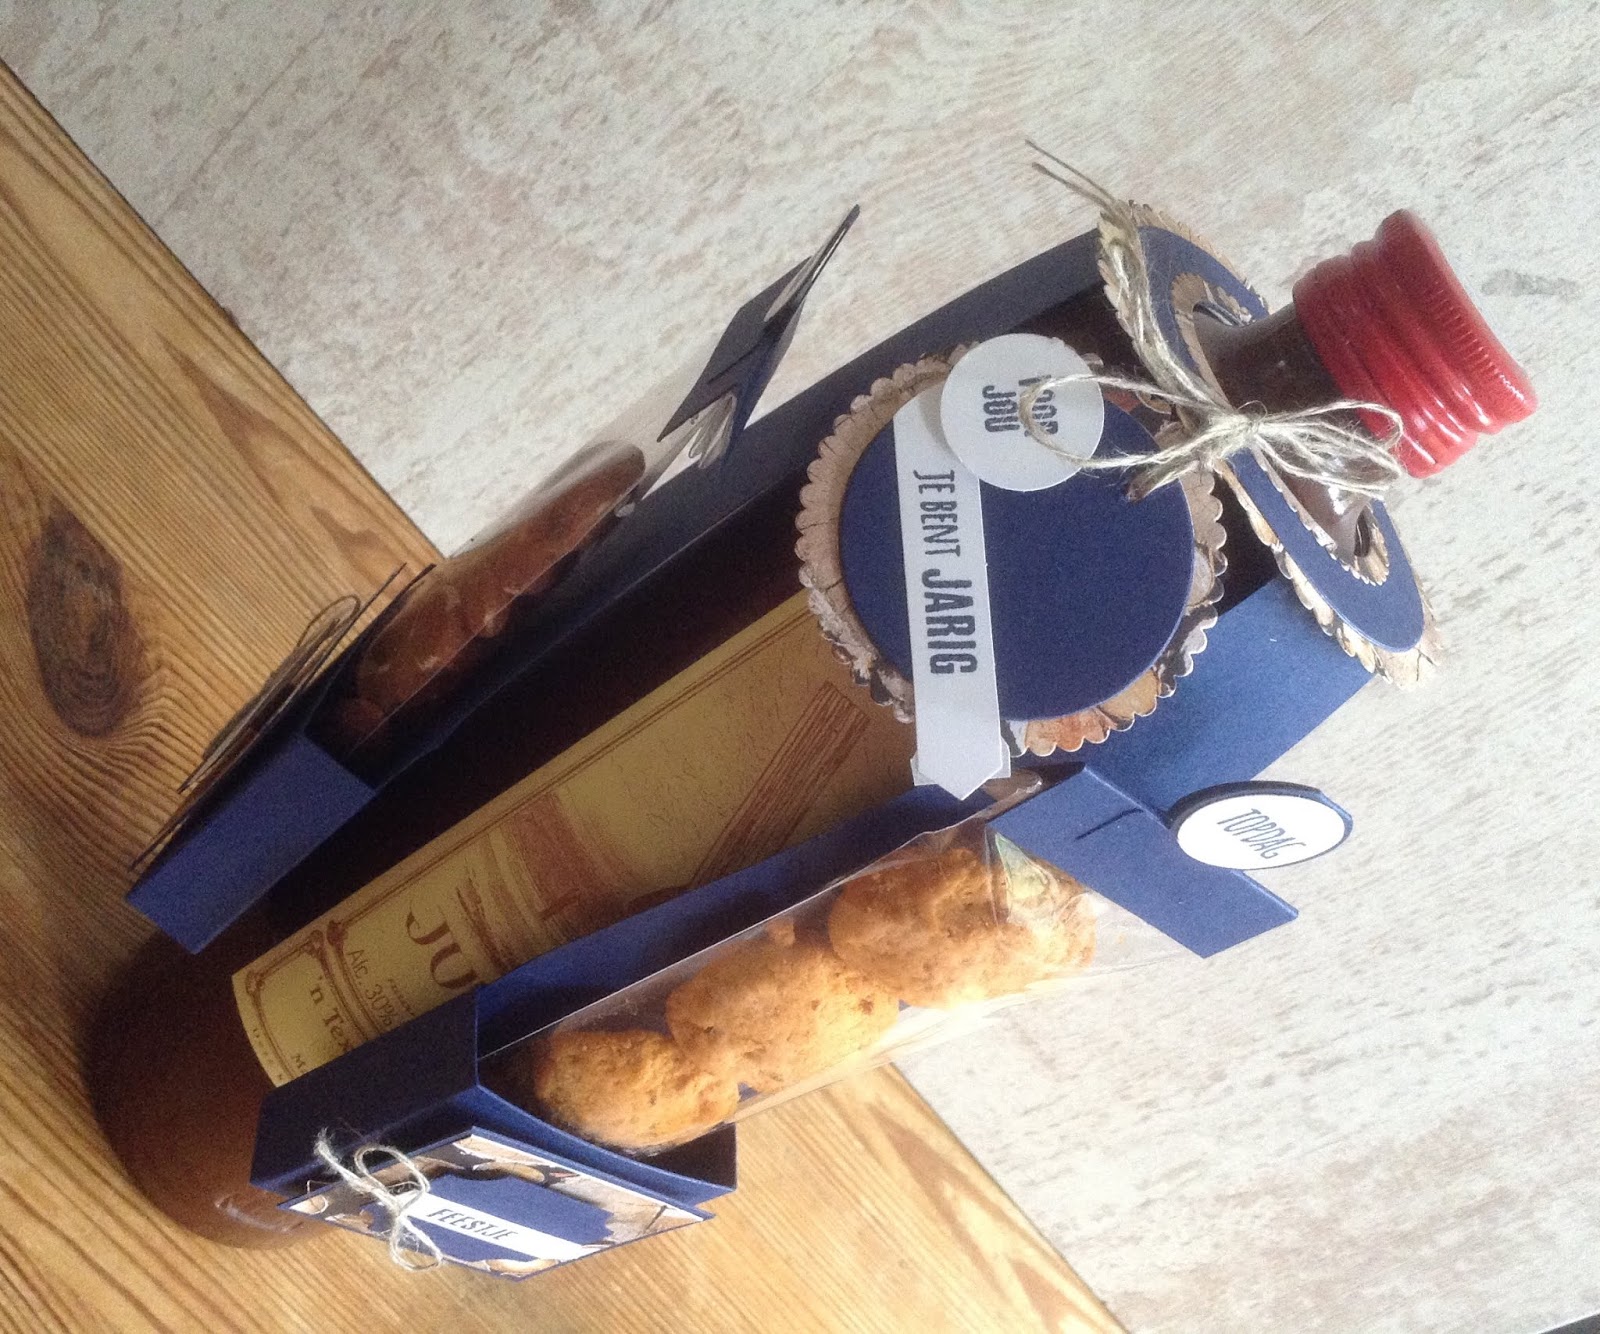
Je feestelijke, rustiek uitziende kado is klaar om mee te nemen naar dat leuke feestje! Veel plezier alvast ;o)
Your festive, rustic looking present is ready to go to your party. Enjoy!


Ik hoop dat je dit weer een leuk en inspirerend project vind en wie weet hem ook eens gaat maken. Bedenk dat je zelf kunt varieren met de inhoud, en ook kun je bijvoorbeeld vier, of zelfs vijf hangdoosjes aan de ring doen (al zie je dan natuurlijk weinig meer van de fles) Laat je mij in een reactie weten wat je er van vond? En ook jouw gemaakte versie van dit project zou ik graag willen zien!
I hope you like my project and that you are inspired to make it too! Remember you can change what you punt in the bags, or choose another bottle... You can also decide to use four or even five hanging boxes to the ring, but in that case you will not see much of the bottle anymore. I would love to hear your comments or see your version when you make this project! So please let me know!
Volgende "halte"in deze bloghop is bij SHARLENE waar je vast iets leuks gaat zien! En zo zul je nog meer leuks tegen gaan komen als je de hele ronde volgt! Veel hopplezier! xAnnette
Next "stop"in this bloghop is at SHARLENE. I am sure you will see many more fun ideas over there! have fun hopping! xAnnette
En voor het geval je de weg kwijt bent is hier de complete blogvolgorde
And in case you get lost, here is the bloglist.
Gebruikte materialen/used Materials
Stempels( Voor Elke Gelegenheid/a tab for Everything
Papier: Cardstock: Night of Navy, Whisper White
Inkt: Night of Navy
Dies: Layering Circles Framelits
Ponsen: Circle Label, Classic Label, 3/4 inch Circle, Darling Label (uit de Darling Label Punch Box)
Embellishments: Linen Thread
Zakjes: Cellophane Bags 5,1x20,3 cm (pakje van 50 stuks)
Tools: Big Shot, Stampin'Trimmer, Paper Snips, Bone Folder
En verder: Tear & Tape Adhesive, Stampin'Dimensionals, Multi Purpose Liquid Glue
Eerstvolgende (mee)besteldagen
Maandag 24 september om 19.00 uur
Maandag 1 oktober om 19.00 uur


 "Pin on Pinterest")


Wil jij graag de nieuwe ! catalogus ontvangen??
Vraag er eenvoudig eentje aan door mij een EMAIL te sturen
Wauw, wat een gaaf idee! Een ideaal mannenkado, en eens iets anders dan een saaie fles!
BeantwoordenVerwijderenThis is a great gift for the men in your life and the wood dsp is ideal for a masculine theme xx
BeantwoordenVerwijderenFabulous idea to add snacks with your bottle. Love it. Hugs Zoe x
BeantwoordenVerwijderenYou made something special again. Thanks or the great and very clear tutorial!
BeantwoordenVerwijderenSuperleuk!
BeantwoordenVerwijderenWauuw Annette wat een voortreffelijk idee, eindelijk iets apparts om aan een man te kunnen geven 😉
BeantwoordenVerwijderenComplimenten Annette je hebt jezelf alweer overtroffen
Beautiful! Great idea, and unique design!
BeantwoordenVerwijderenI like this one the best though they are great I like the shape of it and the content as well it great.
BeantwoordenVerwijderenDanielle
Heel erg leuk! Wat een apart bouwwerk zeg! Maar echt een mooi kado voor een man en je hebt er weer iets speciaals van gemaakt! Dank ook voor de zeer goede uitleg die je er altijd bij maakt!
BeantwoordenVerwijderenOh WOW Annette, this is fabulous! I love how you changed the shape of the carousel to fit your needs - very clever!
BeantwoordenVerwijderen