*This Blogpost is in Dutch AND English!*
Welkom bij de Maart Bloghop van het internationale Thinking Outside of the Box-Design Team!
Je bent hier zojuist begonnen, of je bent hier gekomen via Carrie mijn lieftallige Britse
stempelcollega.
Hello and welcome to the March Bloghop of the Thinking Outside of the Box Design Team! You just started this bloghop here, or you got here through, Carrie my lovely fellow demonstrator from England.

Deze maand was de opdracht een Reageerbuisdoosje te maken. Een open doosje met een huls
This month the challenge was to make a Test Tube Gift Box, an open box with a belly band in which you
can fit a test tube!

Ik vond het een ontzettend leuke opdracht. In plaats van een reageerbuisje kun je natuurlijk ook andere langwerpige
voorwerpen in zo'n doosje doen. Ik besloot een rol pepermunt als uitgangspunt te nemen! Met wat geld er bij is zo'n
doosje een leuk kadootje!
I thought this was a great challenge! Instead of a testtube you can also use something else that has the long thin shape.
This time I decided to take the shape of a roll of candy (peppermint) as a guidance.
With some money this box can make a nice gift!
En natuurlijk vertel ik weer hoe ik het gemaakt heb!
And ofcourse I will tell you how I made it!
Stap 1/ Step 1
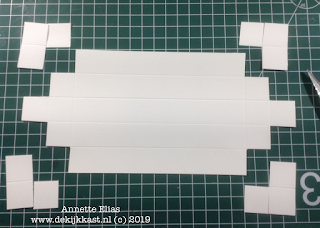
Voor het basisdeel van het doosje nam ik een stuk Whisper White cardstock van 10 x 22 cm.
Aan all kanten rilde ik het op 2 en 4 cm
For the basic part of the box I took a piece of Whisper White cardstock and scored it at all four sides
at 2 and 4 cm
Ik knipte de gemarkeerde vlakjes weg
I cut away the marked squares
Vervolgens knipte ik de vier met rood gemarkeerde lijntjes.
I cut the four lines that are marked red in the picture below
Ik knipte kleine stukjes weg om later het doosje makkelijker in elkaar te kunnen zetten.
Daarna rilde ik alle vouwlijnen goed
I cut away little snips from the flaps to make sure I would be able to fold the box better.
After this I carefully folded all the scored lines
Ik lijmde all vier de kleine flapjes en begon het doosje vorm te geven.
I glued all the small flaps and started to shape the box
Vervolgens plakte ik eerste de twee grootste flappen en vouwde ze naar binnen, en vervolgend de kleine.
Door de dubbele zijkanten krijgt het doosje meer stevigheid en stabiliteit. En het ziet er ook mooi strak
afgewerkt uit!
Now I first glued the two big flaps and folded them to the inside, and after this I did the same to the
smallest flaps. The double layered sides make the bos sturdy and it looks nice too!
Ik sneed twee stukjes designer series paper van 13,5 x 1,5 en ook twee stukjes van 1,5 x 1,5. Deze stukjes plakte
ik aan \de vier zijkanten.
I cut two pieces of designer series paper of 13,5 x 1,5 and two pieces of 1,5 x 1,5 and glued them to the
sides of the box
Stap 2 de huls/ Step 2 the Belly Band
Ik nam een stuk whisper white cardstock van 5,5 x 10 cm en rilde dit op 2,1- 4,2- 6,3- 8,4 cm/ Ik vouwde de lijnen
en plakte de uiteinden op elkaar. Niet te strak want anders paste de huls niet meer om het doosje. Vervolgens nam ik een
stukje Designer Series paper van 5x10 cm en plakte dat om de huls heen.
I took a piece of Whisper White Cardstock of 5,5 x 10 cm and scored this at 2,1- 4,2- 6,3- 8,4 cm. I folded the lines
and attached the flaps on the end on eachother. While attaching it I put it around the box to make sure I would not
make it fit to tight, to be sure the belly band would slide. After this I took a piece of Designer Series Paper of 5 x 10 cm and glued this around the belly band.
Stap 3 de aankleding/ Step 3 the decorating
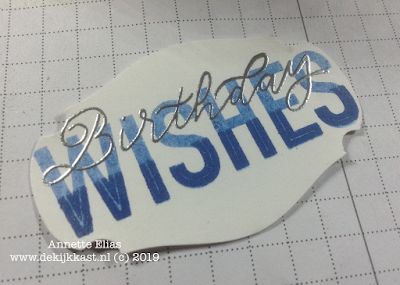
Een stukje lint wikkelde ik twee keer om de huls en strikte ik. Daarna maakte ik een mooie label.
Hiervoor gebruikte ik de supercreatieve tekstenstempelset More than Words en de Story Label Pons.
Beiden zijn onderdeel vande Sale-A-Bration Coordination en alleen deze maand verkrijgbaar, zolang
de voorraad strekt. Het woord Birthday heb ik hier met zilver embossingpoeder gedaan.
I wrapped some ribbon around the belly band twice and made a bow. Then it was time to make a nice
matching label. For this I used the stampset More Than Words and the matching Story Label punch,
Which both can only be purchased this month!
The word Birthday was Heat embossed with Silver Embossingpowder.
Het was zo leuk om te maken, en zo'n lekker makkelijk projectje!
It was so much fun, and very easy to make. I really enjoyed working on it!
Daarom maakte ik ook nog maar een paasversie...
That is why I also made an Easter Version..
Daar kwamen natuurlijk chocolade eitjes in. Dat bleek precies te passen!
Ofcourse i had to put some Chocolate Eggs in this one. That happened to fit perfectly!
Het is op precies dezelfde manier gemaakt.
It was made in exactly the same way!
En de geweldige stempelset kun je gewoon aan elk thema aanpassen
And that great stampset can be used for every occassion!
Ik hoop dat je het leuk vindt om het ook eens te gaan proberen! Laat het me vooral weten in een reactie
I hope you will give it a try too! I would love to read your comments about my project and tutorial!
De doosjes zijn niet moeilijk om te maken en je hebt er niet veel voor nodig
These boxes are easy and simple and you don't need lots of supplies to make it!
Het is nu tijd om de bloghop te vervolgen en te kijken wat mijn mededesigners hebben gemaakt!
Bedankt voor je bezoekje aan de Kijkkast en tot de volgende keer! X Annette
Now it is time to continue this bloghop! Thank you for visiting de Kijkkast and feel free to come back soon!
Byebye! Annette

De volgende halte is bij Beate!
The next Bloghopstop is at Beate!
En voor het geval je de weg kwijt raakt...
And in case you get lost....
Gebruikte producten:
Stempels:More Than Words ( SAB Coordination)
Papier: Cardstock: Whisper White, Crumb Cake
DSP: 2018-2020 In Color DSP
Gingham Gala DSP
Inkt: Blueberry Bushel, Lemon Lime Twist, Crumb Cake, Soft Suede, Versamark
Pons: Story Label (SAB Coordination)
Embellishments: Metallic Edged Ribbon Silver, Mini Ruffled Ribbon Lemon Lime Twist
Bakers Twine Whisper White, Linen Thread, Embossingpowder Silver
Tools: Stampin'Trimmer, Stampin Sponges, Heat Tool, Embossing Buddy
Eerstvolgende (mee)besteldagen:
(evt. Zaterdag 16 maart om 19.00 uur)
Maandag 18 maart om 19.00 uur
Maandag 25 maart om 19.00 uur
Zondag 31 maart 19.00 uur(laatste bestelling tijdens de SAB)
Van 15-25 maart, De Kijkkast Feest-Tiendaagse!
Elke dag een actie, aanbieding of leuk nieuws!
-O-O-
Wil jij graag de jaarcatalogus en/of de NIEUWE voorjaarscatalogus ontvangen??
Vraag er eenvoudig eentje aan door mij een EMAIL te sturen
Of doe een bestelling, dan voeg ik hem er gratis bij!

Ben je ook dol op stempelen, houd je van korting en zou je wel bij het gezelligste team van Nederland willen horen? Kom er bij!
( en kies als je dat wilt de Exclusieve TOTE bij je Startpakket!)


Two great tube boxes Annette - I especially like the two step stamping on the labels. These boxes are so easy to upsize and downsize for other tubes too !
BeantwoordenVerwijderenTwo great tube boxes Annette - I especially like the two step stamping on the labels. These boxes are so easy to upsize and downsize for other tubes too !
BeantwoordenVerwijderen